SSH into StorageLink
Overview
When you transfer files to the cloud, you may need to SSH into your VM at some point for troubleshooting, server management or any other configuration that needs to be done on the server.
- AWS
- Azure
Connect via Terminal
You can use the following command to SSH into the EC2 instance from the terminal:
ssh -i private.key ec2-user@<ip-address>
Note: You will be prompted to accept the server host key on first connection. The server host key is cached on your client machine, based the hostname and port.
PuTTY (Windows)
You can download PuTTY here.
If you created an EC2 Key Pair in .ppk format, you can use this directly in PuTTY.
Otherwise, if your EC2 Key Pair is in .pem format, you need to use PuTTYgen
to convert it to .ppk format. PuTTY only supports the PPK (PuTTY Private Key) format.
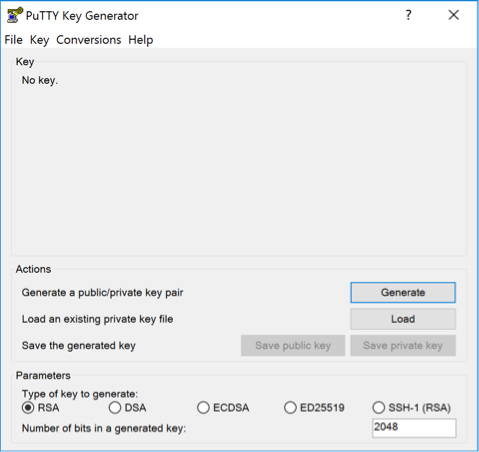
- Open PuTTYgen and click Load to browse for your
.pemkey. When browsing for the key, be sure to select All Files in the dropdown menu to show all file types. Click Open when you have selected your private key. - PuTTYgen will now convert your key to the proper filetype.
- To export your new PPK key, click Save private key.
You are now ready to SSH in to the server with PuTTY using the new .ppk key.
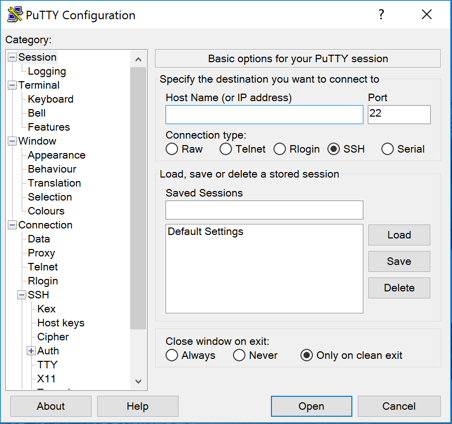
- Open PuTTY and select SSH as the connection type.
- In the Host Name field, enter
ec2-user@<public ip> - Expand the SSH section on the left, then expand Auth and click on Credentials.
- Click on Browse to select your
.ppkkey, and click Open when you have selected it. - To launch the SSH session, click Open.
In this scenario, to connect to your Linux VM over SSH from Windows, you can use PuTTY. Another option for connecting via SSH is the Terminal:
ssh -i private.key azureuser@<ip-address>
A common way to SSH into Linux is to use key-based authentication. This involves using a key pair:
- Public key: This gets appended to
/home/azureuser/.ssh/authorized_keys(your admin username may vary) - Private key: This is a plaintext file stored on your workstation that you gives you access.
Refer to the Microsoft documentation for more details.
Installation
You can download PuTTY here.
Create a key pair
Although you will be using PuTTY to SSH into the VM, you generate a key pair using PuTTYgen. This is what PuTTYgen looks like:

To generate a new key pair:
- Click Generate
- Follow the instructions (you will be asked to move your mouse to create randomness)
- Click Save public key
- Click Save private key
Set the public key when creating your VM
When you create a VM, you will see the following:
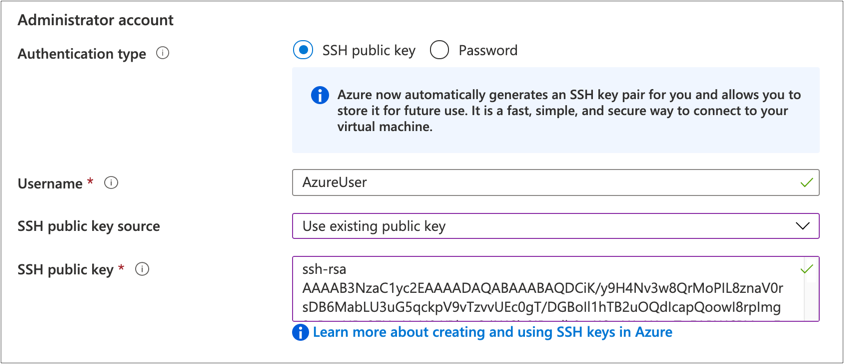
You can set SSH public key source to Use existing public key.
This will reveal a field named SSH public key. Paste the contents of your public key in this box.
Set the public key on an existing VM
If your VM already exists, you can still set the public key.
Under the VM details page, go to Reset password.
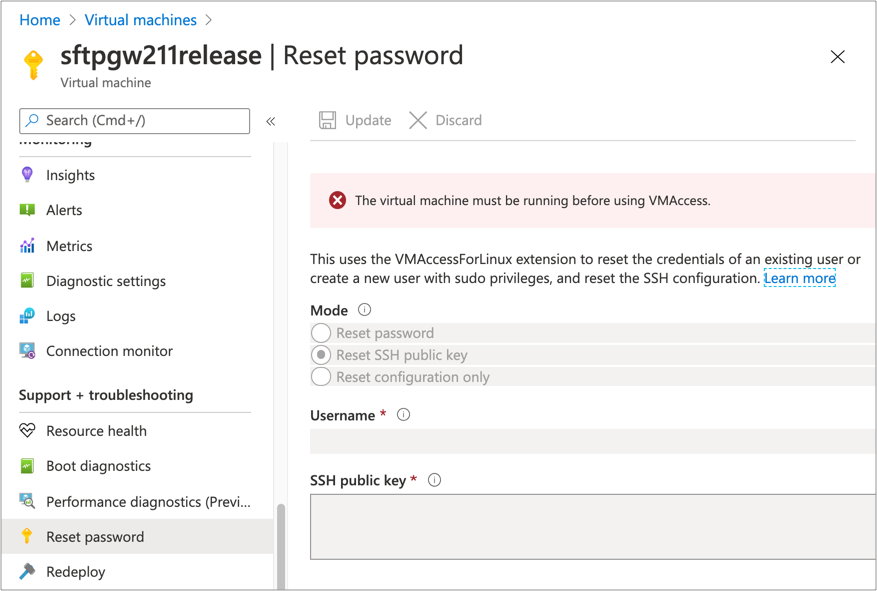
This page gives you the option to Reset SSH public key, and to set your SSH public key.
SSH into the VM using PuTTY
Once your public key is installed on the VM, you can finally SSH into the VM.
Open PuTTY:

- For Connection type, make sure the SSH radio button is selected.
- In the Host Name field, enter
azureuser@<public ip>(your admin username and IP will vary) - Expand the SSH section on the left, then expand Auth and click on Credentials.
- Click on Browse to look for your private key (.PPK), and click Open.
- To launch the SSH session, click Open.
You should be prompted with the VM's host key, where you need to type yes
to continue.
SSH attempt hangs and eventually times out
A common issue is that you will receive no feedback from the VM.
Chances are that the Network Security Group (NSG) does not have an ingress rule for your workstation's public IP over TCP port 22.
Check to verify this ingress rule exists.
When you deploy StorageLink via the Google Cloud Marketplace you are unable to specify SSH credentials.
This article covers how to add SSH credentials to your VM, as well as the multiple ways you can connect to your VM using SSH.
Manually Add an SSH Key to the VM
To add your own SSH key to the VM, navigate to the instance in the Google Cloud Console.
Click into the VM Details page, and then click the Edit button at the top.
Under the Security and access section, you will see a subsection labeled SSH Keys.
To add your SSH key, click + Add Item and paste in your SSH key value.
To specify the Linux Admin Username, add a value after the SSH key. It would look something like this:
ssh-rsa AAAAB.... Bryce
Click the Save button at the bottom and your key should now be added to the VM.
SSH Connect
Another way to connect to the VM via SSH is using the SSH connect feature. However, for this to work you will need to add a Google IP address into your port 22 firewall rule.
Using the top search-bar, navigate to the Firewall service.
Under the VPC firewall rules, search for the name of your Virtual Machine along with the tcp-22 rule.
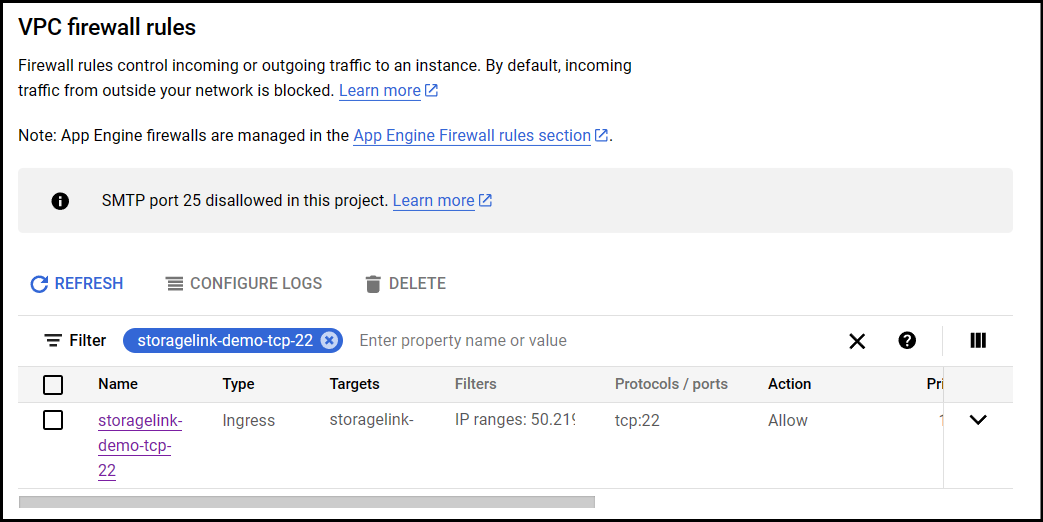
Click into the firewall rule and then click the Edit button at the top.
Under the Source IPv4 ranges section, add this ip address, 35.235.240.0/20.
This is a Google IP address that allows you to SSH into your VM via SSH connect.
Once you have saved the changes to your firewall rule, go to your VM and under the details tab, go to SSH -> Open in browser window.
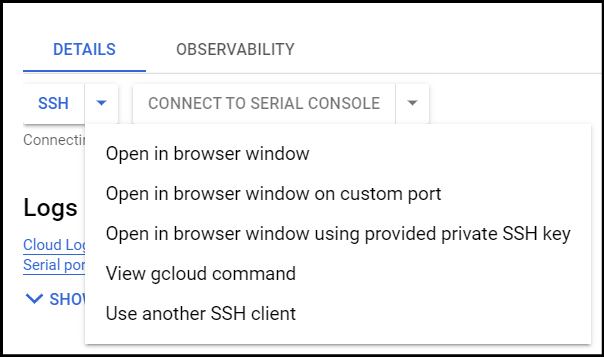
This will then open a new window connecting via SSH to your VM.
Connect using the Terminal
Use the following command to SSH into the VM:
ssh -i private.key ubuntu@<ip-address>
Replace ubuntu with the Linux admin user you specified when provisioning the SSH credentials.
Note: You will be prompted to accept the server host key on first connection. The server host key is cached on your client machine, based the hostname and port.
PuTTY (Windows)

- Open PuTTY and select SSH as the connection type.
- In the Host Name field, enter
username@<public-ip> - Expand the SSH section on the left, then expand Auth and click on Credentials.
- Click on Browse to select your
.ppkkey, and click Open when you have selected it. - To launch the SSH session, click Open.
