StorageLink CloudFormation Usage Instructions
Overview
This guide walks you through launching StorageLink with CloudFormation from the [AWS Marketplace][marketplace-redirect].
When deploying StorageLink, you have the option to use 3 different CloudFormation templates:
- StorageLink (Single Instance Existing Network)
- StorageLink (High Availability Existing Network)
- StorageLink (High Availability New Network)
Select the template which suits you best and click Continue to Launch.
Launch this software | Choose Action
On this page, you only have one form field:
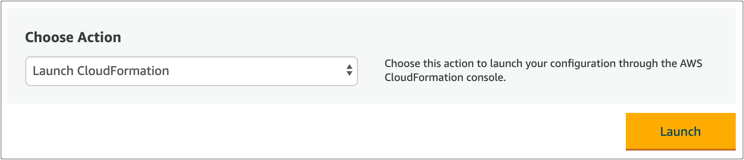
Select Launch CloudFormation, and click Launch.
This takes you to the CloudFormation Create Stack wizard, with the template pre-loaded. Click Next.
Configure CloudFormation parameters
On the Specify stack details page, you will need to configure some CloudFormation parameters.
- Single Instance Existing Network
- High Availability Existing Network
- High Availability New Network
Stack name
This is the name of your CloudFormation stack.
Default Bucket
Enter the name of your S3 bucket. You can use either a new or existing bucket.
Here are some restrictions on naming your S3 bucket:
- Cannot contain uppercase letters
- Can contain lowercase letters, numbers, periods (not recommended), and hyphens
- Must be between 3 and 63 characters
- Must be globally unique
Bucket Access
This parameter determines whether S3 permissions are broad or restrictive.
- open: StorageLink is granted S3 Full Access. This is helpful if you plan on using a different S3 bucket for each user. We recommend [locking down S3 access][restrict-s3-access] after your users are configured.
- restricted: S3 access is limited to the default bucket. This improves your security posture by protecting your other S3 buckets from administrators with shell access to the StorageLink instance.
EC2Type
For testing, use a t3.medium. The t3 class is cheaper, but cannot handle sustained traffic.
For production, use an m5.large or better.
Disk Volume Size
This is set to 32 GB by default. Set this to a higher value if you plan on transferring large batches of data.
For a single instance stack, you can [increase the size of your instance volume][resize-ebs] later on.
Key Pair
Select a key pair of which you own the private key
VPC
Select the option with the IP address range of 172.31.0.0/16.
This is your default VPC, which is public by default.
Subnet ID
Select any option with the IP address range of 172.31.x.0/20.
These subnets belong to the default VPC.
Input CIDR
Get your current IP address from http://checkip.dyndns.org/.
Then enter this IP address, followed by /32. For example, 1.2.3.4/32.
The /32 suffix represents a network range of a single address.
Web Admin Password
Enter an admin password. You'll later use this to log into the web interface for user management.
Stack name
This is the name of your CloudFormation stack.
Default Bucket
Enter the name of your S3 bucket. You can use either a new or existing bucket.
Here are some restrictions on naming your S3 bucket:
- Cannot contain uppercase letters
- Can contain lowercase letters, numbers, periods (not recommended), and hyphens
- Must be between 3 and 63 characters
- Must be globally unique
Bucket Access
This parameter determines whether S3 permissions are broad or restrictive.
- open: StorageLink is granted S3 Full Access. This is helpful if you plan on using a different S3 bucket for each user. We recommend [locking down S3 access][restrict-s3-access] after your users are configured.
- restricted: S3 access is limited to the default bucket. This improves your security posture by protecting your other S3 buckets from administrators with shell access to the StorageLink instance.
EC2Type
For testing, use a t3.medium. The t3 class is cheaper, but cannot handle sustained traffic.
For production, use an m5.large or better.
Disk Volume Size
This is set to 32 GB by default. Set this to a higher value if you plan on transferring large batches of data.
For a single instance stack, you can [increase the size of your instance volume][resize-ebs] later on.
Key Pair
Select a key pair of which you own the private key
Desired Capacity
By default, the auto-scaling group launches two instances -- one in each availability zone.
You can set the number of instances to anywhere between 1 and 4 instances.
VPC
Select an existing VPC in which to deploy StorageLink.
If you created your own VPC, make sure that:
- It has an Internet StorageLink
- Route tables are configured to direct traffic to the Internet StorageLink
- Enable DNS Hostnames is set to true
Otherwise, you can choose the default VPC which is public by default.
Its IP address range is 172.31.0.0/16.
Public Subnet A
StorageLink instances are deployed into an auto-scaling group that spans two subnets. Make sure that this subnet is public and belongs to the VPC you selected earlier.
If you created your own subnet, make sure that Map Public IP On Launch is set to true.
If you selected the default VPC, select a subnet with the IP address range of 172.31.x.0/20.
Public Subnet B
The same rules apply for Public Subnet B. Just make sure it's different from Public Subnet A.
Private Subnet A
StorageLink instances are deployed into an auto-scaling group that spans two subnets. Make sure that this subnet is private and belongs to the VPC you selected earlier.
Private Subnet B
The same rules apply for Private Subnet B. Just make sure it's different from Private Subnet A.
Input CIDR
Get your current IP address from http://checkip.dyndns.org/.
Then enter this IP address, followed by /32. For example, 1.2.3.4/32.
The /32 suffix represents a network range of a single address.
Web Admin Password
Enter an admin password. You'll later use this to log into the web interface for user management.
Stack name
This is the name of your CloudFormation stack.
Default Bucket
Enter the name of your S3 bucket. You can use either a new or existing bucket.
Here are some restrictions on naming your S3 bucket:
- Cannot contain uppercase letters
- Can contain lowercase letters, numbers, periods (not recommended), and hyphens
- Must be between 3 and 63 characters
- Must be globally unique
Bucket Access
This parameter determines whether S3 permissions are broad or restrictive.
- open: StorageLink is granted S3 Full Access. This is helpful if you plan on using a different S3 bucket for each user. We recommend [locking down S3 access][restrict-s3-access] after your users are configured.
- restricted: S3 access is limited to the default bucket. This improves your security posture by protecting your other S3 buckets from administrators with shell access to the StorageLink instance.
EC2Type
For testing, use a t3.medium. The t3 class is cheaper, but cannot handle sustained traffic.
For production, use an m5.large or better.
Disk Volume Size
This is set to 32 GB by default. Set this to a higher value if you plan on transferring large batches of data.
For a single instance stack, you can [increase the size of your instance volume][resize-ebs] later on.
Key Pair
Select a key pair of which you own the private key
Desired Capacity
By default, the auto-scaling group launches two instances -- one in each availability zone.
You can set the number of instances to anywhere between 1 and 4 instances.
VPC IP Range
This CloudFormation template provisions a new VPC, subnets, and other network resources.
Specify a private Class C IP range that doesn't conflict with your existing networks.
Input CIDR
Get your current IP address from http://checkip.dyndns.org/.
Then enter this IP address, followed by /32. For example, 1.2.3.4/32.
The /32 suffix represents a network range of a single address.
Web Admin Password
Enter an admin password. You'll later use this to log into the web interface for user management.