Azure Monitor Agent
Purpose: Send the StorageLink application, audit and license audit logs to an Azure Monitor Log Analytics Workspace with the Azure Monitor Agent (AMA)
Steps:
- Create a Log Analytics Workspace
- In Cloud Shell (PowerShell), create the custom tables
StorageLinkApplication_CL,StorageLinkAudit_CLandStorageLinkLicenseAudit_CL - Create one Data Collection Rule (DCR) per log, with Custom Text Logs and the End of line record delimiter. The first DCR installs the AMA on the VM
Log File Patterns:
- Application:
/opt/swiftgw/log/application-*.log - Audit:
/opt/swiftgw/log/audit-*.log - License audit:
/opt/swiftgw/log/license-audit-*.log(StorageLink 1.3.0 and later)
Not required: A Data Collection Endpoint (DCE), or stopping the VM. The agent picks up each new DCR within about five minutes
Already collecting two logs? Create the StorageLinkLicenseAudit_CL table and a third DCR for the license audit log. Your existing DCRs don't change
Verify: Query each table under the workspace's Logs
Product: StorageLink by Thorn Technologies — cloud storage gateway for secure file sharing
Overview
This article shows you how to install the Azure Monitor Agent (AMA) and send the StorageLink log files to an Azure Monitor Log Analytics Workspace (LAW).
The high level steps are as follows:
- Create a Log Analytics Workspace
- Create a custom table for each log in your Log Analytics Workspace
- Create a Data Collection Rule (DCR) for each log. The first DCR also:
- Installs the Azure Monitor Agent (AMA) on the VM
- Enables the System Assigned Managed Identity on the VM
The custom tables must exist before you create the DCRs that send data to them.
Create a Log Analytics Workspace
Azure Monitor is a service for aggregating logs and metrics. This information is organized into Log Analytics Workspaces.
In the Azure Portal, go to the Log Analytics workspaces service
Click Create
Choose your Subscription
Choose or create a Resource Group
Give the Log Analytics Workspace a Name
Choose your Region. The DCRs you create later must use the same region as the workspace, so keeping all your resources in one region makes setup and troubleshooting easier.
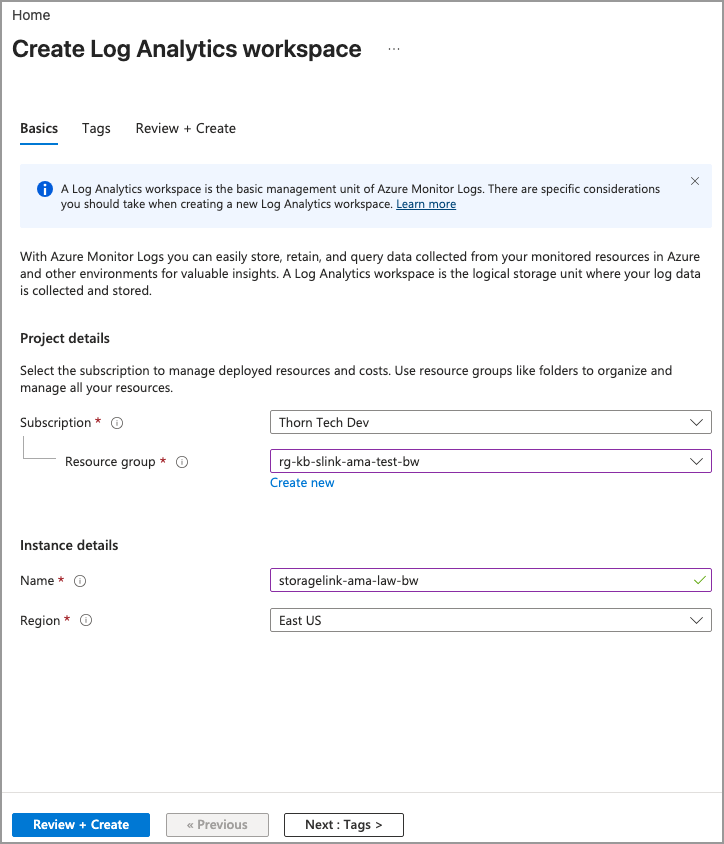
Click Review + Create, then Create
Create the Custom Log Tables
The StorageLink logs do not match a standard schema, so you need to create a table in the Log Analytics Workspace for each log.
StorageLink writes three logs to /opt/swiftgw/log/:
| Log | File pattern | Table | Contents |
|---|---|---|---|
| Application Log | application-*.log | StorageLinkApplication_CL | Events for troubleshooting the Java application |
| Audit Log | audit-*.log | StorageLinkAudit_CL | Web user actions and authentication attempts |
| License Audit Log | license-audit-*.log | StorageLinkLicenseAudit_CL | License events such as activation, replacement, expiry, cluster binding and user-cap import skips (StorageLink 1.3.0 and later) |
In the Azure Portal, you should see the Cloud Shell icon at the top of your screen, to the right of the search bar. Click this to open up the command line console.
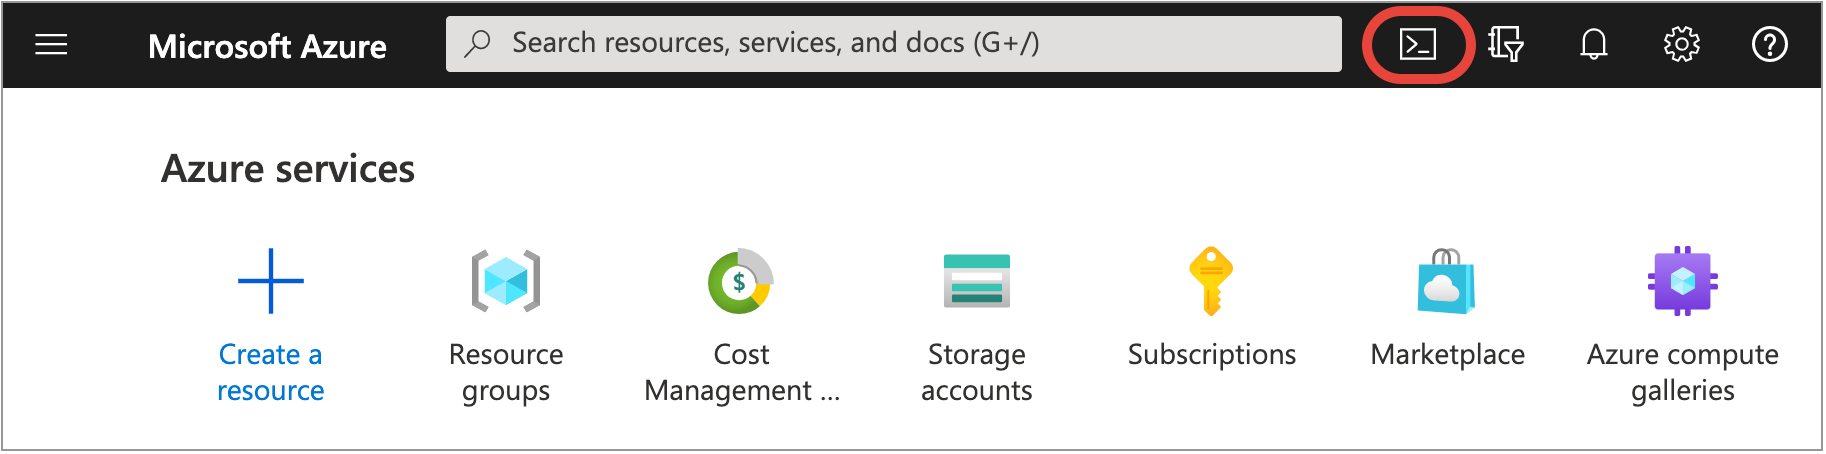
You want to be in the Azure PowerShell environment. If Cloud Shell opens in Bash, click Switch to PowerShell in the Cloud Shell toolbar.
To run the commands below, you need your Subscription ID, Resource group name and Workspace Name. The Essentials section on your Log Analytics Workspace's Overview page shows all three:

Copy each command and replace the values in <> with your subscription and resource values. First, create the Application log table:
$tableParams = @'
{
    "properties": {
        "schema": {
               "name": "StorageLinkApplication_CL",
               "columns": [
                    {
                        "name": "TimeGenerated",
                        "type": "DateTime"
                    },
                    {
                        "name": "RawData",
                        "type": "String"
                    },
                    {
                        "name": "FilePath",
                        "type": "String"
                    },
                    {
                        "name": "Computer",
                        "type": "String"
                    }
              ]
        }
    }
}
'@

Invoke-AzRestMethod -Path "/subscriptions/<subscription-id>/resourceGroups/<resource-group-name>/providers/Microsoft.OperationalInsights/workspaces/<log-analytics-workspace-name>/tables/StorageLinkApplication_CL?api-version=2021-12-01-preview" -Method PUT -payload $tableParams
Then, create the Audit log table:
$tableParams = @'
{
    "properties": {
        "schema": {
               "name": "StorageLinkAudit_CL",
               "columns": [
                    {
                        "name": "TimeGenerated",
                        "type": "DateTime"
                    },
                    {
                        "name": "RawData",
                        "type": "String"
                    },
                    {
                        "name": "FilePath",
                        "type": "String"
                    },
                    {
                        "name": "Computer",
                        "type": "String"
                    }
              ]
        }
    }
}
'@

Invoke-AzRestMethod -Path "/subscriptions/<subscription-id>/resourceGroups/<resource-group-name>/providers/Microsoft.OperationalInsights/workspaces/<log-analytics-workspace-name>/tables/StorageLinkAudit_CL?api-version=2021-12-01-preview" -Method PUT -payload $tableParams
Finally, create the License Audit log table:
$tableParams = @'
{
    "properties": {
        "schema": {
               "name": "StorageLinkLicenseAudit_CL",
               "columns": [
                    {
                        "name": "TimeGenerated",
                        "type": "DateTime"
                    },
                    {
                        "name": "RawData",
                        "type": "String"
                    },
                    {
                        "name": "FilePath",
                        "type": "String"
                    },
                    {
                        "name": "Computer",
                        "type": "String"
                    }
              ]
        }
    }
}
'@

Invoke-AzRestMethod -Path "/subscriptions/<subscription-id>/resourceGroups/<resource-group-name>/providers/Microsoft.OperationalInsights/workspaces/<log-analytics-workspace-name>/tables/StorageLinkLicenseAudit_CL?api-version=2021-12-01-preview" -Method PUT -payload $tableParams
The output of each command shows StatusCode : 200 when the table is created.
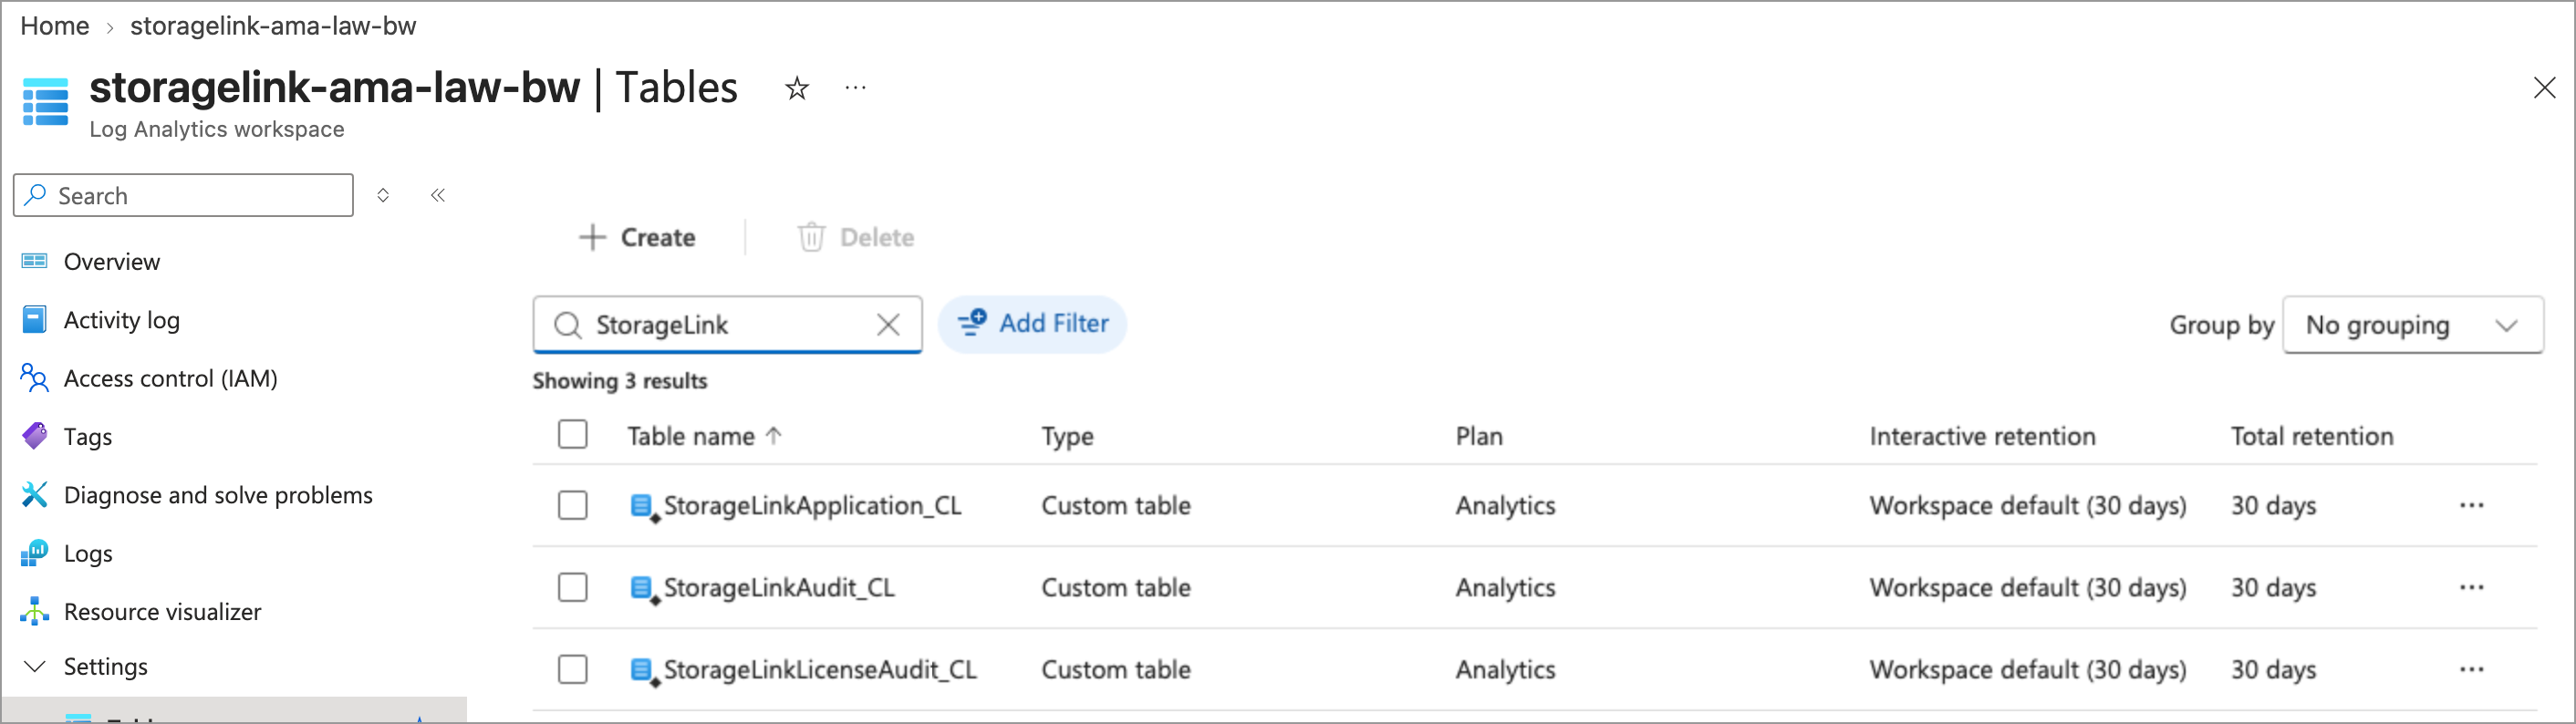
To confirm, open your Log Analytics Workspace, go to Settings > Tables, and filter by StorageLink. All three custom tables appear:
Create the Data Collection Rules (DCRs)
A Data Collection Rule (DCR) wires the VM to the Log Analytics Workspace and defines which log file is collected into which table. You create one DCR per log, starting with the application log.
Custom text logs don't need a Data Collection Endpoint (DCE) unless your network uses Azure Private Link. Leave every Data Collection Endpoint field in the wizard empty. The VM can stay running while you create the DCRs.
To create the first DCR:
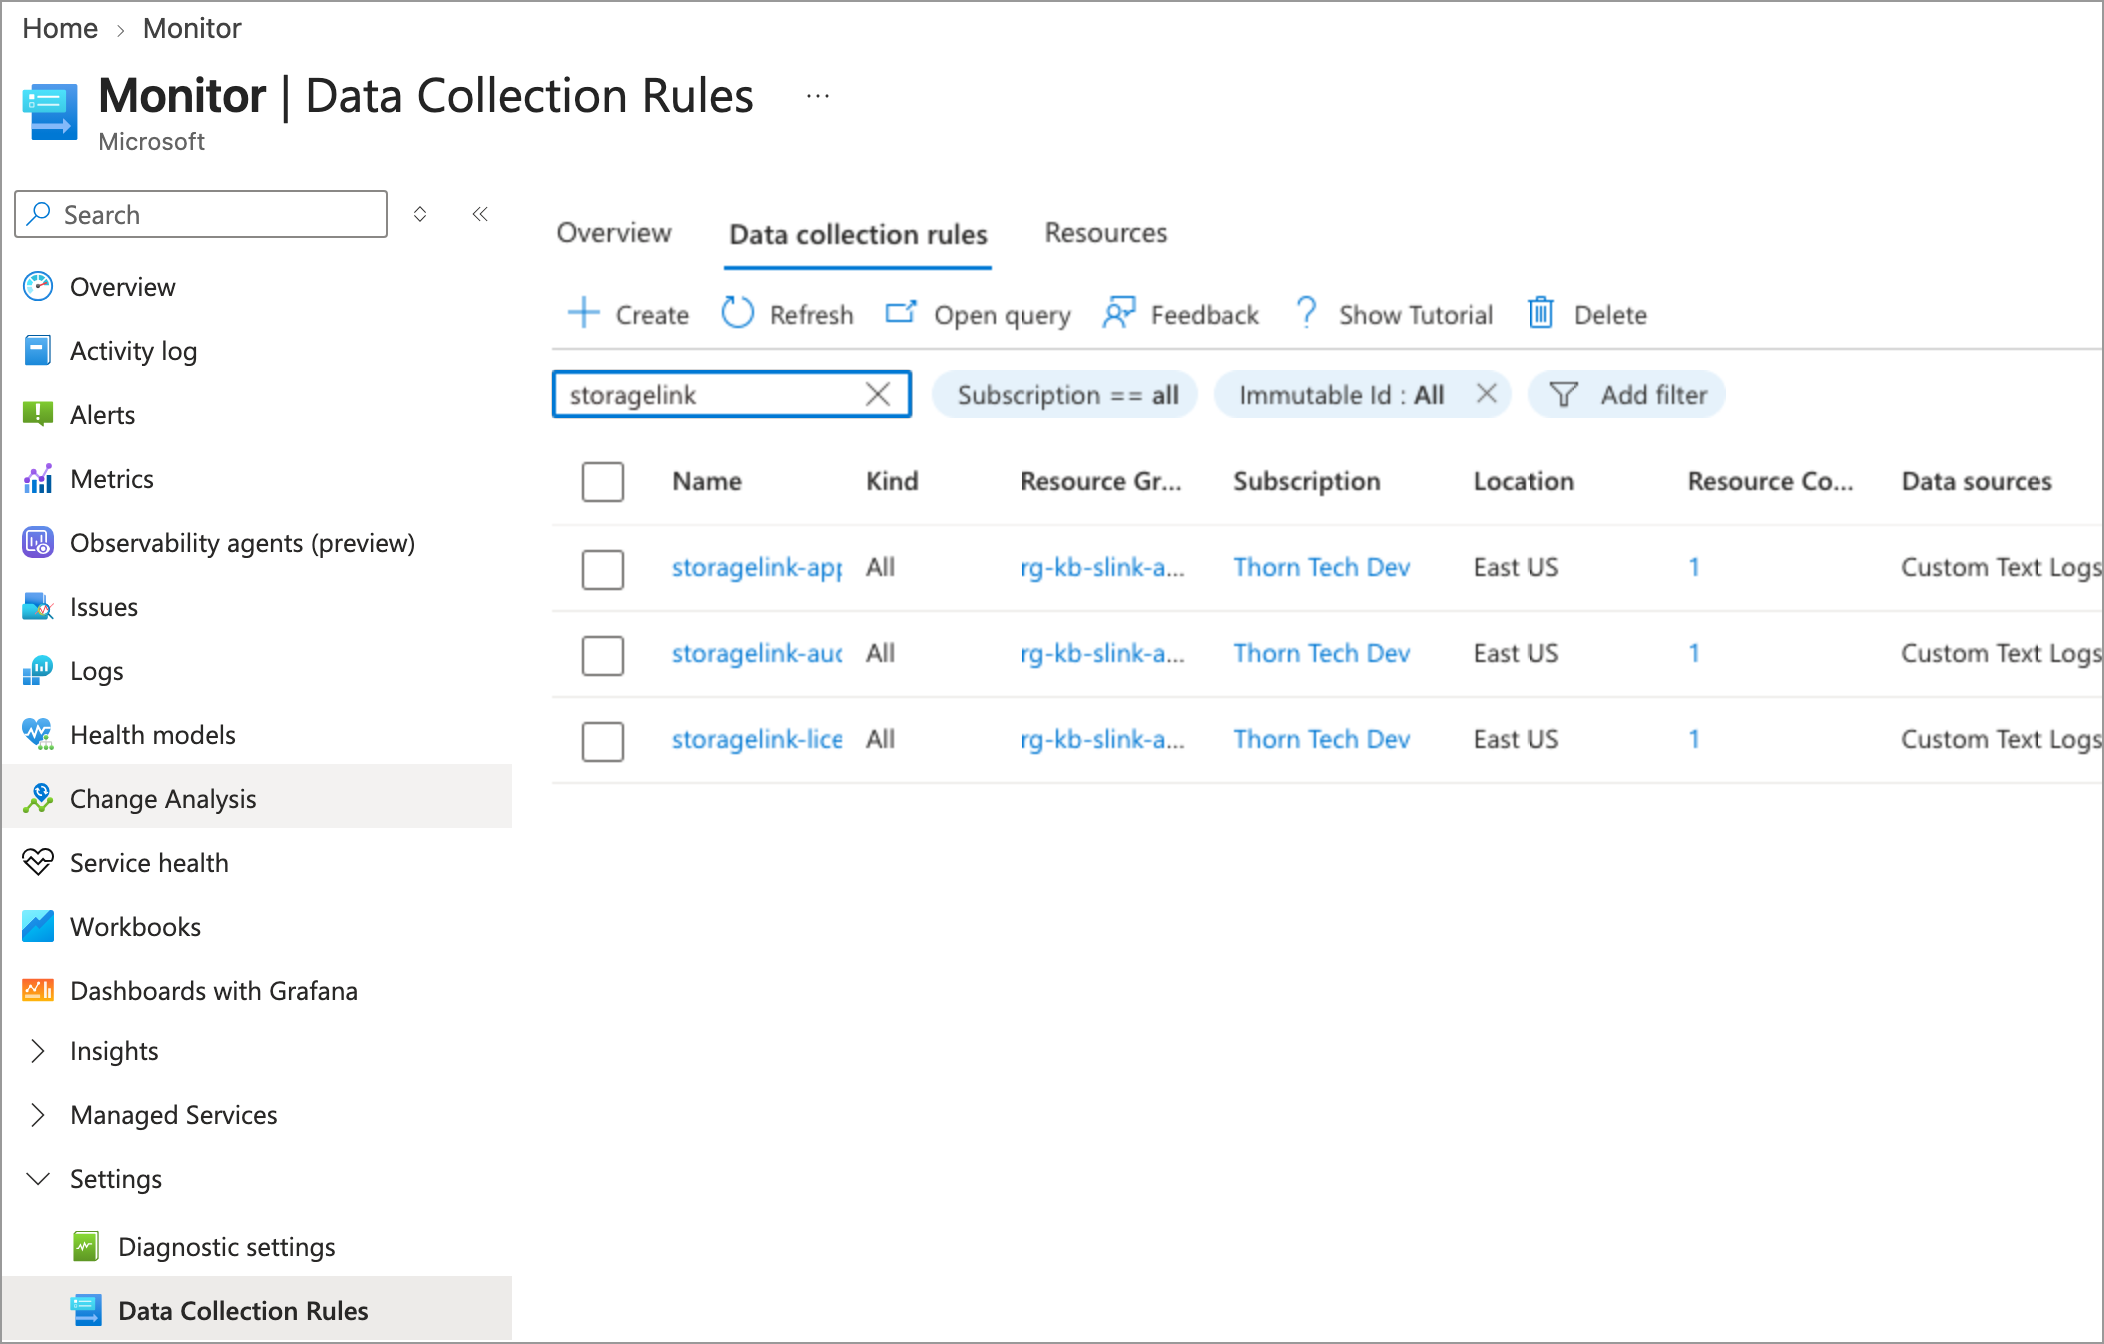
In the Azure Portal, go to the Azure Monitor service
Under Settings, click Data Collection Rules
Open the Data collection rules tab and click + Create
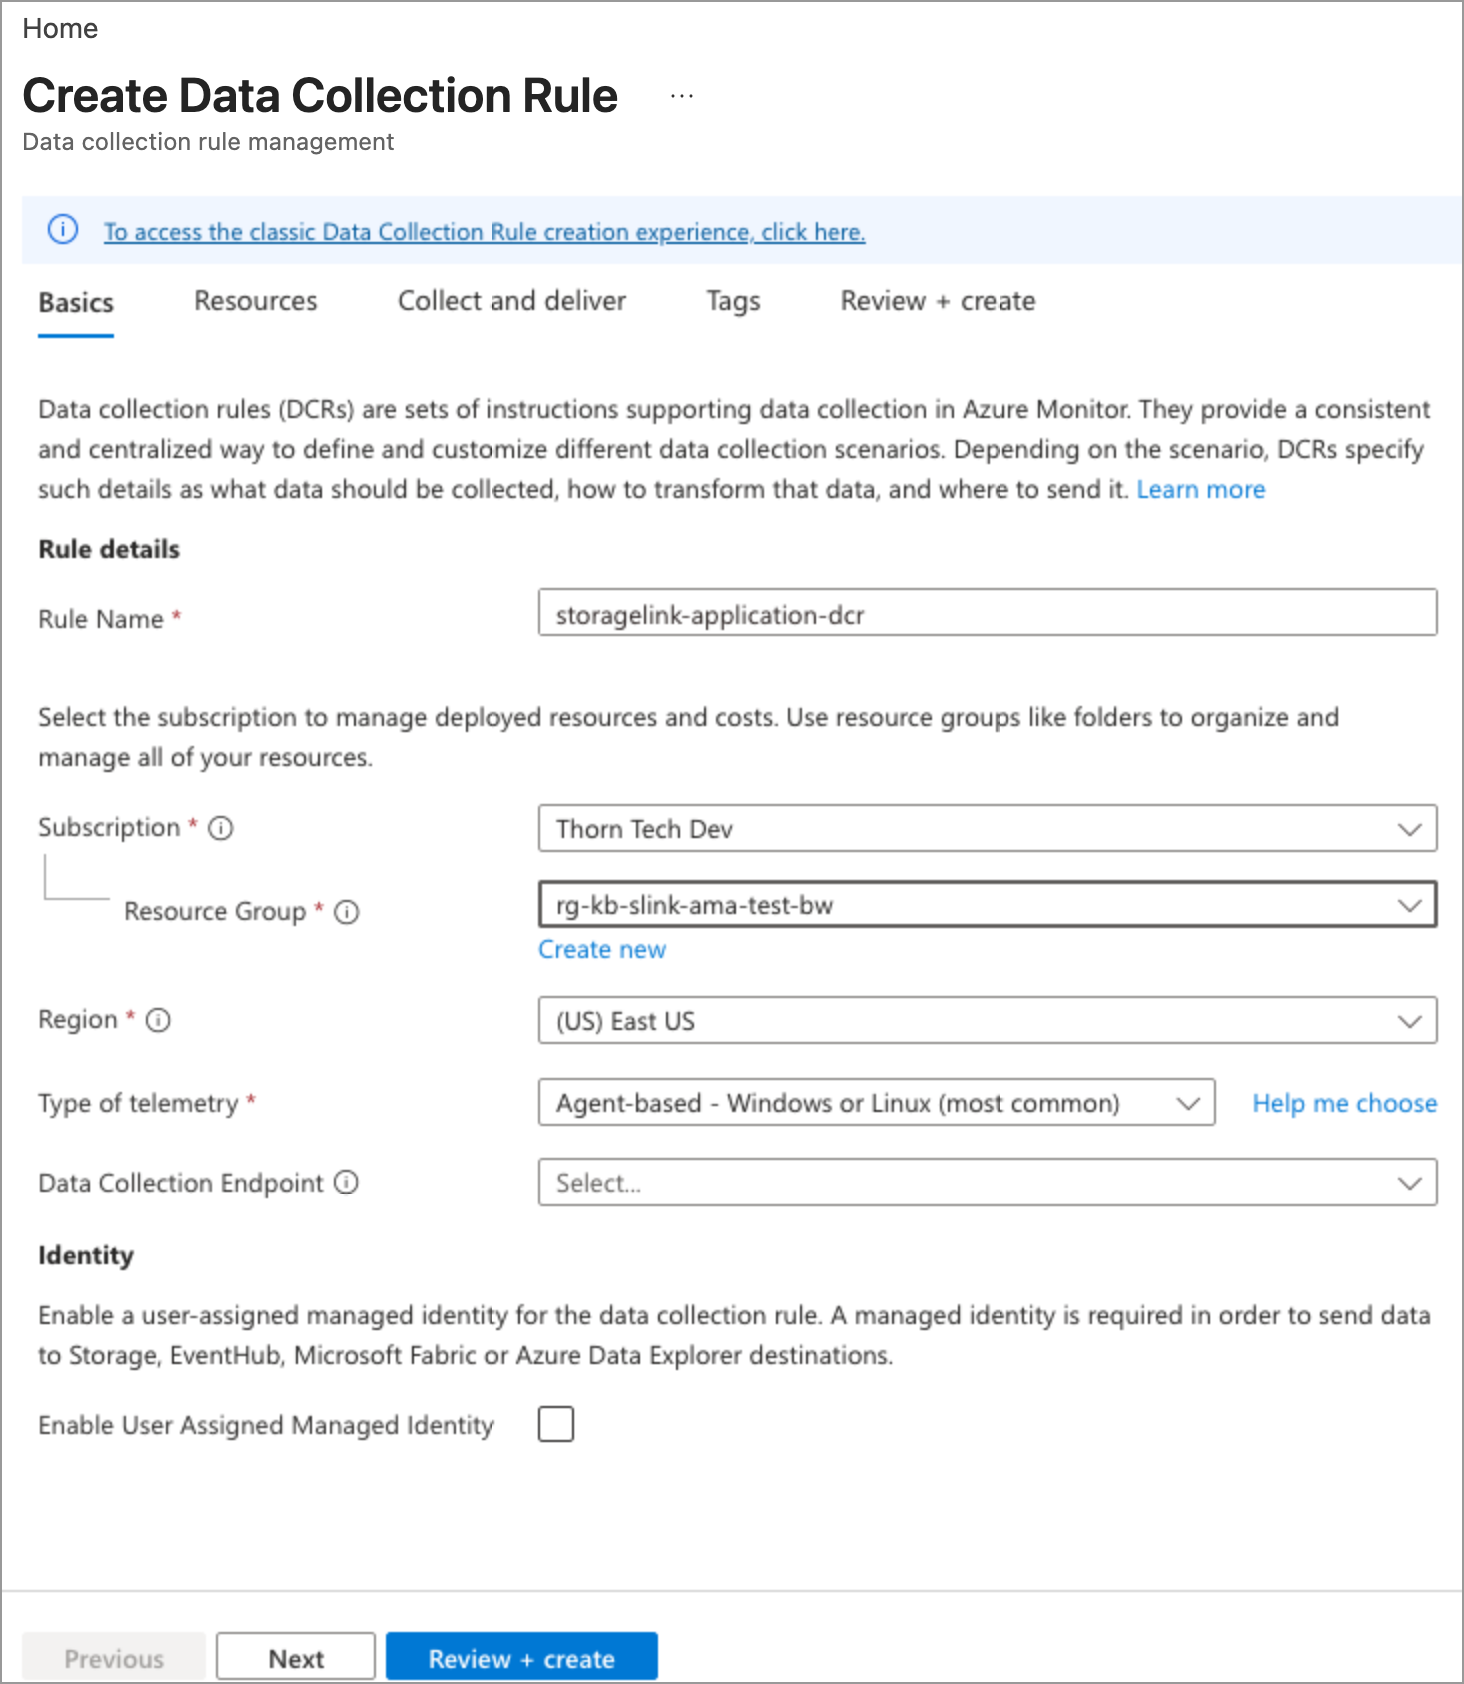
On the Basics tab, configure the following:
Rule Name:
storagelink-application-dcrSubscription and Resource Group: Use the same ones as your Log Analytics Workspace
Region: Use the same region as your Log Analytics Workspace. The Destination step only lists workspaces in the DCR's region.
Type of telemetry: Leave it on
Agent-based - Windows or Linux (most common)Data Collection Endpoint: Leave it empty
Click Next
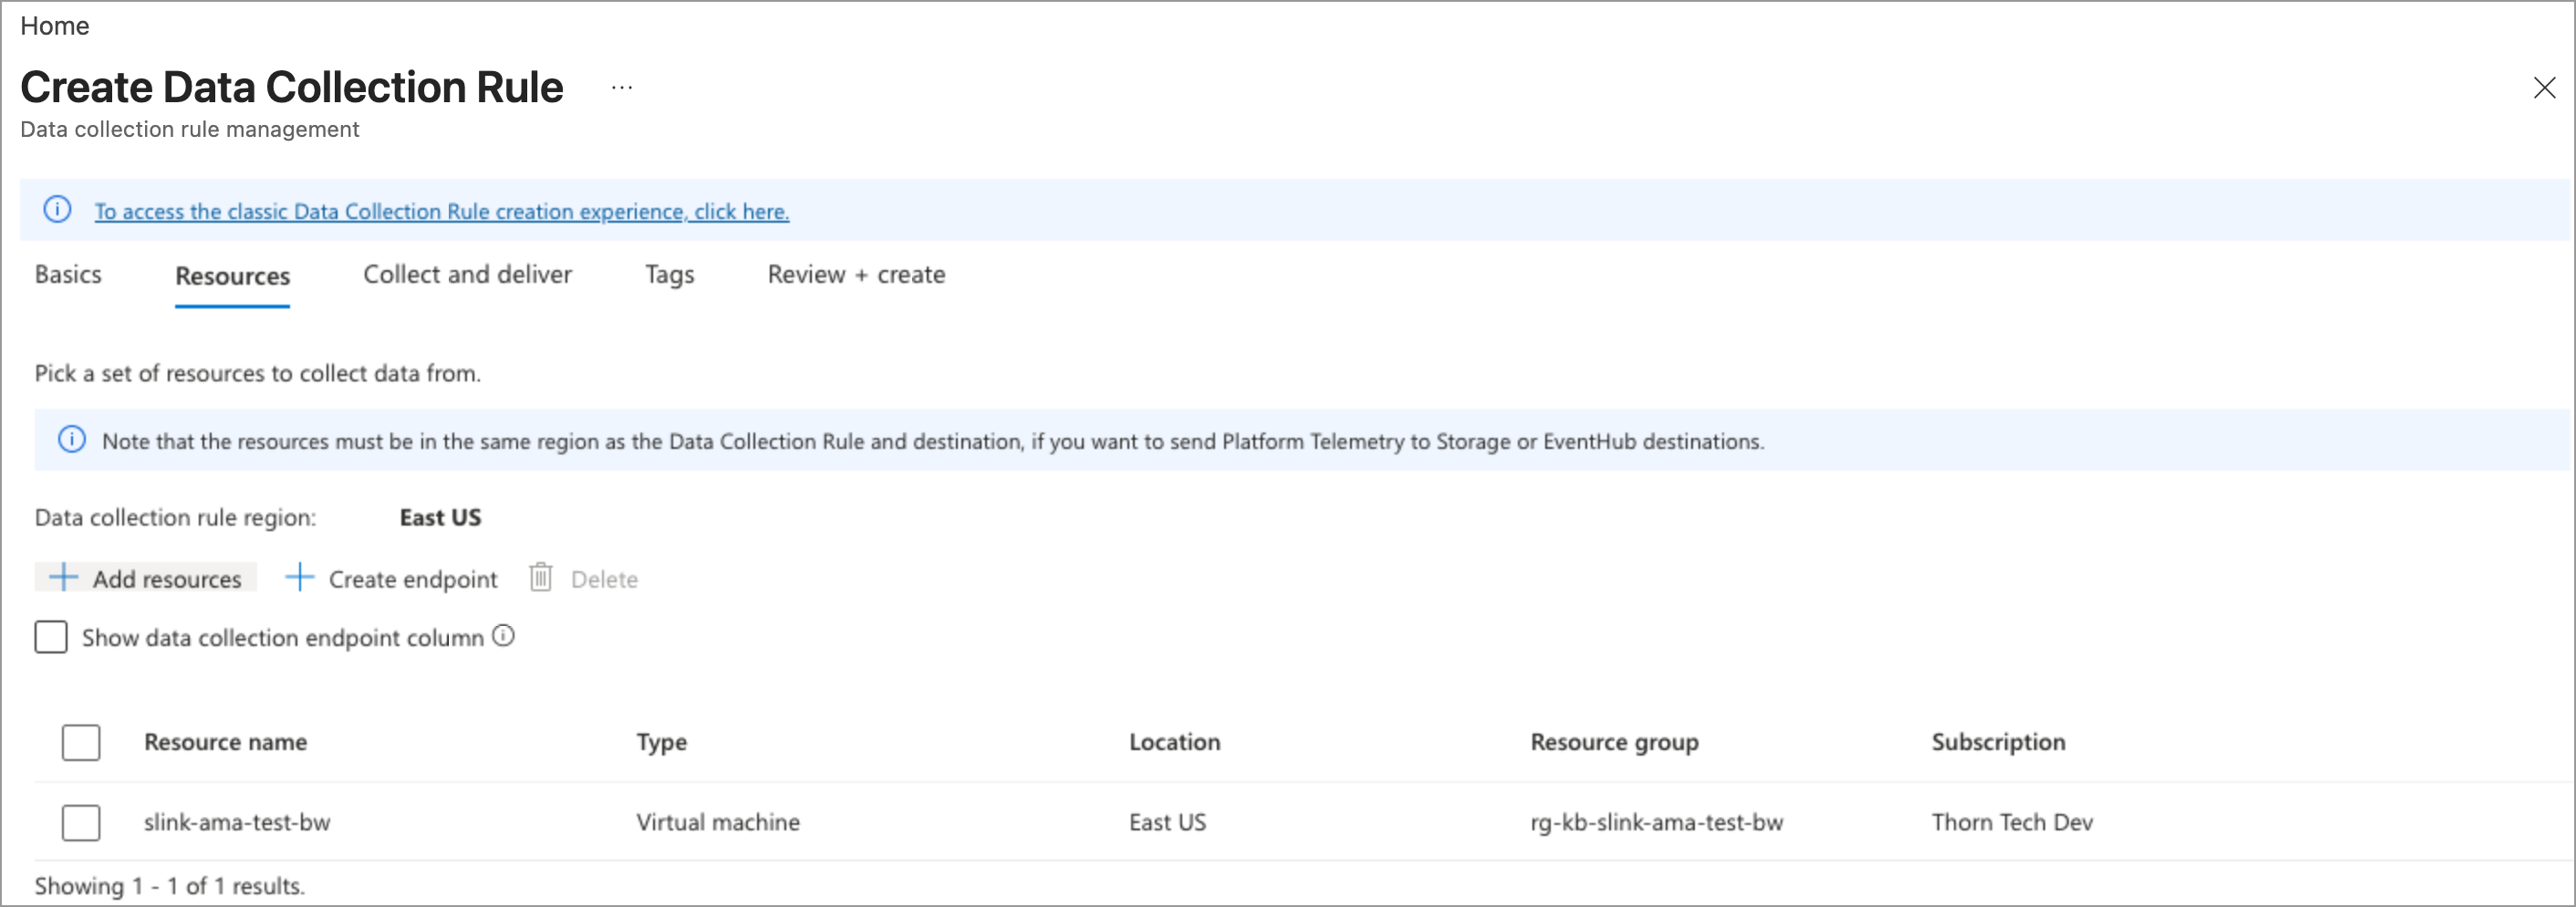
On the Resources tab, do the following:
Click + Add resources
In Select a scope, search for your StorageLink VM, check the box next to it, and click Apply
Leave Show data collection endpoint column unchecked
Click Next
On the Collect and deliver tab, click + Add new data source. This opens the Add new data source page.
On the Data source tab, set the following options:
Data source type:
Custom Text LogsFile pattern:
/opt/swiftgw/log/application-*.logTable name:
StorageLinkApplication_CLRecord delimiter:
End of line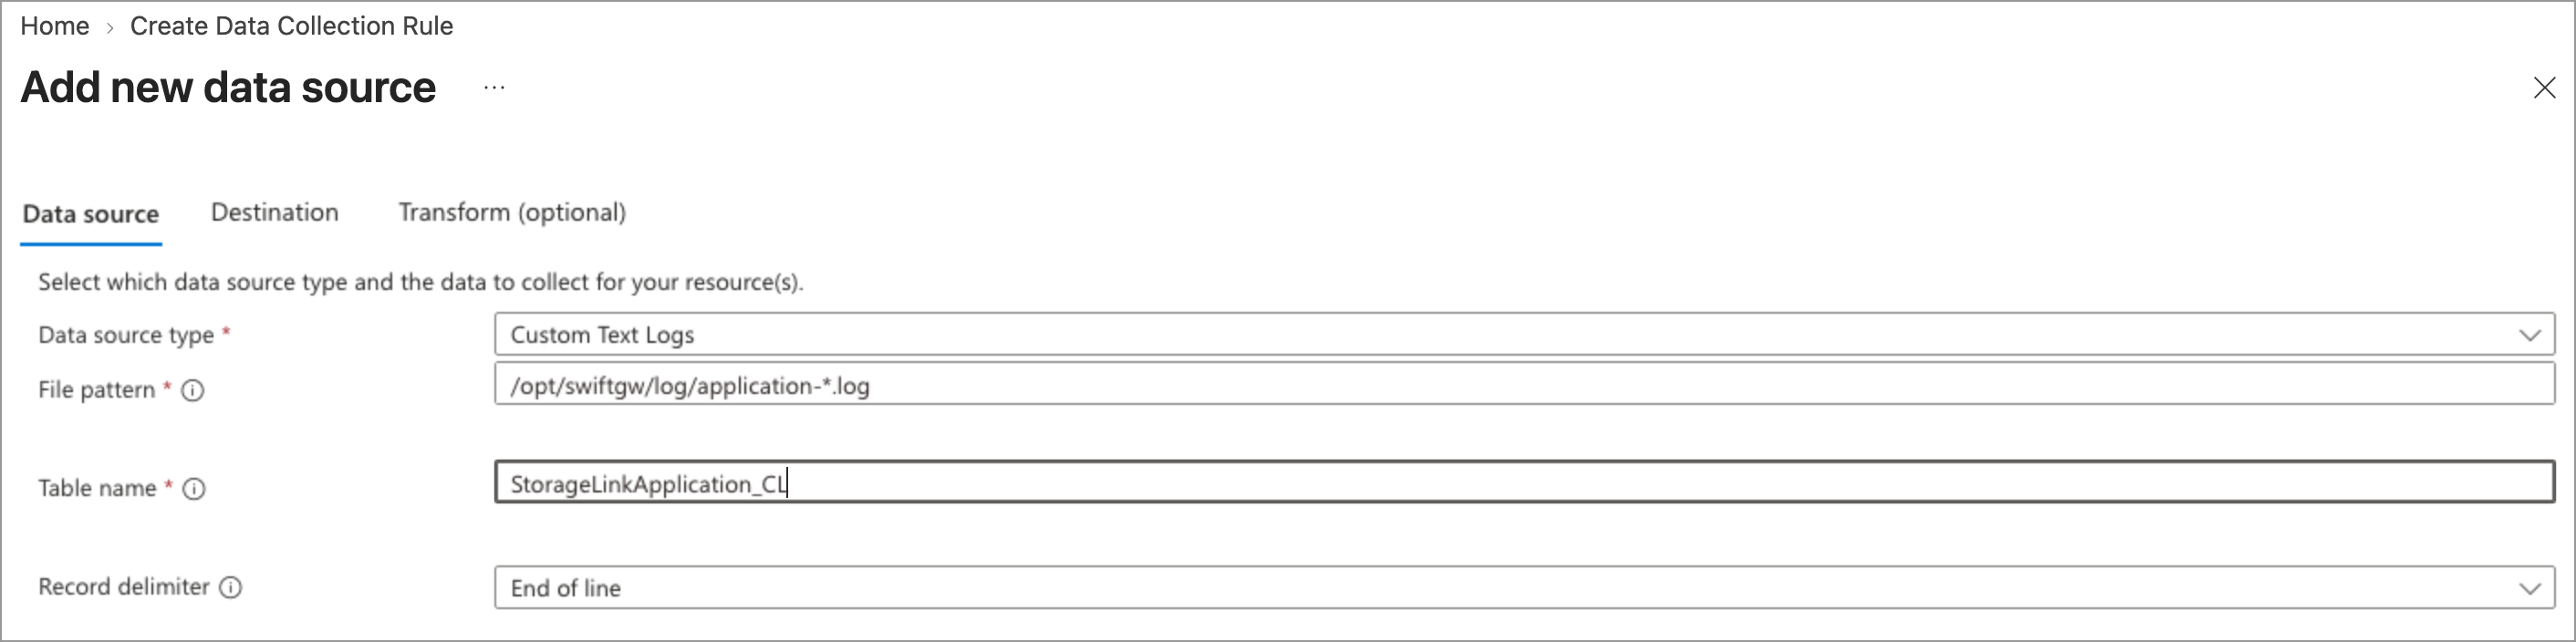
Click Next: Destinations, then click + Add destination and set the following:
Destination type:
Log Analytics WorkspacesSubscription: Your subscription
Log Analytics Workspaces: The workspace you created earlier. This list starts on the subscription's default workspace, so check that it shows yours.
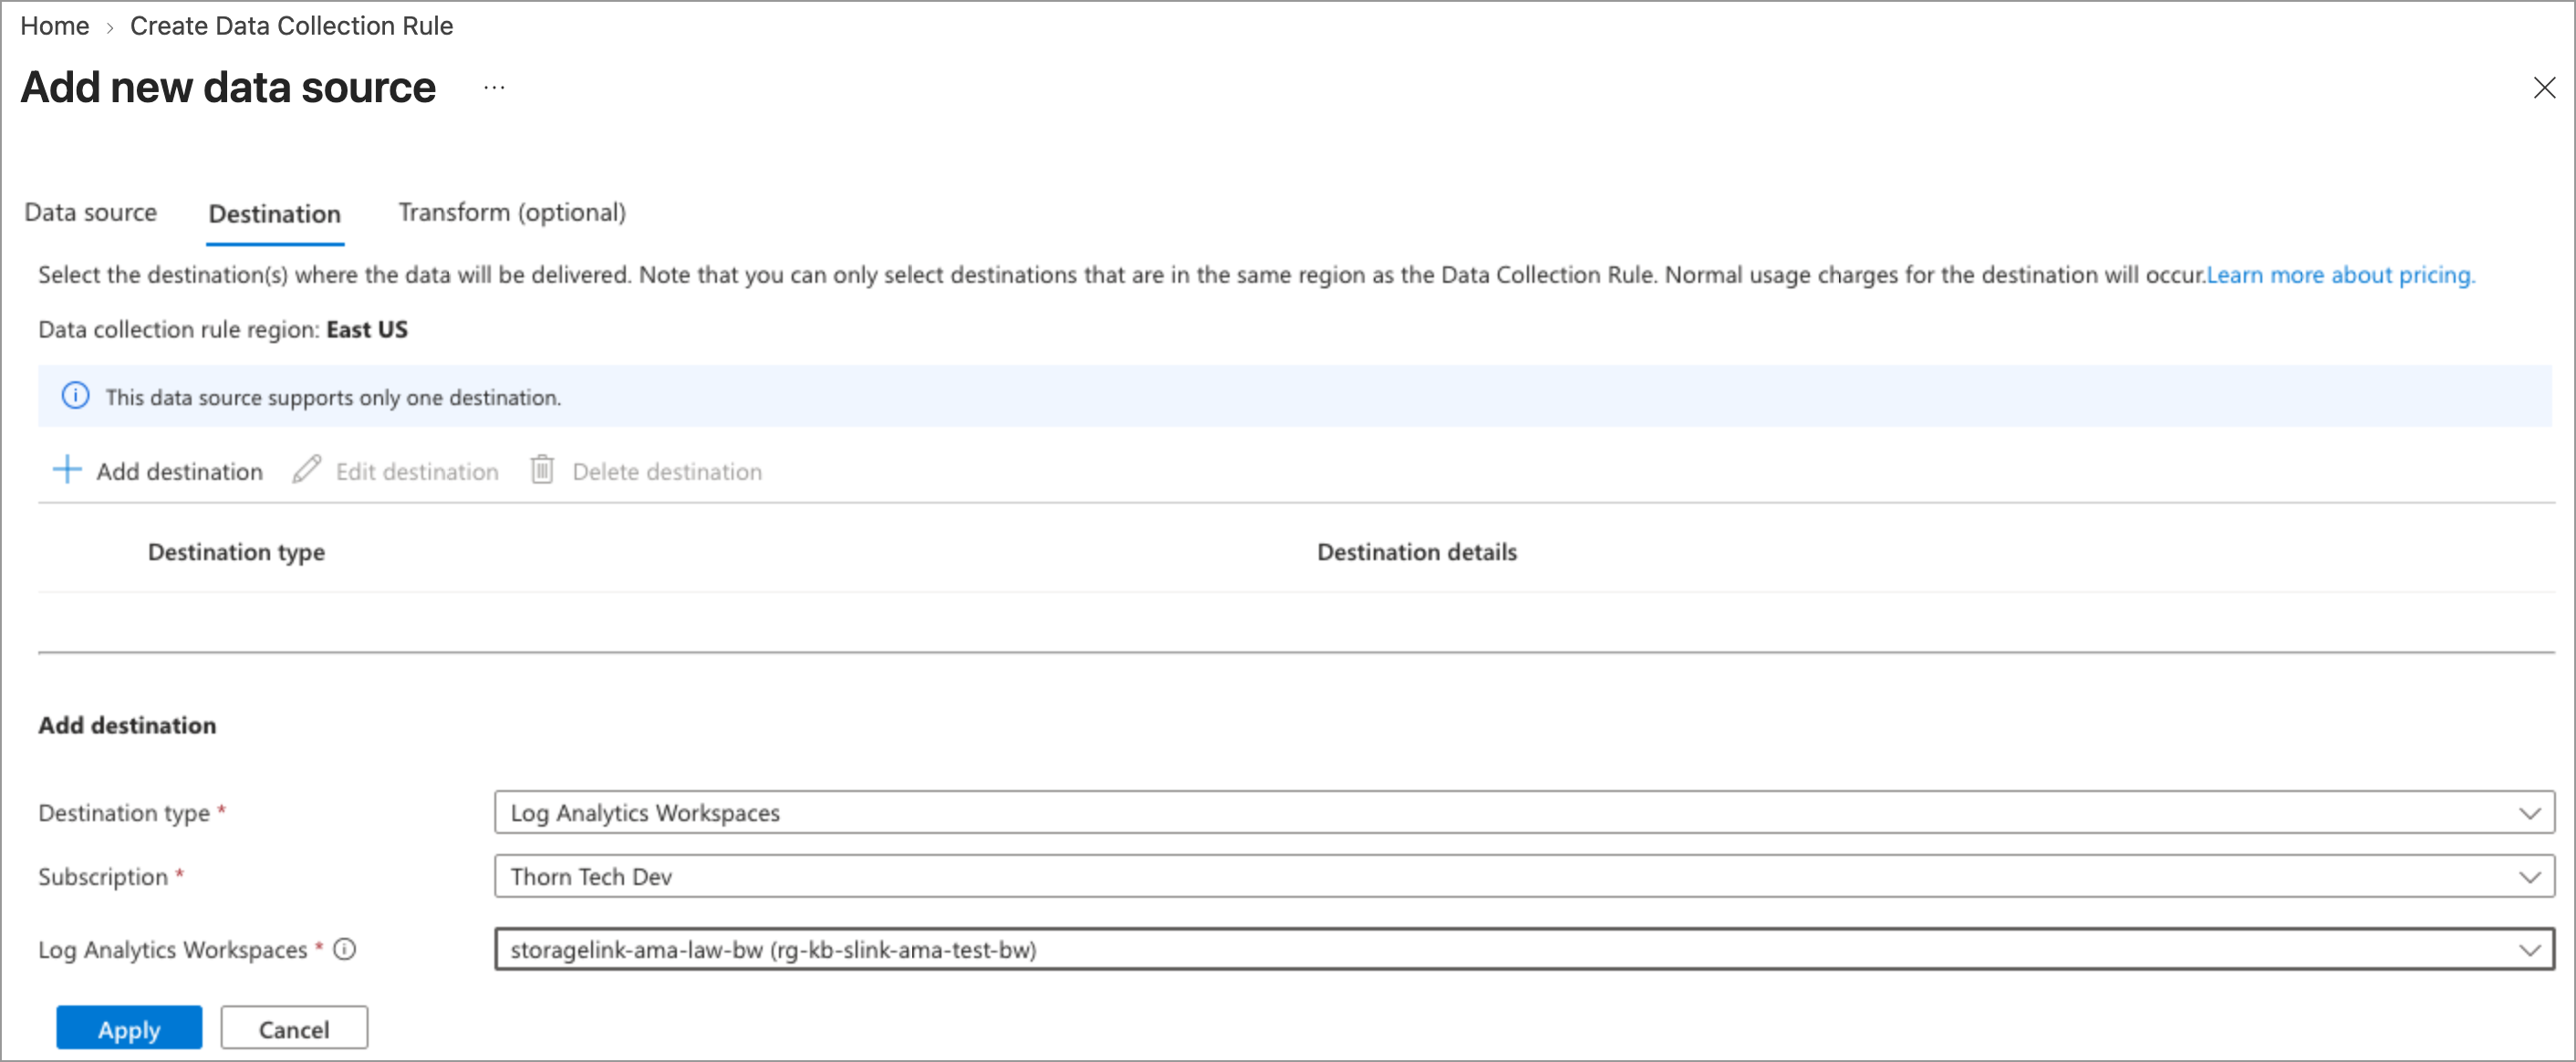
Click Apply. You can skip the Transform (optional) tab.
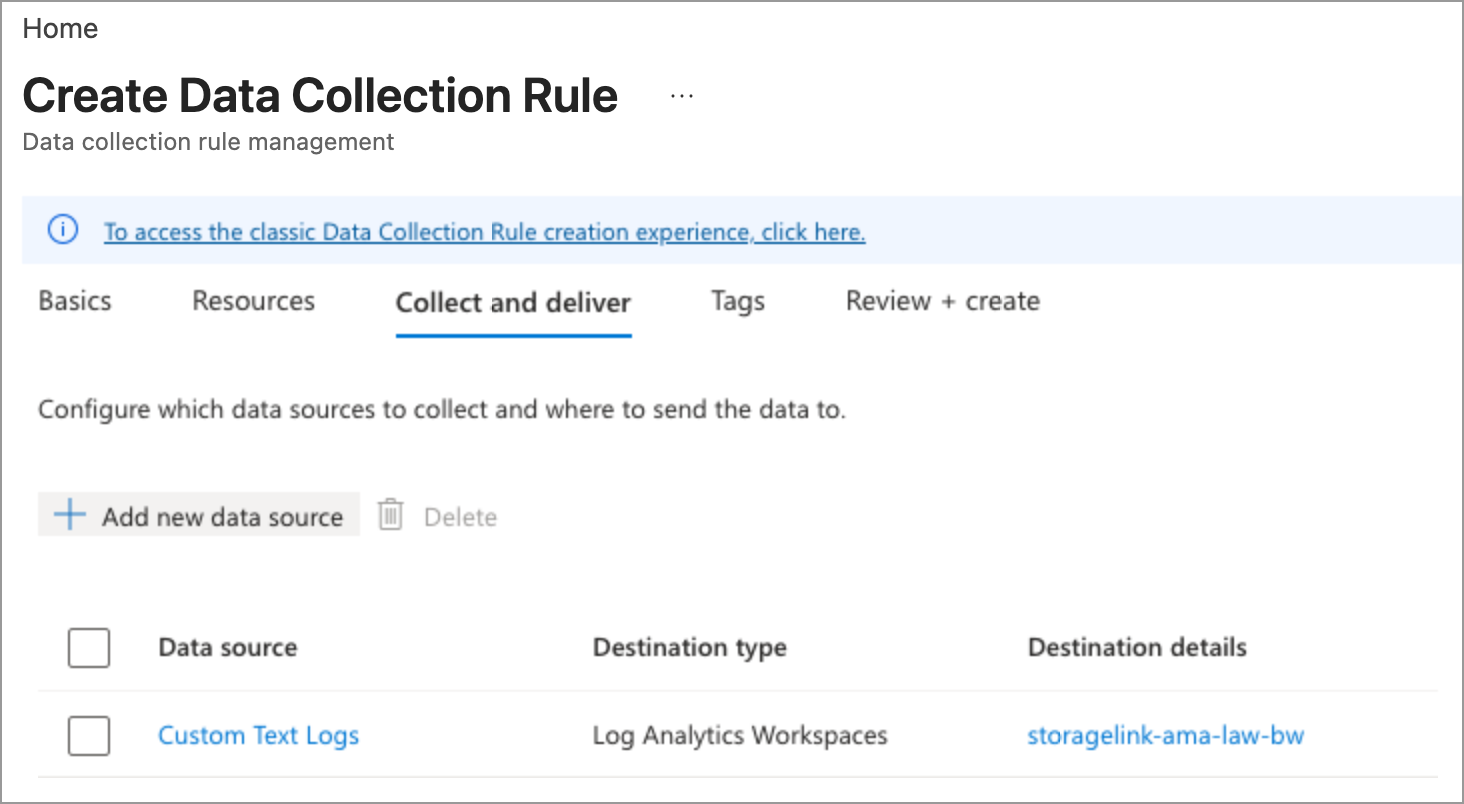
Click Save. The data source now appears on the Collect and deliver tab:
Click Review + create, then Create
StorageLink log timestamps include fractions of a second, for example 2026-10-09T15:17:01.146Z. The TimeStamp record delimiter's ISO 8601 format doesn't accept fractional seconds, so keep End of line. Each line in the log file becomes one row in the table, so a multi-line entry such as a Java stack trace arrives as several rows.
Then, repeat this process for the other two logs, changing only these values:
| Rule Name | File pattern | Table name |
|---|---|---|
storagelink-audit-dcr | /opt/swiftgw/log/audit-*.log | StorageLinkAudit_CL |
storagelink-license-audit-dcr | /opt/swiftgw/log/license-audit-*.log | StorageLinkLicenseAudit_CL |
The Azure Monitor Agent picks up each new DCR within about five minutes, without a restart of the VM or the agent.
Adding the license-audit log to an existing setup
If you already collect the application and audit logs, for example after an in-place upgrade to StorageLink 1.3.0 or later, two steps add the license audit log:
Create the
StorageLinkLicenseAudit_CLtable with the License Audit command in Create the Custom Log TablesCreate the
storagelink-license-audit-dcrDCR as described above
Your existing DCRs don't need any changes, and the VM can stay running.
Verify the Azure Monitor Agent installation
When you created the first DCR, Azure installed the Azure Monitor Agent (AMA) on the VM. To verify this, do the following:
Go to the VM detail page in the Azure Portal
Under Settings, click Extensions + applications
You should see
AzureMonitorLinuxAgentwith a status ofProvisioning succeeded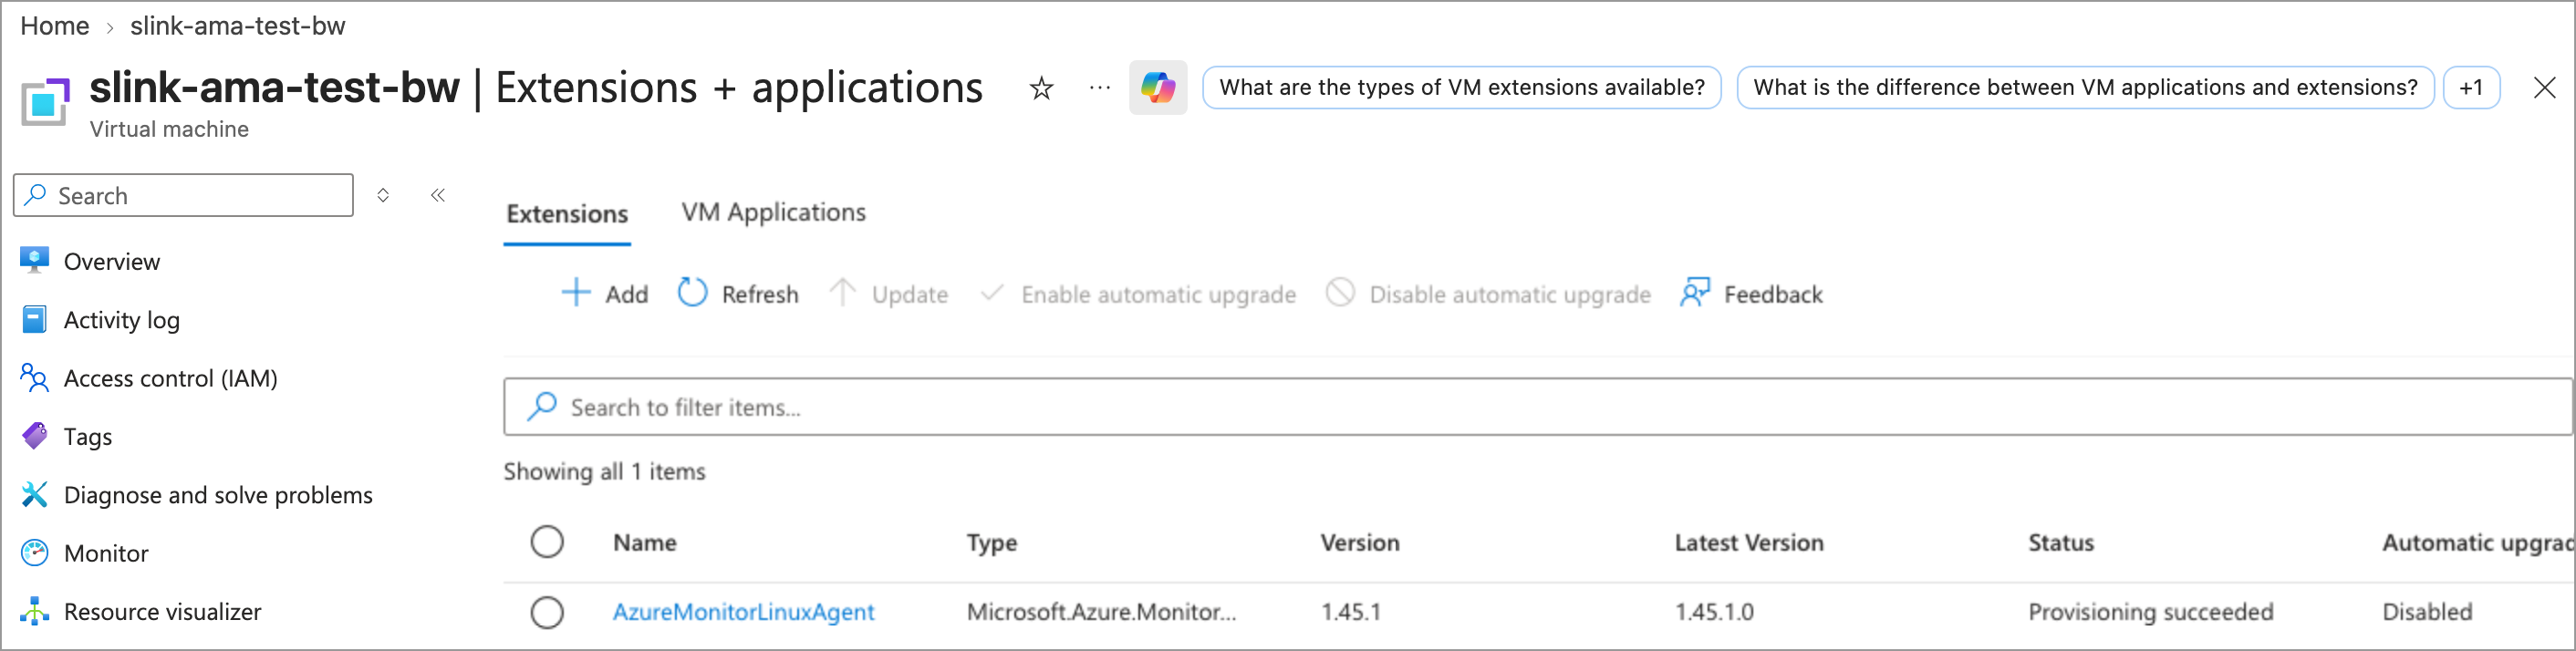
The portal installs the agent with Automatic upgrade disabled. To have Azure keep the agent up to date, select AzureMonitorLinuxAgent and click Enable automatic upgrade.
Check for incoming logs
At this point, everything should be wired properly. In this section, you are going to check the Log Analytics Workspace for incoming logs. It may take up to 20 minutes for the logs to show up initially. The agent collects lines written after a DCR takes effect, so entries already in the files before then don't appear.
In the Azure Portal, search for Log Analytics workspaces
Select the Log Analytics Workspace you created earlier
In the left menu, click Logs. Close any welcome or Queries pop-up.
Make sure the Agent toggle at the top right is off. If the page opens in the Observability Agent chat instead of the query editor, turn the toggle off, and click Discard if asked. If a pop-up offers Analyze with Agent, click Use Query.
In the drop-down on the right, switch from Simple mode to KQL mode

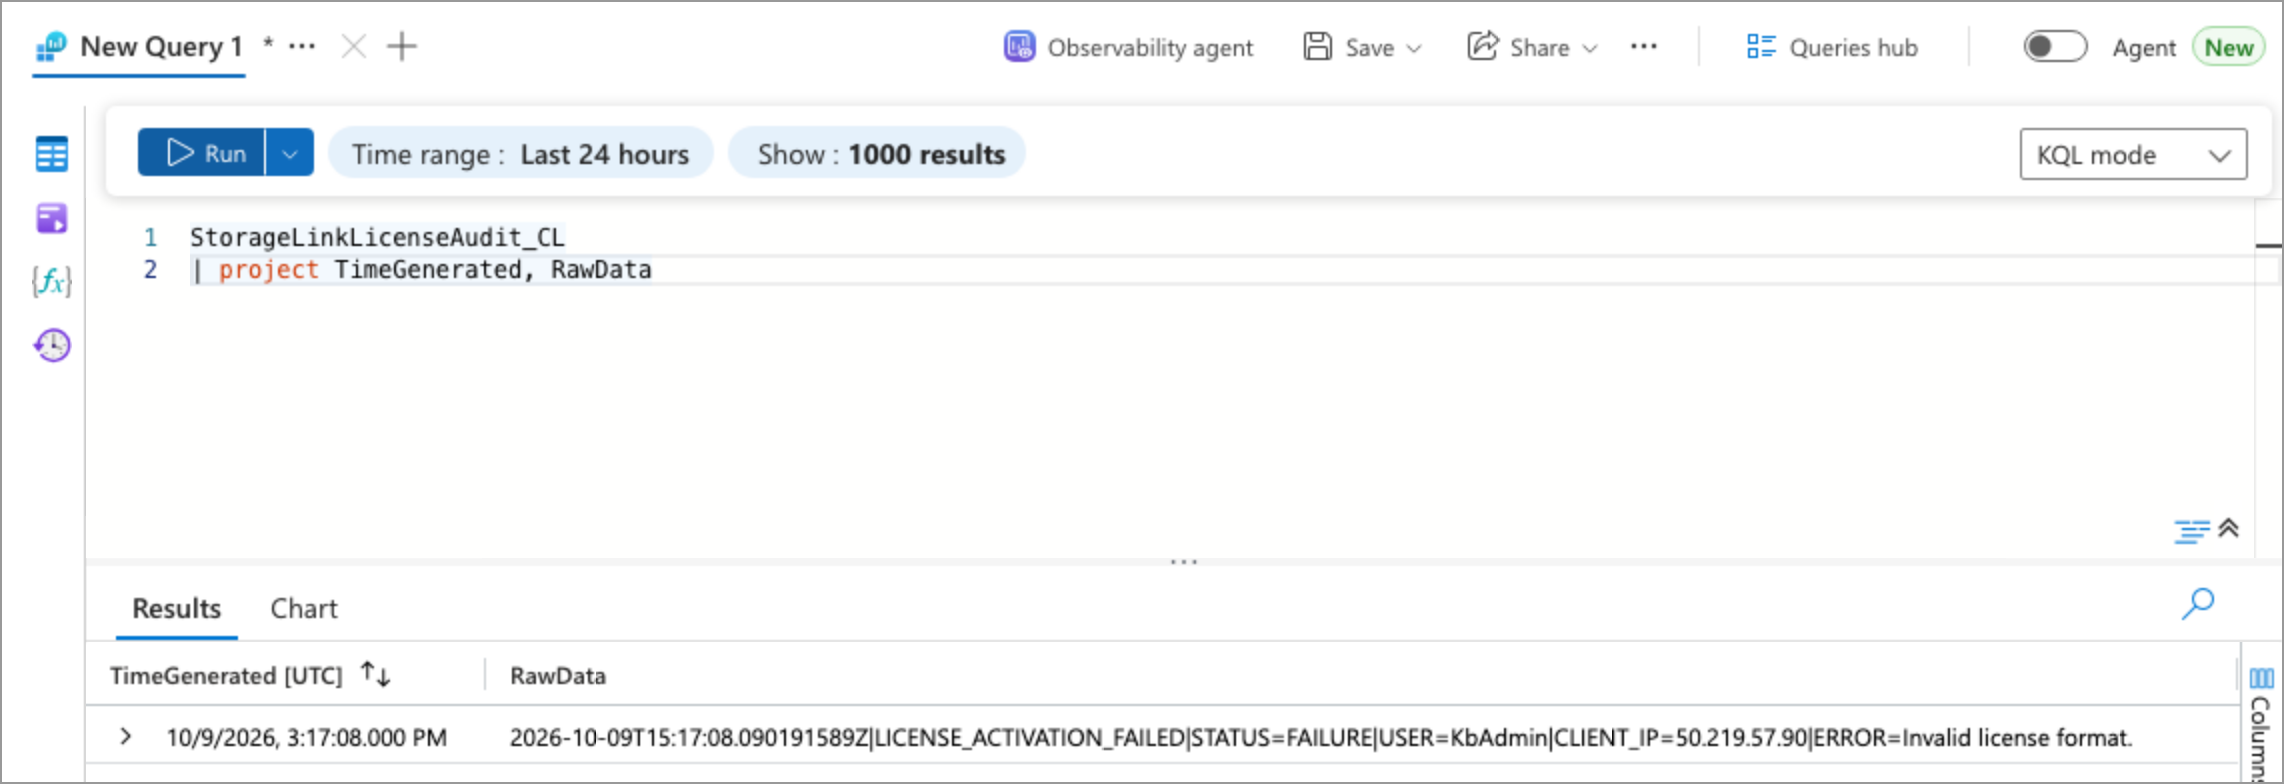
Type the following query and click Run:
StorageLinkApplication_CL
| project TimeGenerated, RawData
You should see rows of results in the table below.
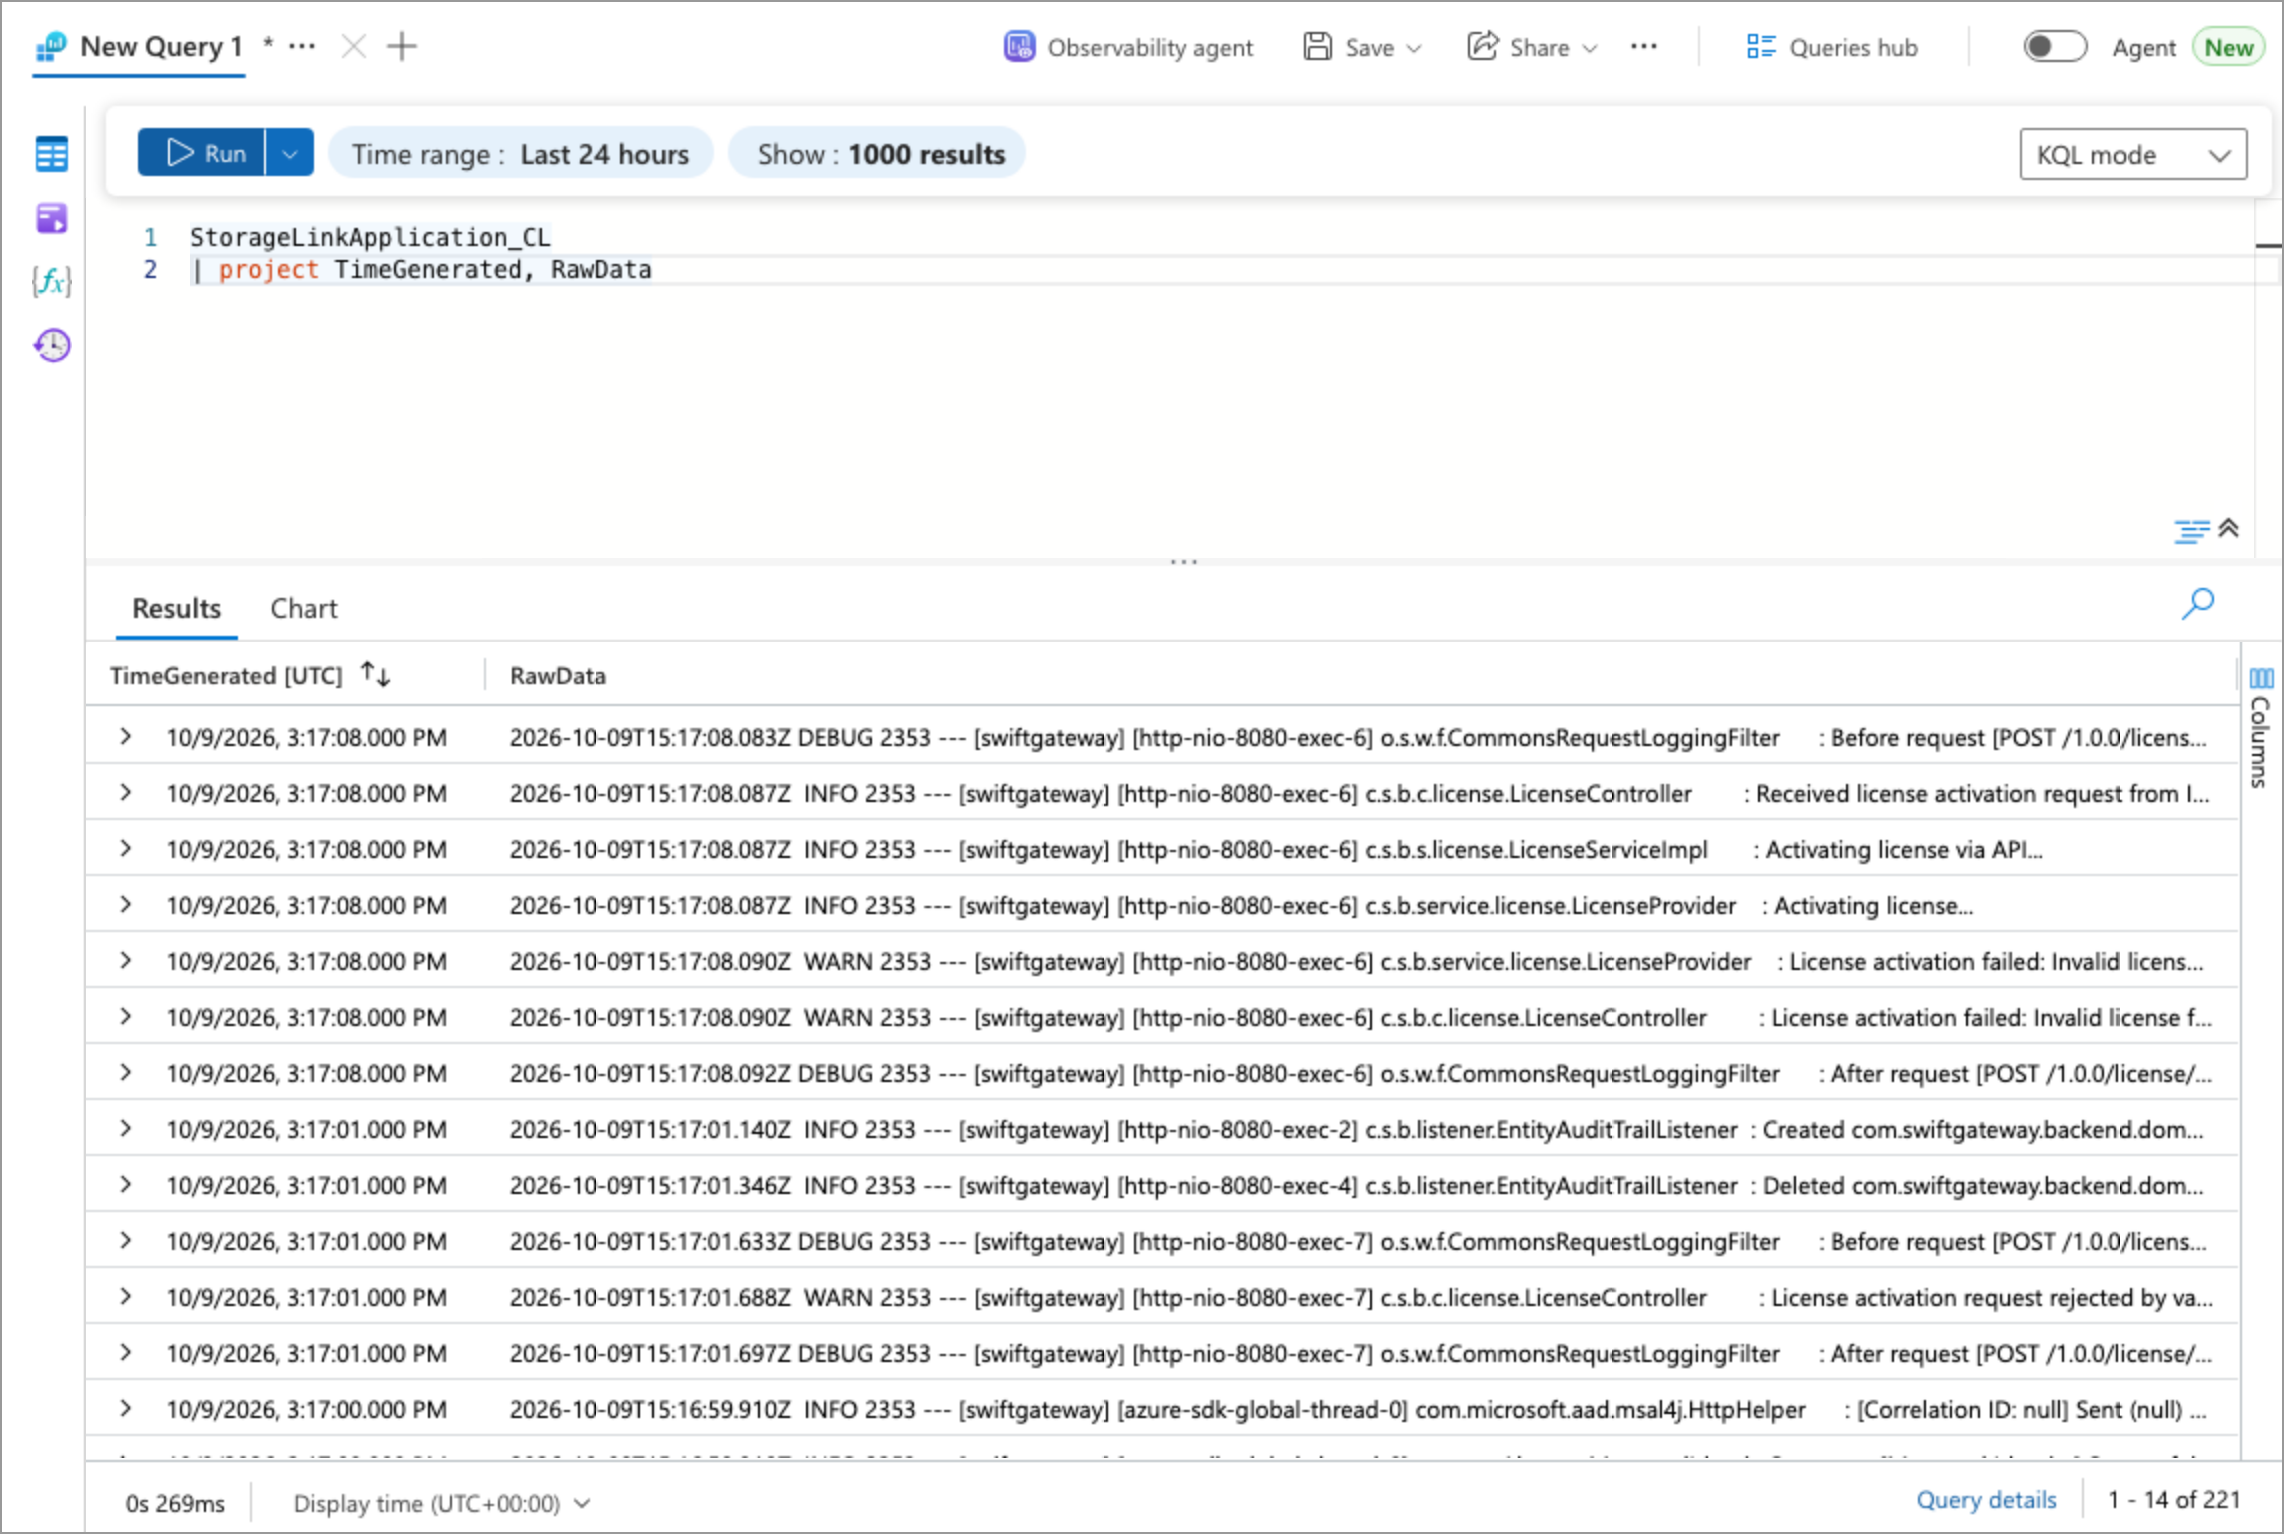
Run the same query with StorageLinkAudit_CL or StorageLinkLicenseAudit_CL as the table name to check the other two logs. The license audit log only gets a new line when a license event occurs, such as a license activation, a failed activation attempt or an expiry, so StorageLinkLicenseAudit_CL can stay empty until then.
Troubleshooting
There are a lot of moving pieces, and there are many things that can go wrong. This section has some troubleshooting steps you can try.
No logs are showing up in the Log Analytics workspace query
- Try waiting an hour to give the incoming logs from the VM a chance to arrive
- Try generating log activity on the VM. For example, restart the Java service:
sudo systemctl restart swiftgateway - Make sure the Time range covers the log entries on the VM (for example, select Last 7 days)
- Run the query
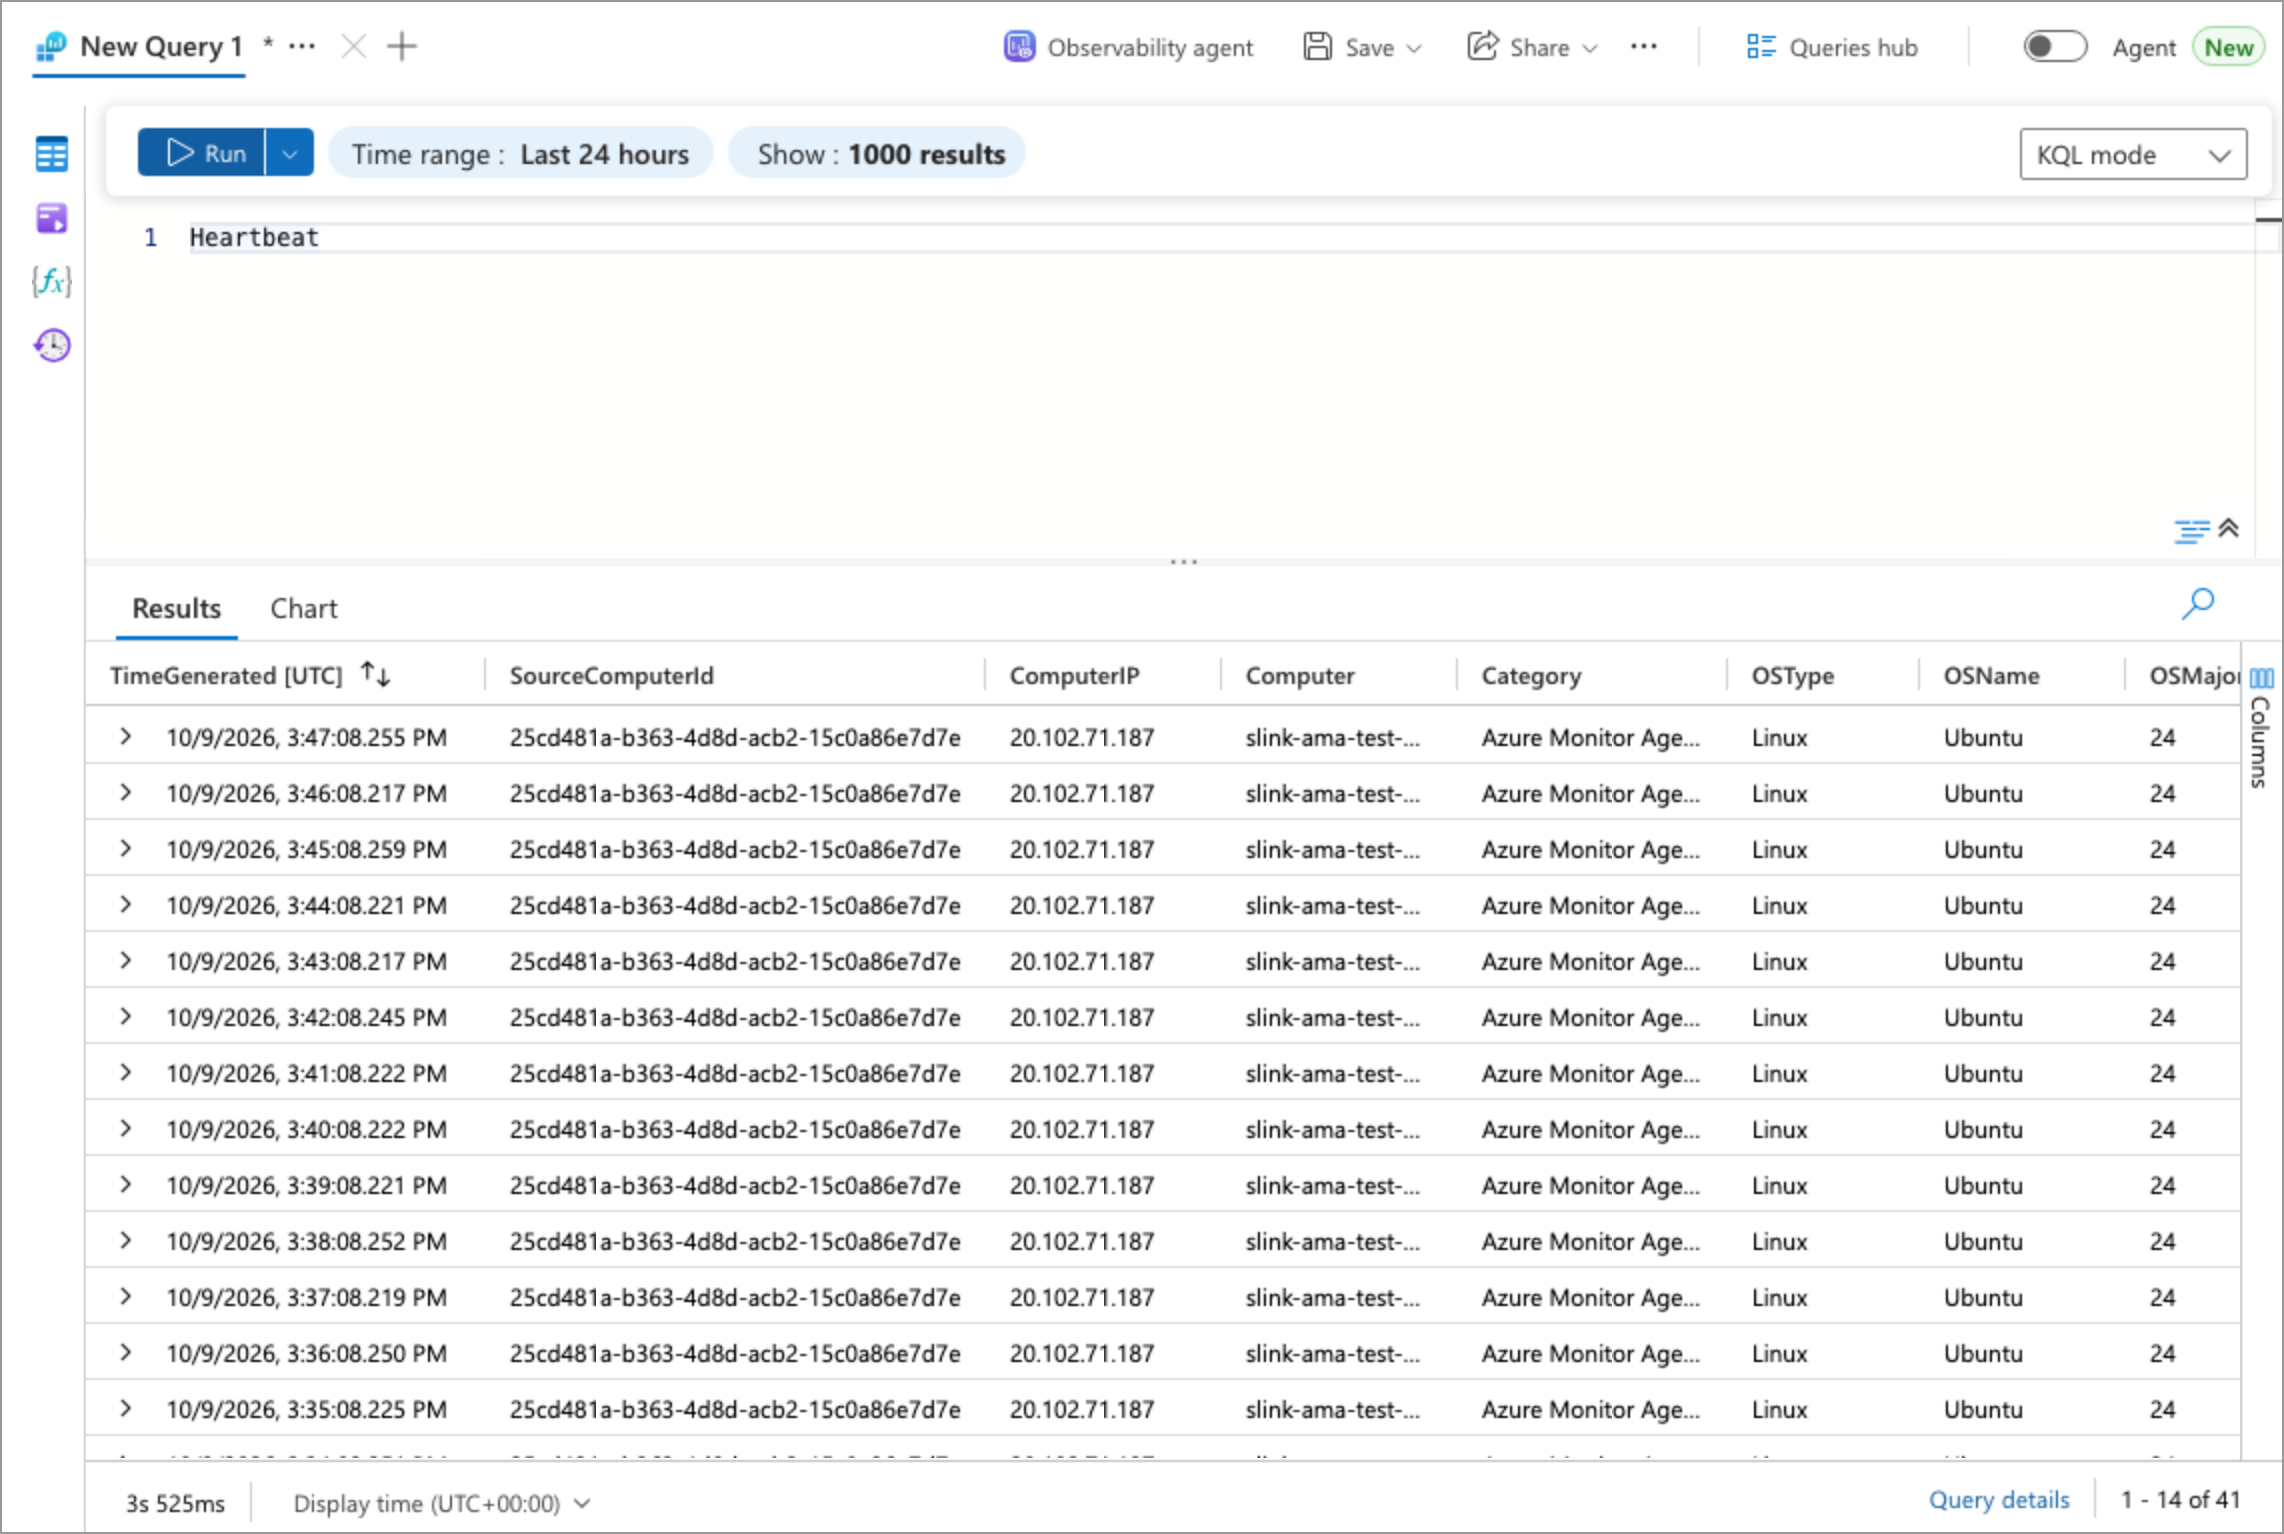
Heartbeat. The agent sends a heartbeat every minute, so recent rows here mean the agent is connected to the workspace.
One table stays empty while the others fill
- Open the DCR for that log and check that its file pattern and table name match the table in Create the Custom Log Tables
- On the VM, check that the log file exists and is growing:
sudo ls -l /opt/swiftgw/log/ StorageLinkLicenseAudit_CLstays empty until a license event occurs. StorageLink versions before 1.3.0 don't write a license audit log.
The Azure Monitor Agent extension is not installing
Try manually installing the AMA software:
az vm extension set --name AzureMonitorLinuxAgent --publisher Microsoft.Azure.Monitor --ids /subscriptions/abc-123/resourceGroups/rob-vm/providers/Microsoft.Compute/virtualMachines/rob-vm --enable-auto-upgrade true
You will need to supply the VM's Resource ID for the --ids parameter.
To get the VM's Resource ID:
Go to the VM's detail page
Under Settings, click Properties
Scroll down, and look for Resource ID