Upgrade Process for StorageLink
Purpose: Upgrade StorageLink by moving your configuration to a new instance with a backup file
Backup (Old Instance): Settings → Backup & Recovery → Export Backup File saves a YAML file of users, folders, cloud connections, identity providers and settings
Restore (New Instance): Use Settings → Backup & Recovery → Import; on a BYOL instance, start the trial or activate a license first
Not in the Backup: Custom application.properties entries, SSL certificates and website.conf, DNS records or a static IP
User Limit (1.3.0+): A Standard (pay-as-you-go) instance is licensed for 10 users, so a larger backup imports only the first 10; deploy from the BYOL listing to keep them all
Recommended: The preferred path from 1.2.1 or earlier to 1.3.1, since the in-place upgrade script leaves the instance unlicensed
Product: StorageLink by Thorn Technologies — cloud storage gateway for secure file sharing
Overview
This article outlines an upgrade process that you can use when upgrading to the latest version of StorageLink. It's important that you test this scenario yourself, so you know what to expect beforehand.
You can also use this as a backup and recovery process that you can use for disaster recovery, or just for making a backup of your StorageLink configuration.
StorageLink 1.3.0 introduced licensing. A new 1.3.1 instance deployed from the Standard (pay-as-you-go) listing is licensed automatically for 10 StorageLink users, with nothing to activate; a new instance from the StorageLink BYOL listing starts with the free 30-day trial and then your purchased license. Either way, your backup file carries your configuration across. The alternative, the in-place upgrade script, leaves the existing instance unlicensed: you start the free 30-day trial, stay at the 10-user default, and must purchase a license when the trial ends. If you have more than 10 users, deploy from the StorageLink BYOL listing instead.
Upgrade Process Details
The upgrade procedure for going to the latest version of StorageLink is a fairly simple process. On the old instance, you would export a yaml backup file containing configuration details such as Folders, Users & Settings. Then, you would import this backup file into the new instance to create the same configuration you had previously.
This way, you can upgrade to the latest version of StorageLink, while maintaining the same configuration.
Backup
There are a few steps you can perform now to prepare for performing a migration to an upgraded version of StorageLink.
Export your users and settings
Go to the web admin portal for StorageLink.
On the Settings page, scroll down to the Backup & Recovery section.
click the Export Backup File button.
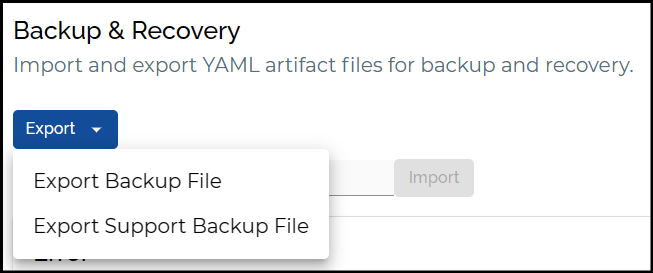
This will download a yaml backup artifact containing your users and settings to your local machine. The backup covers Users (passwords included), Folders, Cloud Connections and their credentials, Identity Providers and Settings.
Note: You may want to export this yaml file on a regular basis.
Not included in the backup — re-apply these on the new instance after the import:
- Custom entries in
/opt/swiftgw/application.properties - Your SSL certificate and the nginx
website.conf(see Install SSL Certificate and LetsEncrypt) - DNS records or a static IP that point at the old instance
Restore
Deploy a new instance of StorageLink.
Starting with StorageLink 1.3.0, an instance launched from the pay-as-you-go marketplace listing is licensed for 10 StorageLink users (administrators are not counted). Marketplace images before 1.3.0 had no user limit.
If your backup contains more than 10 users and you import it into a pay-as-you-go 1.3.x instance, the import completes, the first 10 users are imported, and each remaining user is skipped and reported by name with the message: "User X was not imported: the license user cap (10) has been reached. Contact sales@thorntech.com to raise the limit." Users already on the instance keep working, but you cannot add or replace a user above the limit.
To keep all of your users, deploy the new instance from the StorageLink BYOL (Bring Your Own License) listing instead, activate the free 30-day trial or your purchased license under Settings → License, and then import the backup. See Purchasing a License.
If you deployed a BYOL instance, activate a trial or license before importing: until the instance is licensed, non-administrator users cannot sign in and file transfers stay disabled.
Then, perform the following steps to restore your users and settings.
Import your users and settings
Find the yaml backup artifact, and import it into the Settings ---> Backup & Recovery ---> Import page.
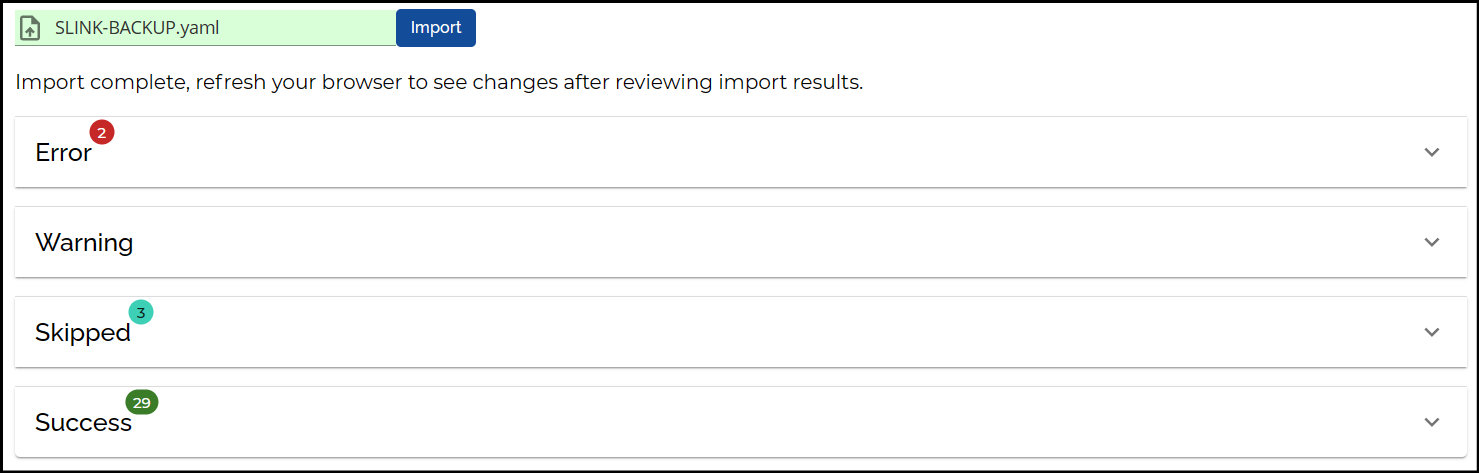
You should see some output on the screen, as your configuration is imported.
The four output categories are:
- Error - Shows error details when certain properties failed to import such as users, folders, etc.
- Warning - Shows warning details for certain properties that may be affected or changed.
- Skipped - Shows properties that have been skipped such as users or settings as they already exist.
- Success - Shows properties which imported successfully with no issues.