
Resetting SSH Credentials
Purpose: Regain SSH access to your StorageLink VM after losing your private key or getting locked out
By Cloud:
- AWS: Stop the instance, add a back-door user and public key via UserData, start it, then delete the UserData
- Azure: Use Reset password on the VM to reset the password or SSH public key, or to add a Linux admin user
- Google Cloud: Edit the VM and add your SSH key under Security and access → SSH Keys
SSH Users: ec2-user (AWS), azureuser or your chosen name (Azure), ubuntu or the user you specified (Google Cloud)
Note (AWS HA): The UserData method is only for single instances with no existing UserData. For an Auto Scaling group, use SSM or contact support@thorntech.com.
Product: StorageLink by Thorn Technologies — cloud storage gateway for secure file sharing
Overview
If you lose SSH access to your StorageLink VM, you can regain access without reinstalling the system. The procedure varies by cloud provider — select your platform below.
- AWS
- Azure
There are a couple of ways you can lock yourself out of your EC2 instance.
- You lose your SSH private key
- The
ec2-usergets corrupted somehow - The
ec2-userpassword expires
Fortunately, there are ways to get back into your EC2 instance. The least invasive approach is to modify the UserData. There's a really good AWS article that describes how to do this. Below, I'll go over the steps you need to do this.
Note: This method is only used for Single Instances that have no UserData content. If you're in an HA setup with an AutoScaling Group, you can use SSM to inject new credentials or contact us at support@thorntech.com for assistance.
Create a back-door user via User Data
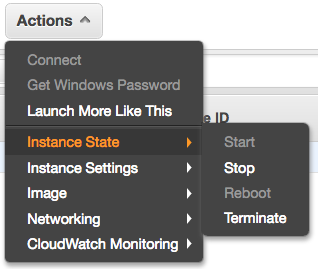
First, you need to stop your EC2 instance. Go to EC2 > Actions > Instance State > Stop
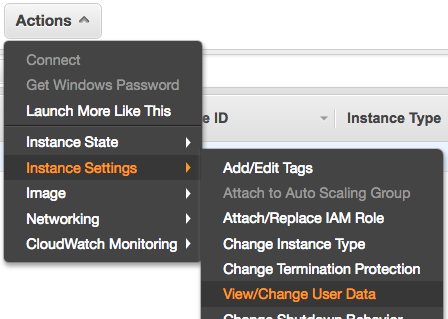
Second, edit the UserData. Go to EC2 > Actions > Instance Settings > View/Change User Data.
Third, paste in the following code snippet (replacing everything that's already there)
Content-Type: multipart/mixed; boundary="//"
MIME-Version: 1.0

--//
Content-Type: text/cloud-config; charset="us-ascii"
MIME-Version: 1.0
Content-Transfer-Encoding: 7bit
Content-Disposition: attachment; filename="cloud-config.txt"

#cloud-config
cloud_final_modules:
- [scripts-user, always]

--//
Content-Type: text/x-shellscript; charset="us-ascii"
MIME-Version: 1.0
Content-Transfer-Encoding: 7bit
Content-Disposition: attachment; filename="userdata.txt"

#!/bin/bash
USER=robtest #1
adduser $USER #2
echo "$USER ALL=(ALL) NOPASSWD:ALL" >> /etc/sudoers.d/cloud-init #3
mkdir /home/$USER/.ssh #4
echo "ssh-rsa AAAAB3NzaC1yc2EAAA....A38MHe0KAzY9Ob private.key" >> /home/$USER/.ssh/authorized_keys #5
--//
UserData gets called once on first launch. The first 20 lines of code forces the EC2 instance to run the bash script at the bottom for every launch.
This is what the bash script is doing:
- You're creating a user named
robtest. Be sure to replace this with a username of your choice. - You create a regular Linux user (this is not a StorageLink Web User)
- You grant this user sudo access, just like how
ec2-userhas sudo access - Create a
.sshdirectory. This needs to exist before you can create theauthorized_keysfile - You append a public key to
/home/robtest/.ssh/authorized_keys. Make sure you replace the contents of the public key.
To generate a public key, run the following command on your local Mac:
ssh-keygen -t rsa -C private.key -f private.key -q -N ""
This generates two files:
private.key: You'll use this tossh -iinto the instance momentarily. (Be sure tochmod 600it)private.key.pub: This is the public key, whose contents you paste into the bash script above.
Finally, hit Save.
Start your EC2 instance again: Go to EC2 > Actions > Instance State > Start
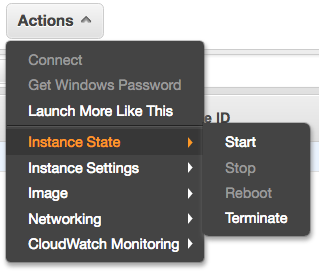
If all goes well, you should be able to SSH using your new username.
Cleanup
If everything is working, make sure you delete your UserData so that it doesn't keep running on subsequent launches. Like before, you'll have to stop your instance in order to make the change.
If for some reason you cannot SSH into your VM using your Linux admin user (e.g. azureuser), you can reset your credentials via the Azure Portal.
Reset your credentials with the Reset Password tool
The Reset Password tool in the Azure Portal lets you update the credentials of Linux admin users, as well as create new users.
Under the VM details page, go to Reset password.
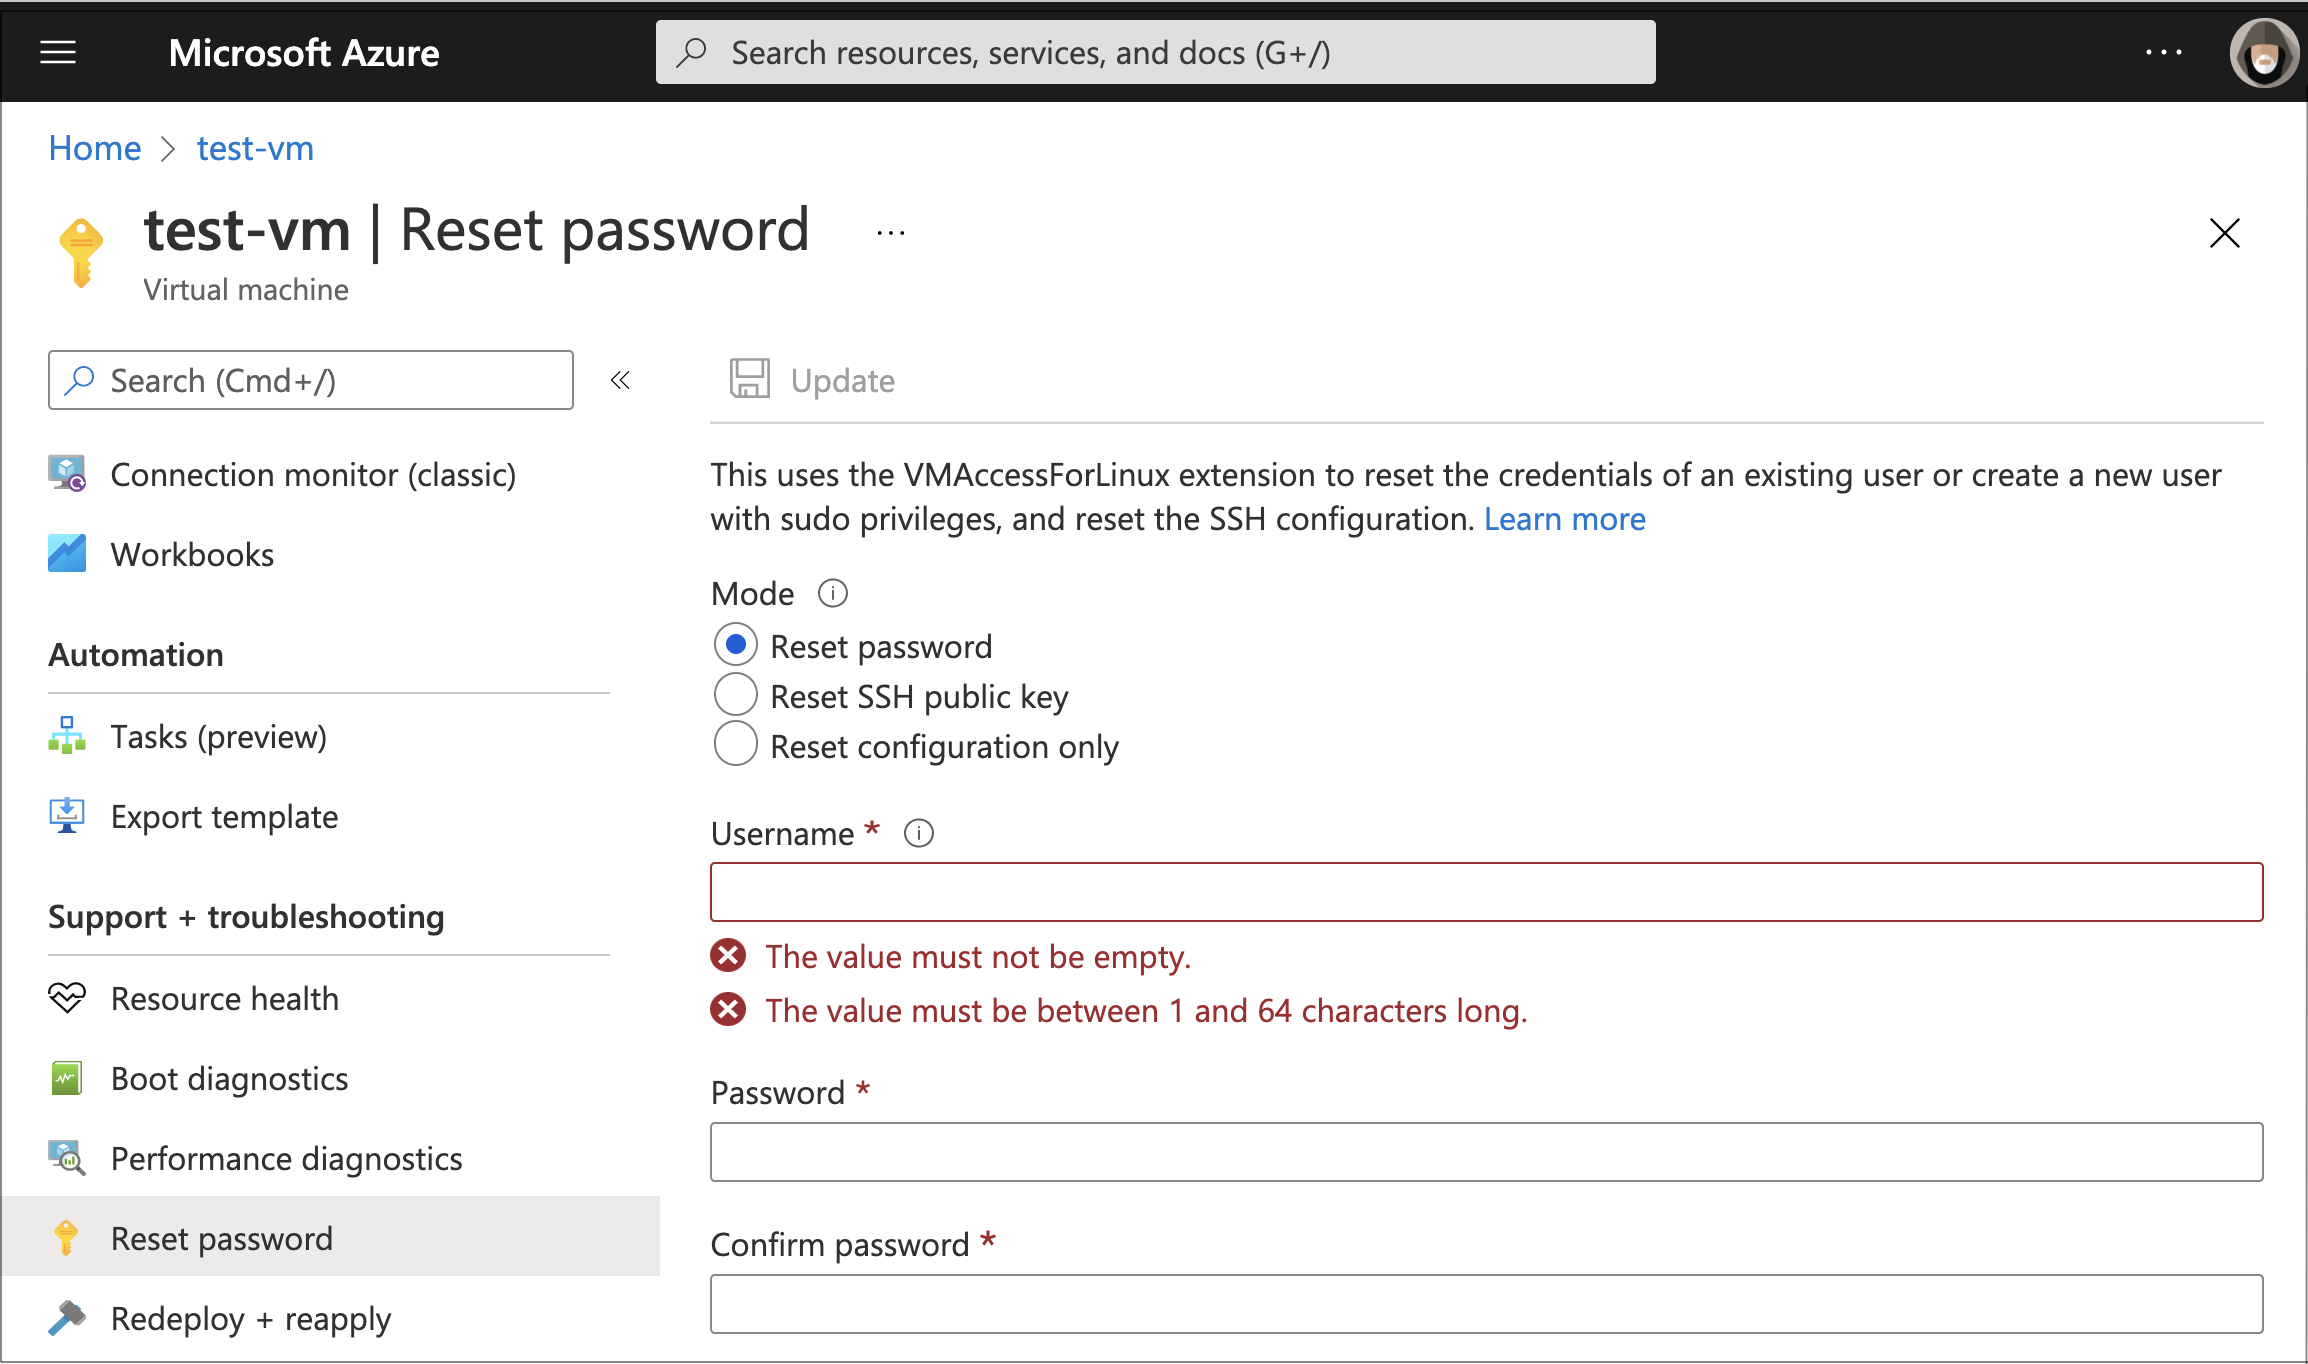
This page gives you the option to reset your password or SSH public key.
You can also create a new Linux admin user, as long as you specify a new username.
When you deploy StorageLink via the Google Cloud Marketplace you are unable to specify SSH credentials.
This article covers how to add SSH credentials to your VM, as well as the multiple ways you can connect to your VM using SSH.
Note: StorageLink uses port 22 for the SSH protocol.
Manually Add an SSH Key to the VM
To add your own SSH key to the VM, navigate to the instance in the Google Cloud Console.
Click into the VM Details page, and then click the Edit button at the top.
Under the Security and access section, you will see a subsection labeled SSH Keys.
To add your SSH key, click + Add Item and paste in your SSH key value.
To specify the Linux Admin Username, add a value after the SSH key. It would look something like this:
ssh-rsa AAAAB.... Bryce
Click the Save button at the bottom and your key should now be added to the VM.
Video Reference
SSH Connect
Another way to connect to the VM via SSH is using the SSH connect feature. However, for this to work you will need to add a Google IP address into your port 22 firewall rule.
Using the top search-bar, navigate to the Firewall service.
Under the VPC firewall rules, search for the name of your Virtual Machine along with the tcp-22 rule.
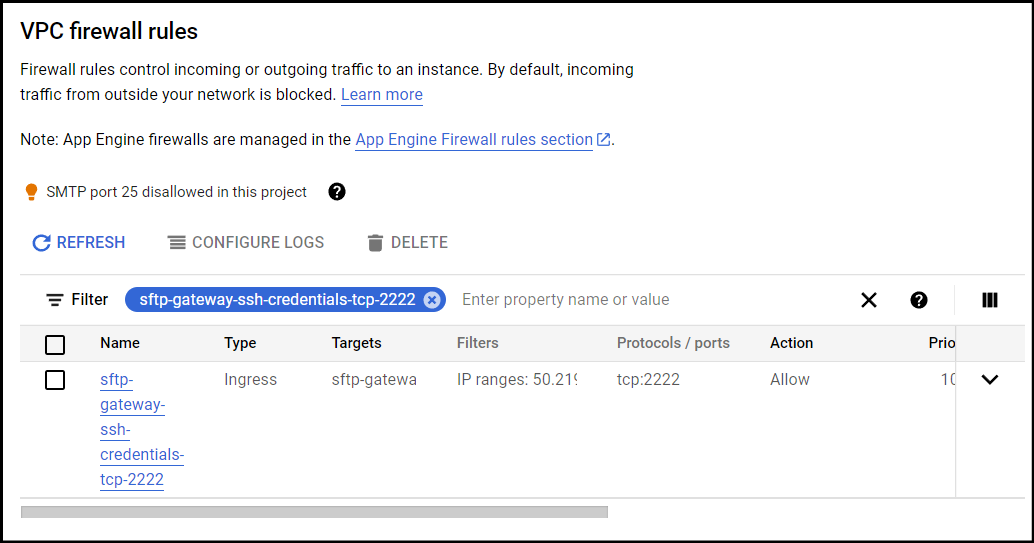
Click into the firewall rule and then click the Edit button at the top.
Under the Source IPv4 ranges section, add this ip address, 35.235.240.0/20.
This is a Google IP address that allows you to SSH into your VM via SSH connect.
Once you have saved the changes to your firewall rule, go to your VM and under the details tab, go to SSH -> Open in browser window on custom port.
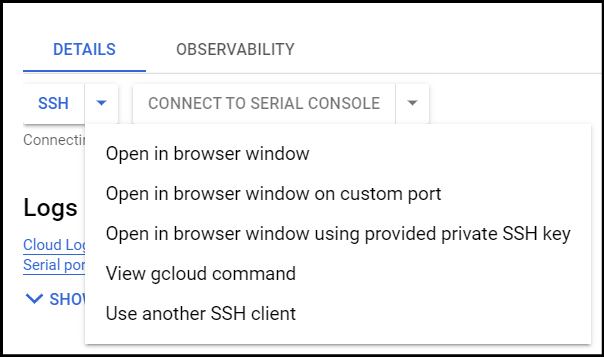
When prompted for the custom port, use port 22. You should now be connected to the VM.
Connect using the Terminal
Use the following command to SSH into the VM:
ssh -i private.key ubuntu@<ip-address> -p 22
Replace ubuntu with the Linux admin user you specified when provisioning the SSH credentials.
Note: You will be prompted to accept the server host key on first connection. The server host key is cached on your client machine, based the hostname and port.
SCP
When using SCP (which uses SSH behind the scenes), you will also need to specify port 22:
scp -P 22 local-file.tar.gz ubuntu@<ip-address>:/home/ubuntu/
Replace ubuntu with the Linux admin user you specified when provisioning the SSH credentials.
PuTTY (Windows)
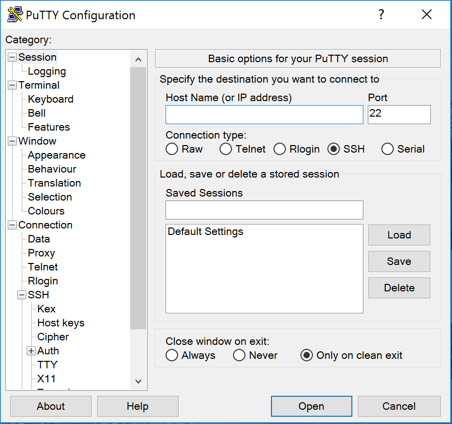
- Open PuTTY and select SSH as the connection type.
- In the Host Name field, enter
username@<public-ip> - In the Port field, leave it set to
22(the default). - Expand the SSH section on the left, and click on Auth.
- Click on Browse to browse for the
.ppkkey, and click Open when you have selected it. - To launch the SSH session, click Open.