
SSL Termination with Azure Application Gateway
Purpose: Terminate SSL at an Azure Application Gateway instead of on the StorageLink VM
Requirements: A .pfx SSL certificate, and a gateway subnet in the VM's VNet (not the VM's subnet)
Steps:
- Create a Standard V2 gateway: public frontend IP, HTTPS listener (443) with your .pfx, backend pool with your VM
- Route to the VM over HTTP port 80 and allow port 80 from the gateway subnet in the VM's NSG
- Point your DNS A record at the gateway's frontend public IP
- Back up
/etc/nginx/sites-available/website.conf, replace it with the HTTP-only config and restart nginx - Add the gateway subnet to
security.client-ip.trusted-proxiesin/opt/swiftgw/application.properties(keep the loopback entries) and restartswiftgateway
Important: Until step 5, 1.3.0 records every user under the gateway's address. Behind Application Gateway, 1.3.0 failed-login lockout does not accumulate.
Product: StorageLink by Thorn Technologies — cloud storage gateway for secure file sharing
This guide walks you through terminating SSL via an Application Gateway and assumes you have your SSL certificate file (.pfx format) available on your local machine.
In this example, I have configured an SSL cert (bryce-gcp-oauth) for my domain:
bryce-gcp-oauth.sftpgw.cloud
The first step of the process is to create your Application Gateway.
Creating the Application Gateway
Step 1: Basic Configuration
- Navigate to Application gateways in the Azure Portal
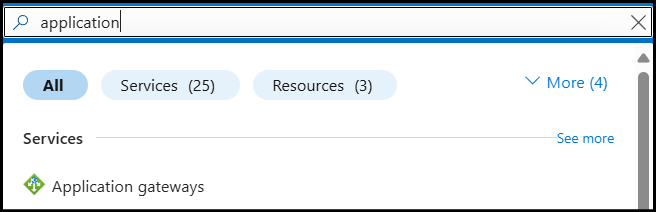
- Once inside the service, click Create
- Configure the Basics tab:
- Subscription: Select your subscription
- Resource group: Select existing or create new
- Application gateway name:
storagelink-app-gateway - Region: Same region as your VM
- Tier: Standard V2 (recommended)
- Enable autoscaling: Yes
- Minimum instance count: 1 (never set to 0)
- Maximum instance count: 2-10 based on expected load
- HTTP2: Enabled
- Virtual network: Select the same VNet as your VM
- Subnet: Select existing subnet
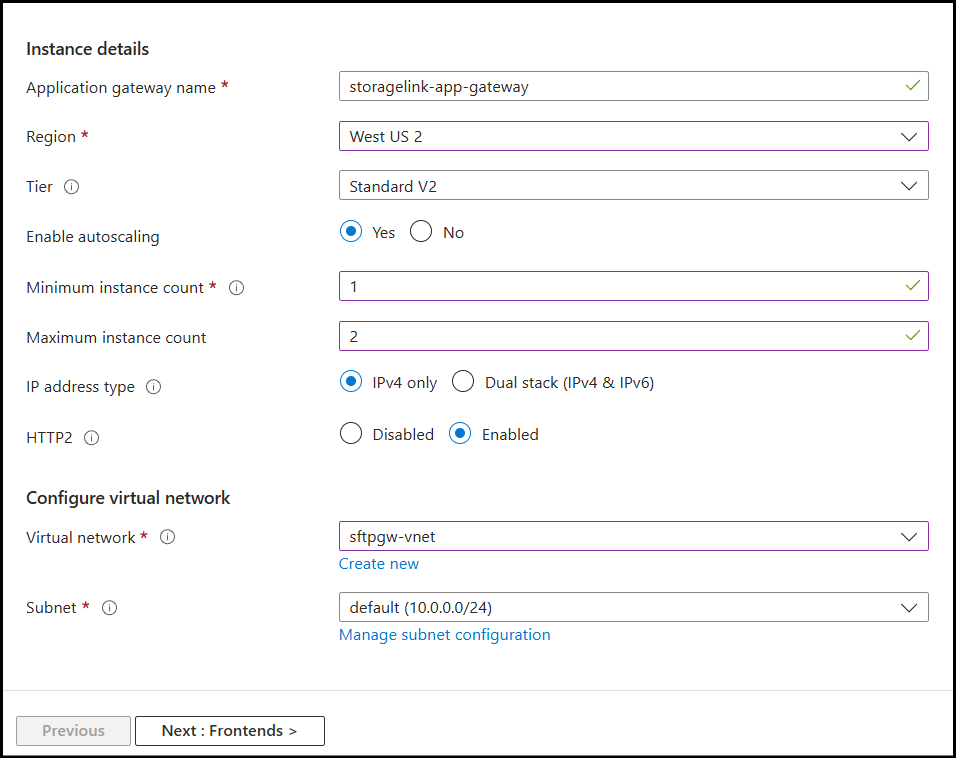
The Application Gateway subnet has to be different from your VM's subnet, but they must be in the same VNet.
Step 2: Frontend Configuration
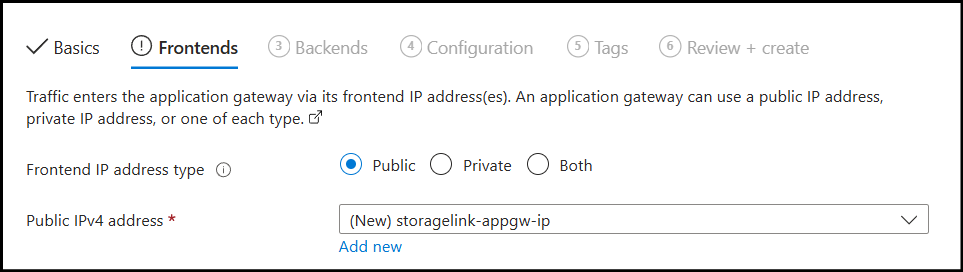
- Configure Frontends tab:
- Frontend IP address type: Public
- Public IP address: Create new
- Public IP name:
storagelink-appgw-ip
Step 3: Add Backend Pool
- Navigate to the Backends tab
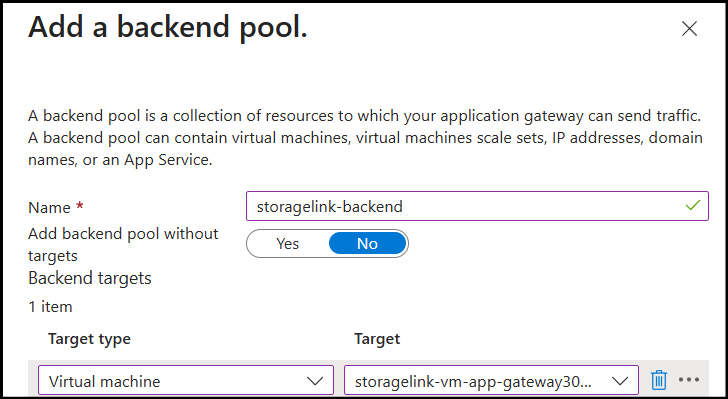
- Click Add a backend pool
- Configure:
- Name:
storagelink-backend - Add backend pool without targets: No
- Target type: Virtual Machine
- Target: Select your VM from the list
- Name:
- Click Add
Step 4: Create HTTPS Routing Rule
- Navigate to the Configuration tab
- Click Add a routing rule
- Configure basic settings:
- Rule name:
https-rule - Priority: 100
- Rule name:
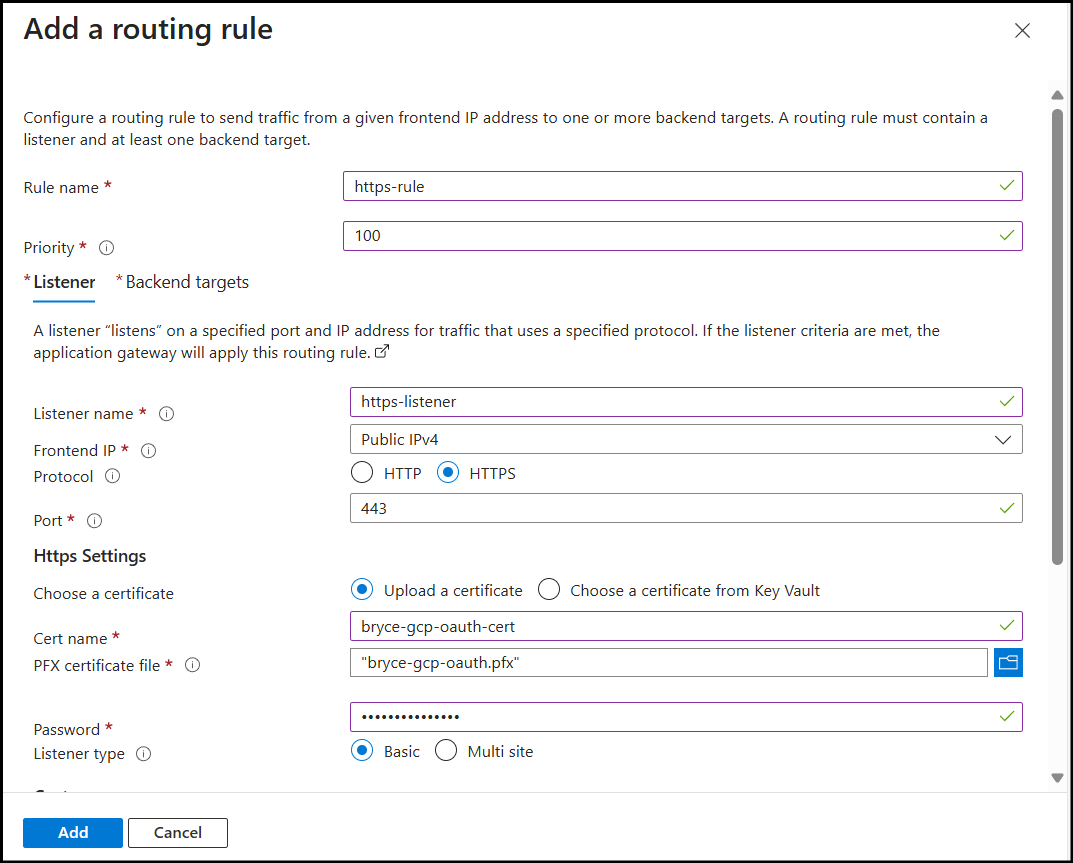
Step 5: Configure HTTPS Listener
On the Listener tab:
- Listener name:
https-listener - Frontend IP: Public
- Protocol: HTTPS
- Port: 443
- Listener type: Basic
- Error page url: Leave blank
- Listener name:
Certificate configuration:
- Choose a certificate: Upload a certificate
- Cert name: Enter a descriptive name
- PFX certificate file: Browse and select your .pfx file
- Password: Enter the certificate password
Step 6: Configure Backend Targets
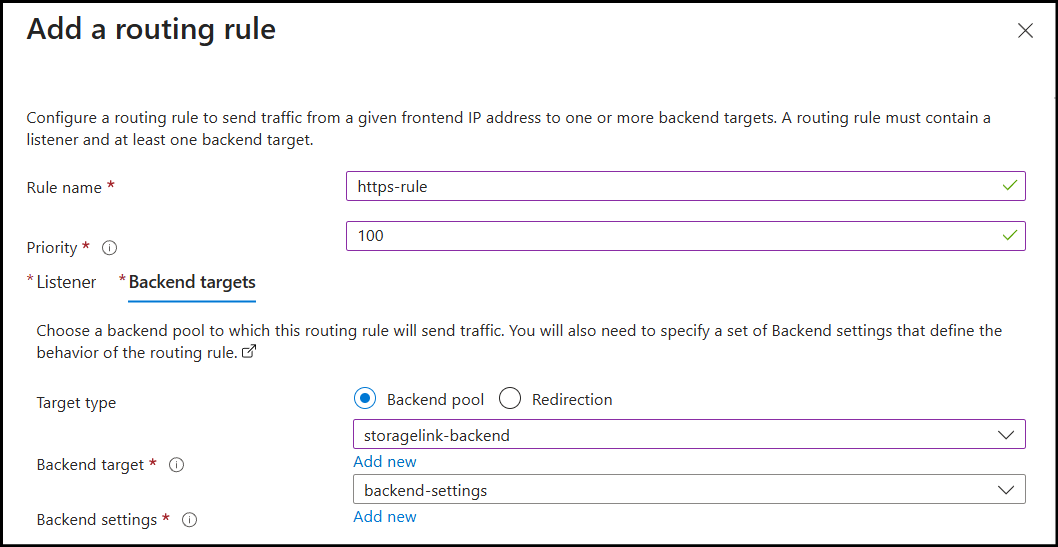
- Navigate to the Backend targets tab:
- Target type: Backend pool
- Backend target: Select
storagelink-backend - Backend settings: Create new
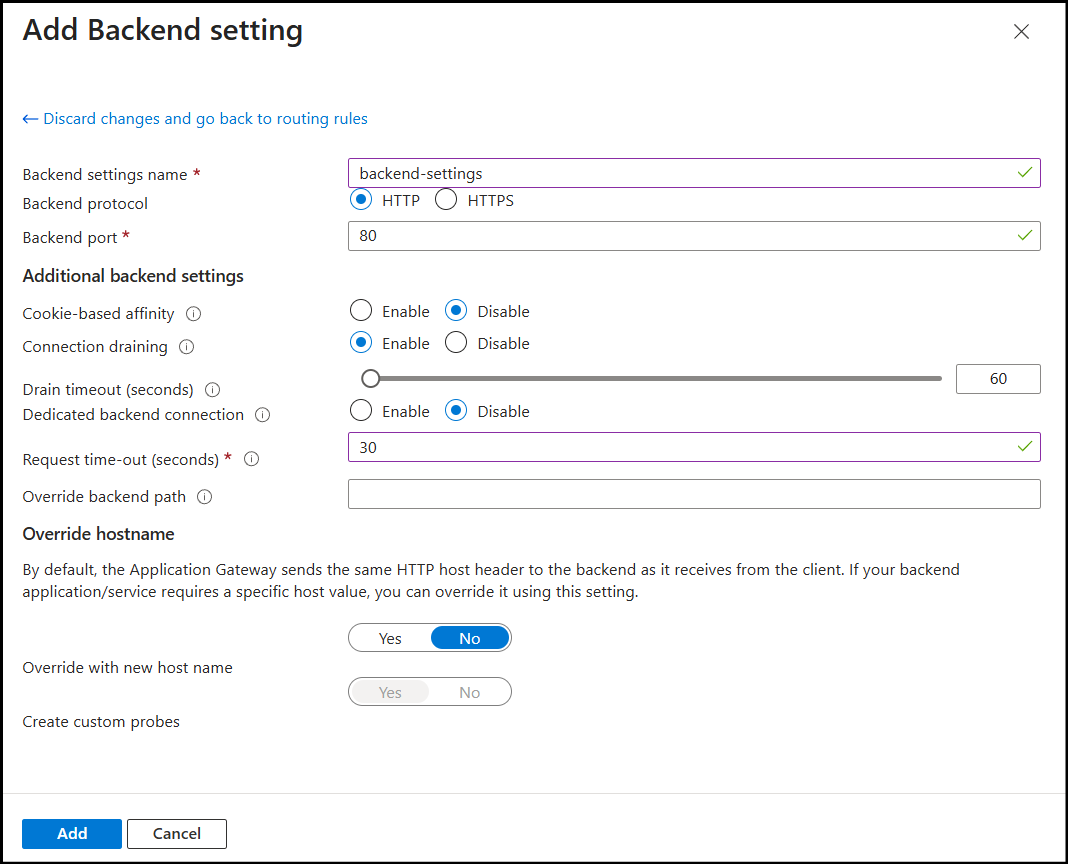
- Create Backend Settings:
- Backend settings name:
backend-settings - Backend protocol: HTTP
- Backend port: 80
- Cookie-based affinity: Disabled
- Connection draining: Enabled
- Request timeout (seconds): 30
- Override with new host name: No
- Backend settings name:
- Click Add to save the backend settings
- Click Add to save the routing rule
These are all the required steps, so we can proceed with the application gateway creation.
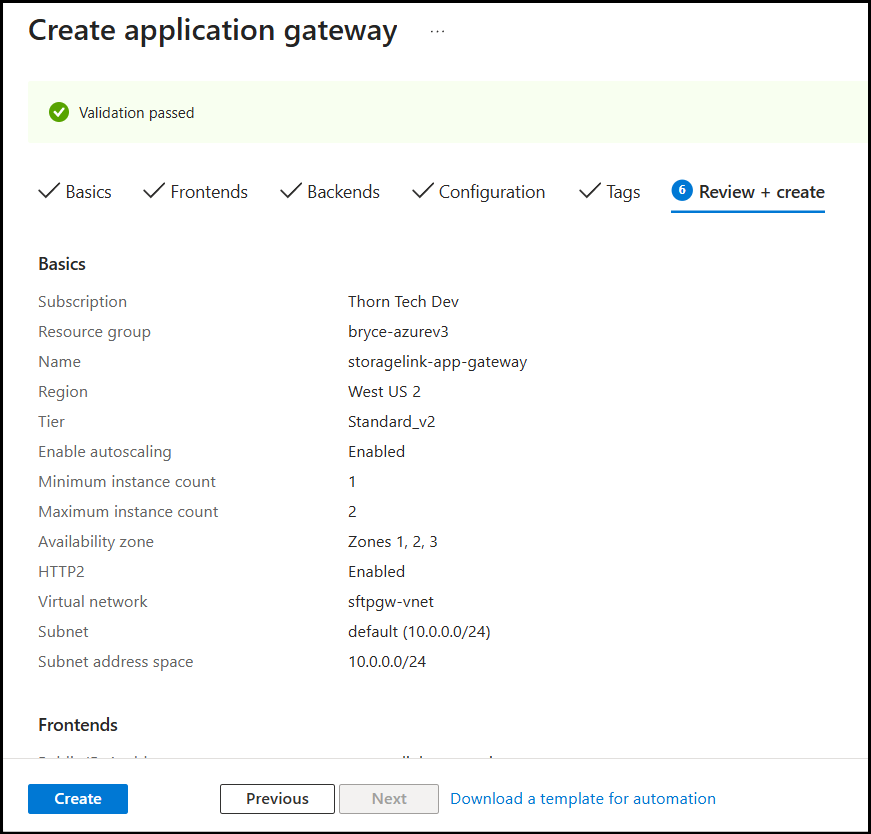
Step 7: Review and Deploy
Once validation has passed, create your gateway.
Since your Application Gateway is in a different subnet than your VM, create an inbound port 80 rule on the NSG of the VM to the subnet the gateway is located inside of (e.g., 10.0.1.0/24).
Step 8: Configure DNS
Get the Application Gateway Public IP.
- Navigate to your Application Gateway → Overview
- Note the Frontend public IP address
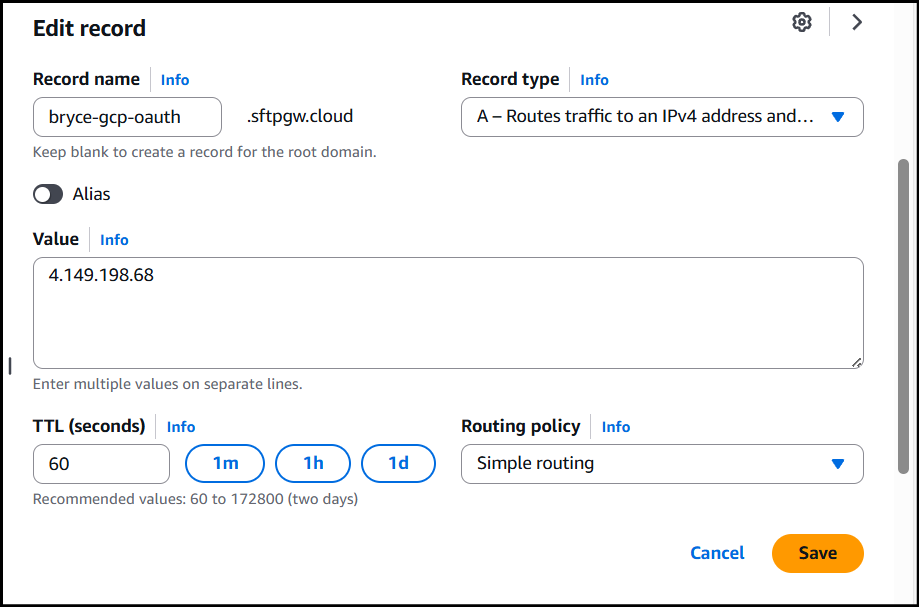
Update DNS Records.
- Access your DNS management console
- Locate the A record for your domain
- Update the record:
- Save the DNS record
- Wait 5-15 minutes for DNS propagation
Afterwards, when you navigate to the hostname, you should see you have a valid SSL cert configured.
Step 9: Update Nginx
However, this isn't the last step. Now that the Application Gateway terminates SSL, everything arrives at nginx on HTTP, even HTTPS requests. Since the Application Gateway handles HTTPS, configure nginx to always serve the admin UI on HTTP.
SSH into the instance (Use the Instance IP, not the App Gateway IP) and edit the nginx conf file:
vi /etc/nginx/sites-available/website.conf
You should make a copy of your current website.conf before modifying it though:
sudo cp /etc/nginx/sites-available/website.conf /etc/nginx/sites-available/website.conf.backup
Replace the content of the entire file, to handle only HTTP requests:
server {
  listen 80;
  listen [::]:80;
  server_name _;

  location /backend/ {
    client_max_body_size 5000000M;
    rewrite  ^  $request_uri;
    rewrite  ^/backend(/.*) $1 break;
    return 400;
    proxy_request_buffering off;
    proxy_pass    http://127.0.0.1:8080$uri;
    add_header 'Cache-Control' 'no-store, no-cache, must-revalidate, proxy-revalidate, max-age=0';
    expires off;
    proxy_set_header X-Client-IP $proxy_add_x_forwarded_for;
    proxy_set_header X-Real-IP $remote_addr;
    proxy_set_header X-Forwarded-For $proxy_add_x_forwarded_for;
    proxy_set_header X-Forwarded-Host $host;
    proxy_set_header X-Forwarded-Server $host;
    proxy_set_header X-Forwarded-Port 443;
    proxy_set_header X-Forwarded-Proto https;  # Force HTTPS
    proxy_set_header X-Original-URI $request_uri;
    proxy_read_timeout 3600;
    proxy_http_version 1.1;
    proxy_set_header Connection "";
  }

  location / {
    root /usr/share/nginx/admin-ui/;
    try_files $uri $uri/ /index.html?$args;
  }

  index index.html;
}
You can then restart Nginx with this command:
nginx -t && service nginx restart
Afterwards, when you navigate to your hostname, you should see the Sign in page. You may need to clear your browser cache or navigate to the site on a private browser to see the updated changes.
Step 10: Register the Application Gateway as a trusted proxy
Starting with StorageLink 1.3.0, the client address written to audit records and used for login lockout is resolved from the X-Forwarded-For header, walking it from the right and stopping at the first hop that is not a trusted proxy. Only loopback (127.0.0.0/8,::1/128) is trusted by default. Until you add the Application Gateway, nothing fails and no error is shown, but every user is recorded under the gateway's own address.
Register the Application Gateway subnet CIDR (the subnet you selected in Step 1, for example 10.0.1.0/24) as a trusted proxy. SSH into the VM and add the following line to /opt/swiftgw/application.properties (see Editing Files on Linux). Use CIDR ranges or bare IP addresses separated by commas; DNS names are not accepted.
security.client-ip.trusted-proxies=127.0.0.0/8,::1/128,10.0.1.0/24
Keep the two loopback entries: nginx on the VM forwards requests to StorageLink over loopback, so it must stay trusted.
Then restart the service:
sudo systemctl restart swiftgateway
Automated 1.3.0 deployments, such as the high-availability templates, set the same list through LOAD_BALANCER_ADDRESSES in the launch configuration (/opt/swiftgw/launch_config.env) before first boot.
To verify, sign in as an administrator and look at the top navigation bar: it shows Seen as <address>, the client address your own session resolved to. It should be your public IP, not an address from the gateway subnet.
Azure Application Gateway forwards the client address with a source port attached (for example 203.0.113.10:51234), and the port changes on every request. In StorageLink 1.3.0 this means the failed-login lockout does not accumulate behind Application Gateway, and audit records carry the port alongside the address, which also prevents a SIEM from correlating events by client IP. Other load balancers, including AWS ALB and Cloudflare, forward a plain address and are unaffected. Handling the ported form is planned for a later release.