Enabling FTPS using vsftp
Warning: using FTPS with the recent versions of SFTP Gateway 1.x and 2.x could result in truncated files. We recommend using SFTP instead of FTPS, or using md5 validation.
By default SFTP Gateway uses SFTP, which leverages OpenSSH. FTPS is not configured by default, because it requires that you expose additional ports.
However, there are some situations where you might need FTPS:
- Legacy clients that only support FTPS
- FTPS supports X509 SSL certificates, which may be a requirement for securely identifying the server
Here are instructions on how to install and configure vsftp on SFTP Gateway to add FTPS functionality. It also covers how to add an SSL certificate.
Installation
Elevate privileges to root:
sudo su
Install vsftp with this command:
yum install vsftpd -y
Create certificates
As a preparatory step, you need to first create a self-signed certificate. This is to encrypt your FTPS traffic.
Run the following commands:
mkdir /etc/ssl/private/ && cd $_
openssl req -x509 -nodes -days 365 -newkey rsa:2048 -keyout vsftpd.key -out vsftpd.crt -subj "/C=NA/ST=NA/L=NA/O=NA/OU=NA/CN=NA"
(Feel free to put in real values for your state, locality, organization, etc.)
This creates a directory /etc/ssl/private/
And then it creates two files:
vsftpd.crt: This is your SSL certificatevsftpd.key: This is the private key
Eventually, you want to use a real SSL certificate, but for now, a self-signed cert will do.
Configure vsftp
Edit /etc/vsftpd/vsftpd.conf
On line 12, change anonymous_enable from YES to NO:
anonymous_enable=NO
On line 96, uncomment the following line:
chroot_local_user=YES
Append the following to the end of the vsftpd.conf file:
rsa_cert_file=/etc/ssl/private/vsftpd.crt
rsa_private_key_file=/etc/ssl/private/vsftpd.key
ssl_enable=YES
allow_anon_ssl=NO
force_local_data_ssl=NO
force_local_logins_ssl=NO
ssl_tlsv1=YES
ssl_sslv2=NO
ssl_sslv3=NO
require_ssl_reuse=NO
ssl_ciphers=HIGH

user_sub_token=$USER
local_root=/home/$USER/home/$USER

pasv_enable=YES
pasv_min_port=1024
pasv_max_port=1048
pasv_address=<Public IP of your instance>
Note: remember to set the last line (pasv_address) to your Elastic IP
The first section configures SSL.
The second section sets the chroot directory.
And the third section configures your IP and ports.
Restart the service to apply your changes:
/etc/init.d/vsftpd restart
Make sure vsftpd runs after a reboot:
chkconfig vsftpd on
Configure your Security Group
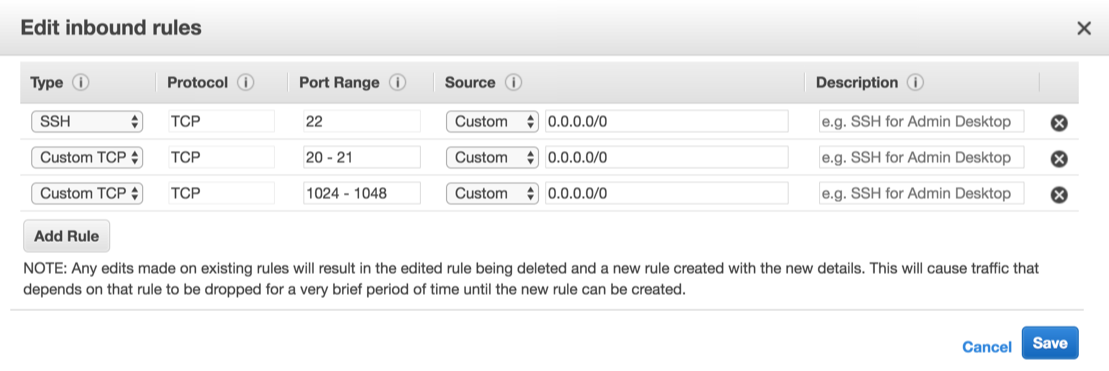
FTPS requires several ports, so you'll have to open them up on your EC2 Security Group.
- In CloudFormation, click the Resources tab
- Click the link next to
SFTPGatewayInstanceto open the EC2 instance details - At the bottom, click the link next to Security groups
- Click the Inbound tab
- Click Edit
- Add a rule for Custom TCP, Port range 20-21, from Source Anywhere
- Add a rule for Custom TCP, Port range 1024-1048, from Source Anywhere
- Click Save

Integrate with SFTP Gateway
There are a few steps in order to get vsftp working with SFTP Gateway.
Create a new user:
addsftpuser robtest
Set a password for this user:
passwd robtest
The addsftpuser command disable's the user's shell for security reasons. You need to re-enable the user's shell in
order to use FTPS:
usermod -s /bin/bash robtest
Connecting an FTPS client
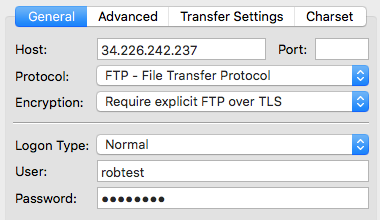
To test, connect using FileZilla.
- Protocol: Select
FTP - File Transfer Protocol - Encryption: Select
Require explicit FTP over TLS
Log in with your username and password.

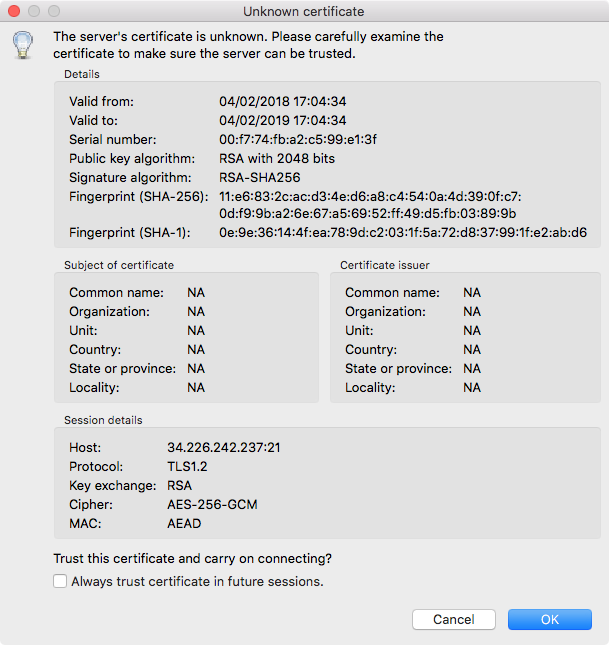
Since you're using a self-signed certificate, you will be prompted with this window. Click OK to proceed.

If all goes well, you should see your /uploads and /local/ folders.
Where to go from here
For more details on installing vsftp, check out this Stack Overflow article.
For more on configuring SSL for vsftp, see this article.