WinSCP Setup
Setup using the AWS CloudFormation template is recommended (see Links section below). If the SFTP Gateway was setup
using a single AMI only, then certain AWS resources must be configured after first launching the instance. Log into the
SFTP Gateway server using SSH as the ec2-user user with the key you selected when launching the instance.
ssh -i MyPrivateKey.pem ec2-user@<public ip>
Once logged in, run the following command to setup the S3 bucket and other necessary properties:
sudo sftpgatewaysetup. The EC2 instance that is launched
must have an IAM Role that has AmazonS3FullAccess permission for proper setup.
The AMI comes preloaded with administration commands to add and delete users.
From the primary ec2-user user account, run the following command to add a new user: sudo addsftpuser <username>.
Running this command will do the following things:
- Create the new Linux user
- Disable the users login shell so they can only SFTP and not SSH to the server
- Setup the appropriate home directory for SFTP
- Create user's new SSH key and email the key to a chosen address
Uploads will only occur within the user's upload directory.
Users can be deleted by running the following command from the primary ec2-user account
sudo deletesftpuser <username>. The user's account, their SSH key, and their home directory along with everything in
it, will be deleted. Be sure to backup the home directory before running this command if you want to keep the files.
Key-based login with WinSCP
When establishing an SFTP connection, you'll still use the hostname and username fields. The main difference is that you use a key instead of a password.
- Look for the email sent by the EC2 instance.
- Copy the contents (including the
---BEGINand---ENDheaders) into a new notepad file namedprivate.txt. - In WinSCP, fill in the
Host nameandUser namefields as usual. - Leave the
Passwordfield blank. - Click on
Advanced...>SSH>Authentication. - For the
Private key file, change the drop-down toAll Files (*.*), and open theprivate.txtfile you created earlier. - Click
Open - You should see a pop up that says
Do you want to convert this OpenSSH private key to PuTTY format? - Click
OKand thenSave. This will generate a.ppkformatted key.
You should be able to connect using your private key.
Disable the resume/transfer setting of WinSCP
Prior to version 1.003.2 of SFTP Gateway, WinSCP users would experience an issue with files getting stuck in the
uploads directory. This is a result of the resume/transfer feature of WinSCP and the way it uploaded large files. This
issue was resolved in 1.003.2, by including the ability to exclude the .filepart place holder that is uploaded to the
server for WinSCP to stream bits to. Get more information about the file exclusion feature of SFTP Gateway,
here.
Certain FTP clients try to be helpful by adding features like file resume. However, this interferes with SFTPGateway's ability to upload files to S3.
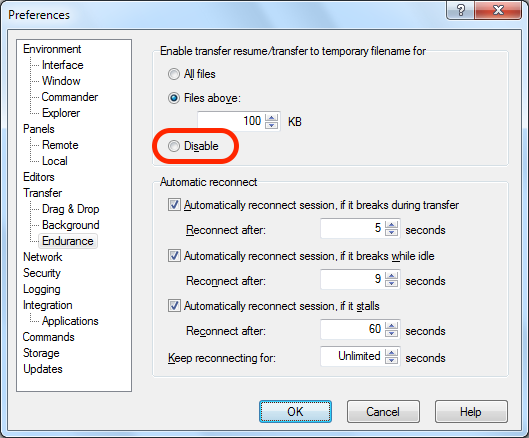
If you're using WinSCP, make sure you disable the resume/transfer setting.
Under Options > Preferences, go to Transfer > Endurance > Enable transfer resume/transfer to temporary filename for > (choose the Disable radio button)
