Azure File Storage Mount
Discover the simple, secure, and affordable way to give SFTP users access to cloud storage locations. Get a 30-day free trial of SFTP Gateway. No credit card or commitment is required.
Overview
You can mount an Azure File Storage file share on your SFTP Gateway VM for Azure. Uploaded files will be saved to the file share, rather than the Linux volume. You can then mount this same file share on a Windows machine.
By default, an SFTP user is configured with a local folder, which is just a regular folder on the local Linux
volume. The SFTP user has read-write access to this local folder.
In this article, you are going to mount an Azure File Storage file share onto this local folder. The SFTP user will
still have read-write access. However, the files will be physically stored on the file share instead.
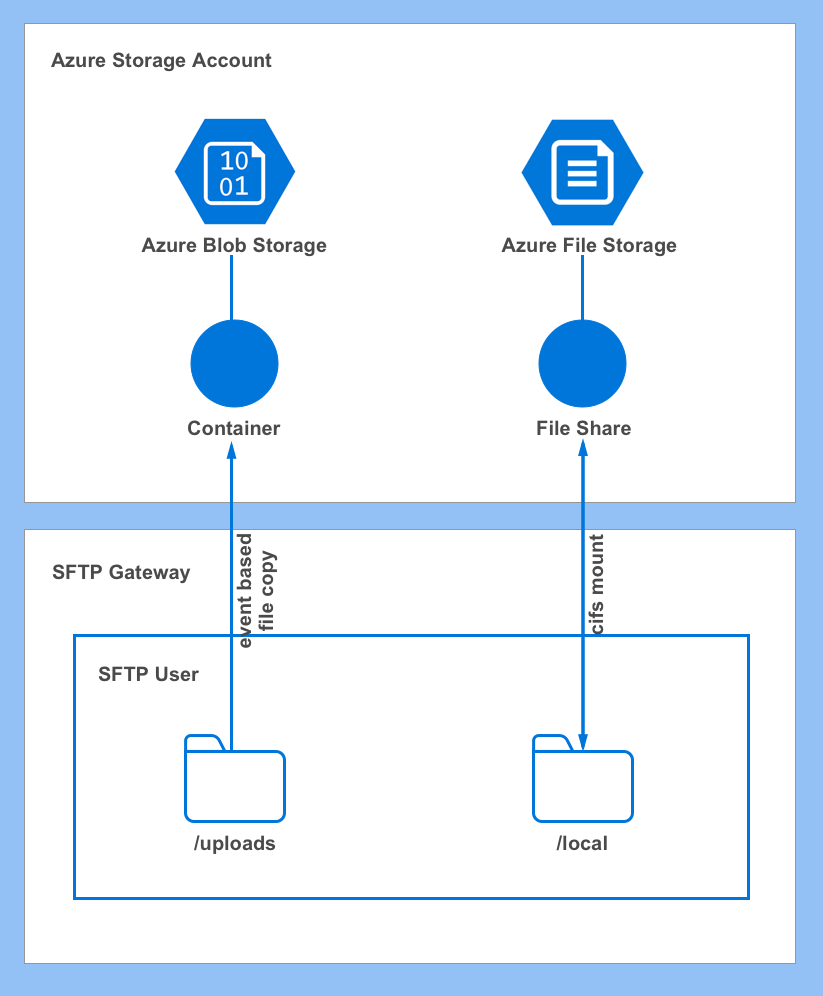
The diagram below shows that:
- The
uploadsdirectory uses file events to move files to Blob - A file share is mounted onto the
localdirectory.

Create a File Share
If you don't already have an Azure File Storage file share, the first step is to create one.
- In the Azure Portal, go to Storage Accounts, and select a Storage Account
- Click on File Shares
- Click the plus button next to File Share
- Specify a Name
- Click Create

Gather some information
Once you have a file share, you can proceed.
Collect the following information and keep it handy:
- File Share name
- Storage Account name
- Access Key
The Access Key grants us permission to mount the file share.
To get the Access Key, go to Storage Account > Access keys > key1 and copy the value of the Key.
Create a Credential File
Before you mount anything, it's helpful to first create a credential file. Each subsequent mount operation will use this credential file in order to access Azure File Storage.
SSH into the server and run the following commands:
sudo su
cd /usr/local/bin
touch create-credential-file.sh
chmod +x create-credential-file.sh
This creates an empty bash script /usr/local/bin/create-credential-file.sh
Next, paste the following contents into the script:
#!/bin/bash

while [[ $# -gt 0 ]]; do
  key="$1"
  case $key in
    help)
      usage
      shift
      shift
      ;;
    --storage-account-name)
      STORAGE_ACCOUNT_NAME="$2"
      shift # past argument
      shift # past value
      ;;
    --storage-account-access-key)
      STORAGE_ACCOUNT_ACCESS_KEY="$2"
      shift # past argument
      shift # past value
      ;;
  esac
done

function usage {
    echo "Usage: $0 --storage-account-name <storage account name> --storage-account-access-key <key 1>"
    exit 0
}

if [[ -z ${STORAGE_ACCOUNT_NAME} || -z ${STORAGE_ACCOUNT_ACCESS_KEY} ]]; then
    usage
fi

CRED_FOLDER=/etc/smbcredentials
CRED_FILE=${CRED_FOLDER}/${STORAGE_ACCOUNT_NAME}.cred

if [ ! -d "${CRED_FOLDER}" ]; then
  sudo mkdir ${CRED_FOLDER}
fi

if [ ! -f "${CRED_FILE}" ]; then
  sudo bash -c "echo \"username=${STORAGE_ACCOUNT_NAME}\" >> ${CRED_FILE}"
  sudo bash -c "echo \"password=${STORAGE_ACCOUNT_ACCESS_KEY}\" >> ${CRED_FILE}"
fi
sudo chmod 600 ${CRED_FILE}
This bash script generates a credential file based on the parameters you pass in.
Finally, run the script:
/usr/local/bin/create-credential-file.sh        \
  --storage-account-name <storage account name> \
  --storage-account-access-key <access key>
If successful, you should see a credential file in the following location:
/etc/smbcredentials/<storage-account-name>.cred
This file contains the following contents:
username=<storage account name>
password=<storage account access key>
Mount a File Share for each SFTP User
In this section, you will create a bash script that will mount a file share on a per-user basis.
Specifically, it will create the folder /<username>/local/ within Azure File Storage.
Then, it will mount the file share onto the SFTP user's /local directory.
Run the following commands:
sudo su
cd /usr/local/bin
touch configure-user-local-file-storage.sh
chmod +x configure-user-local-file-storage.sh
This creates an empty bash script /usr/local/bin/configure-user-local-file-storage.sh
Next, paste the following contents into the script:
#!/bin/bash

while [[ $# -gt 0 ]]; do
  key="$1"
  case $key in
    help)
      usage
      shift
      shift
      ;;
    --storage-account-name)
      STORAGE_ACCOUNT_NAME="$2"
      shift # past argument
      shift # past value
      ;;
    --username)
      SFTPUSER="$2"
      shift # past argument
      shift # past value
      ;;
    --file-share-name)
      FILE_SHARE_NAME="$2"
      shift # past argument
      shift # past value
      ;;
  esac
done

function usage {
    echo "Usage: $0 --storage-account-name <storage account name> --username <SFTP username> --file-share-name <file share name>"
    exit 0
}

if [[ -z ${STORAGE_ACCOUNT_NAME} || -z ${SFTPUSER} || -z ${FILE_SHARE_NAME} ]]; then
    usage
fi

LOCAL_UID=$(id -u ${SFTPUSER})
LOCAL_GID=$(id -g ${SFTPUSER})

FILE_SHARE_NAME_PATH="//${STORAGE_ACCOUNT_NAME}.file.core.windows.net/${FILE_SHARE_NAME}"
CRED_FOLDER=/etc/smbcredentials
CRED_FILE=${CRED_FOLDER}/${STORAGE_ACCOUNT_NAME}.cred
ROOT_MOUNT_OPTIONS="vers=3.0,credentials=${CRED_FILE},serverino"

# Make the user's "local" directory
sudo mkdir -p /mnt/${STORAGE_ACCOUNT_NAME}/
sudo mount -t cifs ${FILE_SHARE_NAME_PATH} /mnt/${STORAGE_ACCOUNT_NAME} -o ${ROOT_MOUNT_OPTIONS}
sudo mkdir -p /mnt/${STORAGE_ACCOUNT_NAME}/${SFTPUSER}/local
sudo umount /mnt/${STORAGE_ACCOUNT_NAME}

# Mount the folders
USER_MOUNT_OPTIONS="vers=3.0,credentials=${CRED_FILE},uid=${LOCAL_UID},gid=${LOCAL_GID},serverino"
sudo mount -t cifs ${FILE_SHARE_NAME_PATH}/${SFTPUSER}/local /home/${SFTPUSER}/home/${SFTPUSER}/local -o ${USER_MOUNT_OPTIONS}

# Add entries to /etc/fstab so that it will survive a reboot
sudo bash -c "echo \"${FILE_SHARE_NAME_PATH}/${SFTPUSER}/local /home/${SFTPUSER}/home/${SFTPUSER}/local cifs nofail,${USER_MOUNT_OPTIONS}\" >> /etc/fstab"
There's a lot going on in this script. Here are a few of the main points:
- The script expects a number of parameters, including the username
- A temporary mount is used to create the folder
/<username>/localin Azure File Storage - The file share is mounted onto the SFTP user's
/localdirectory - The mount settings are added to
/etc/fstabso the mount persists after a reboot
Finally, run the script:
/usr/local/bin/configure-user-local-file-storage.sh \
  --storage-account-name <storage account name>     \
  --username <SFTP username>                        \
  --file-share-name <file share name>
To test whether the mount was successful, upload a file to the SFTP user's /local directory. It should appear
on the file share within the Azure Portal.
Caveats and Limitations
You'll find that you are not able to chmod or chown any files in the file share.
This is because the mount uses the cifs protocol, where permissions and ownership for all files and folders within
the mount are defined in the mount options. By default, ownership is set to root, with permissions of 755.
The mount options can be overridden. For example, in the configure-user-local-file-storage.sh
script, we include the options uid=${LOCAL_UID},gid=${LOCAL_GID}. This gives the SFTP user read-write access to
files and subfolders.
Check out our YouTube channel for how-to videos and additional assistance. For even more cloud computing news and tips, connect with us on LinkedIn and Twitter. Don't forget to sign up for your 30-day free trial of SFTP Gateway.