Getting Started with SFTP Gateway on Azure
Note: This page applies to SFTP Gateway version 2.x. Visit Here for documentation on version 3.x.
Note: This page applies to version 2.001.00.
Check out the release notes for a full list of features
and bug fixes.
Click here
for the documentation on version 2.000.02.azu.
Overview
SFTP Gateway on Azure is a pre-configured Linux-based SFTP server that you can deploy in your Azure subscription as a VM offer.
SFTP Gateway helps you move files to Blob Storage. It also has a web admin UI for easier user management.

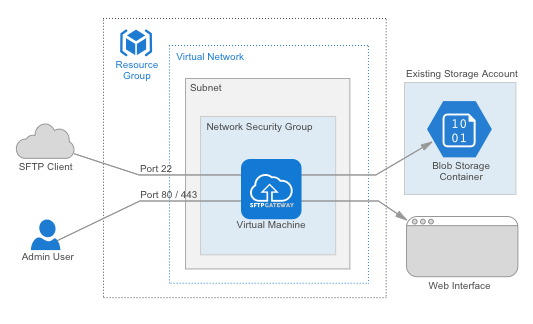
Figure 1: An admin user connects to the web interface and creates an SFTP user. The SFTP user connects to SFTP Gateway and uploads a file. The server uploads the file to Azure Blob storage.
SFTP Gateway 2.001.00 is a major update that includes features such as audit logging, and the ability to set user passwords in the web admin console. Check out the release notes for a full list of features and bug fixes.
1. Launch a VM
To begin, launch the SFTP Gateway virtual machine from the Azure Marketplace. You will need to configure your network security group with access to port 22 for SFTP, as well as ports 80 and 443 for the web management interface.
See: Azure Launch a VM
2. Initial configuration
When you provision the SFTP Gateway VM, you will need to go through a one-time setup process. You will need to SSH into the VM to obtain the default password for the web page. And if you are uploading files to Blob, you will need to set the Storage Account keys.
See: https://help.thorntech.com/help/azure-initial-configuration
3. Create an SFTP user and log in
After completing the one-time setup, you can start using SFTP Gateway. Provision an SFTP user, and then log in as that user. Upload a file, and that file will automatically appear on Azure Blob Storage.