API documentation
TLDR - Quick Summary
What: Use REST API to manage SFTP Gateway programmatically
Auth: Get OAuth token via POST to
/backend/oauth/token(or/backend/loginfor v3.5.0+)Endpoints:
/cloudconnections,/folders,/userswith Bearer tokenDocs: View OpenAPI JSON at editor.swagger.io
Overview
This article covers how to use the REST API of SFTP Gateway. By the end of this article, you should be able to create an SFTP user. This article also covers the prerequisite steps needed along the way, such as creating a Cloud Connection.
This is the overall process:
- Download the API documentation (OpenAPI format)
- View the API documentation in an online Swagger visualization tool
- Get the application
client-idandclient-secret - Use the credentials of both the application and web admin user to get an OAuth token
- Using the OAuth token, create a Cloud Connection
- Using the OAuth token, create a Folder
- Using the OAuth token, create an SFTP user
Before you get started
The API requires the credentials of a web admin user in order to obtain an OAuth token.
If you haven't already done so, take a moment to go through the First Launch Experience to create a web admin user.
You can also create a web admin user via the API, using the admin/config endpoint.
Note: No credentials are needed to call the /admin/config endpoint. However, this endpoint is disabled as soon as the first web admin user is created.
View the API documentation
Here is a link to the SFTP Gateway API documentation file (it will open in your browser):
https://thorntech-public-documents.s3.amazonaws.com/sftpgateway/KB/openapi.json
This file is in OpenAPI JSON format, which is designed to be viewed using Swagger. Go to http://editor.swagger.io/, an online Swagger viewer.
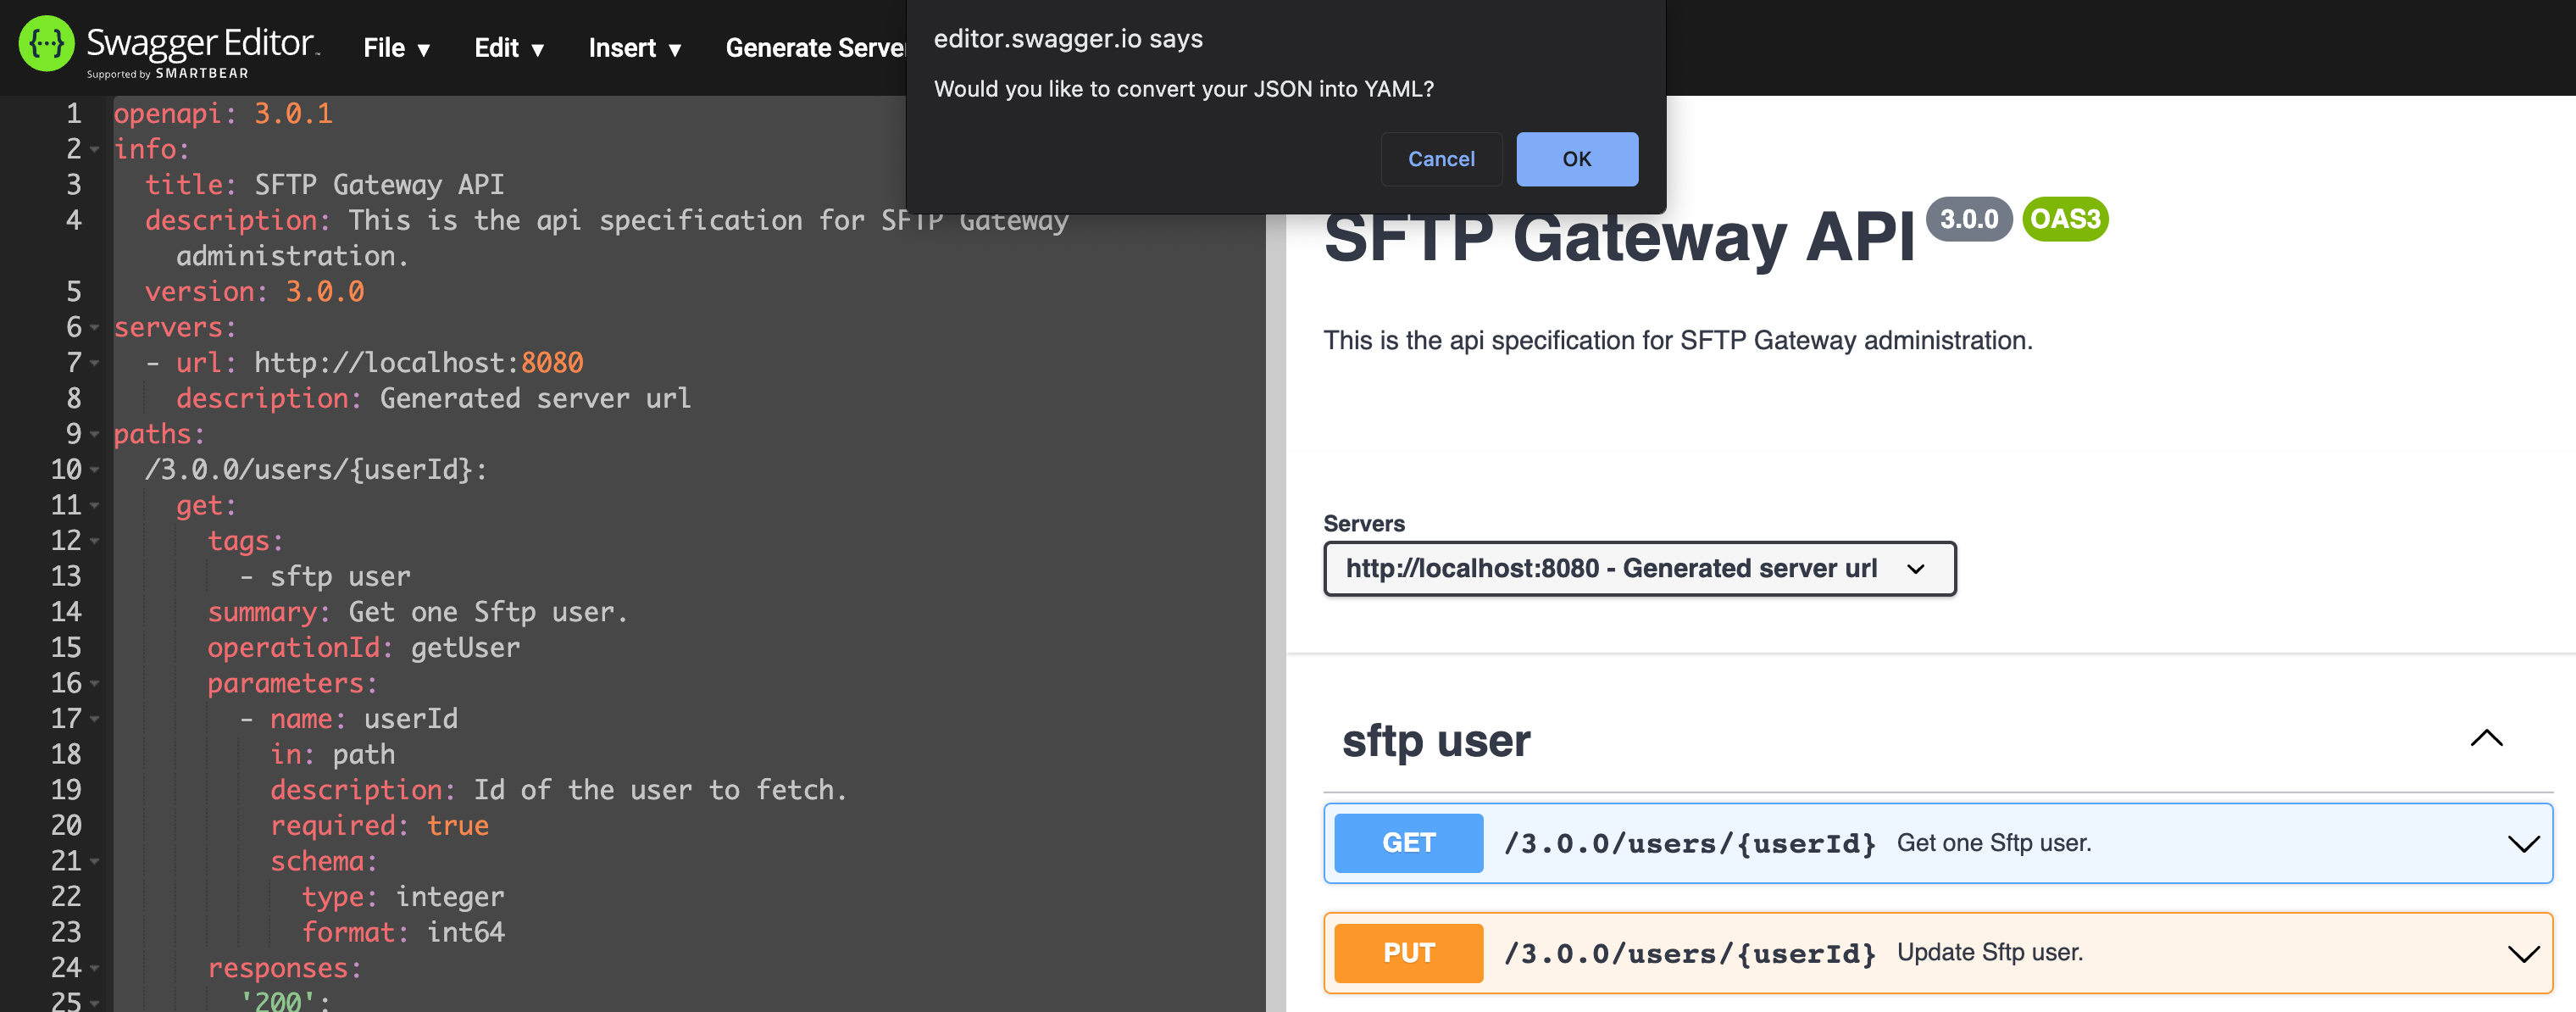
Paste in the JSON API. When prompted to convert your JSON to YAML, click OK. You will then see the API documentation for SFTP Gateway.
1. Get the OAuth token
Before you make any API calls, you need the OAuth token of a web admin user. This OAuth token needs to be included in the header of each API call to authorize your access.
To get an OAuth token, you need to gather four pieces of information:
- Application credentials
client-idclient-secret
- Web admin user credentials
usernamepassword
You supply this information to the OAuth token endpoint. In return, you will receive a Bearer Token which acts as your credentials for all subsequent API calls.
1a. Gather the application client-id and client-secret
The application credentials are located in Java's application.properties file.
SSH into your VM, and show the contents of this file:
sudo su
cat /opt/sftpgw/application.properties
Your output should look like this:
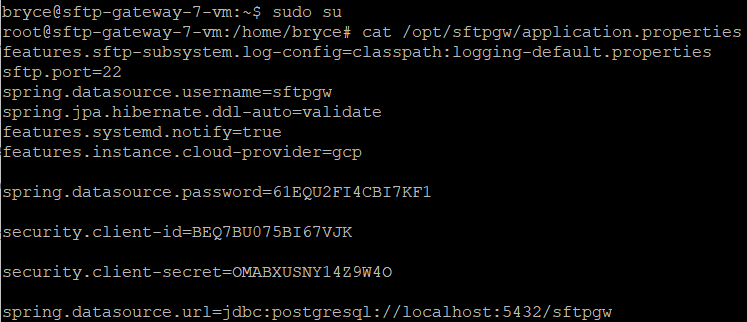
Copy the values of the following properties:
security.client-idsecurity.client-secret
1b. Retrieve the OAuth token via Postman
Once you have your client id and secret, open up Postman.

In the request url tab, enter in https://ip-address:443/backend/oauth/token using the POST method.
IMPORTANT: If you're on version 3.5.0 or newer of SFTP Gateway, use this URL instead:
https://ip-address:443/backend/login
Under the Authorization tab, select Basic Auth.
Use the application credentials as the Basic Auth credentials:
- Username: Enter in the value of
security.client-id - Password: Enter in the value of
security.client-secret
Once you have filled out the information in the Authorization tab, switch over to the Body tab and select form-data for your input method.
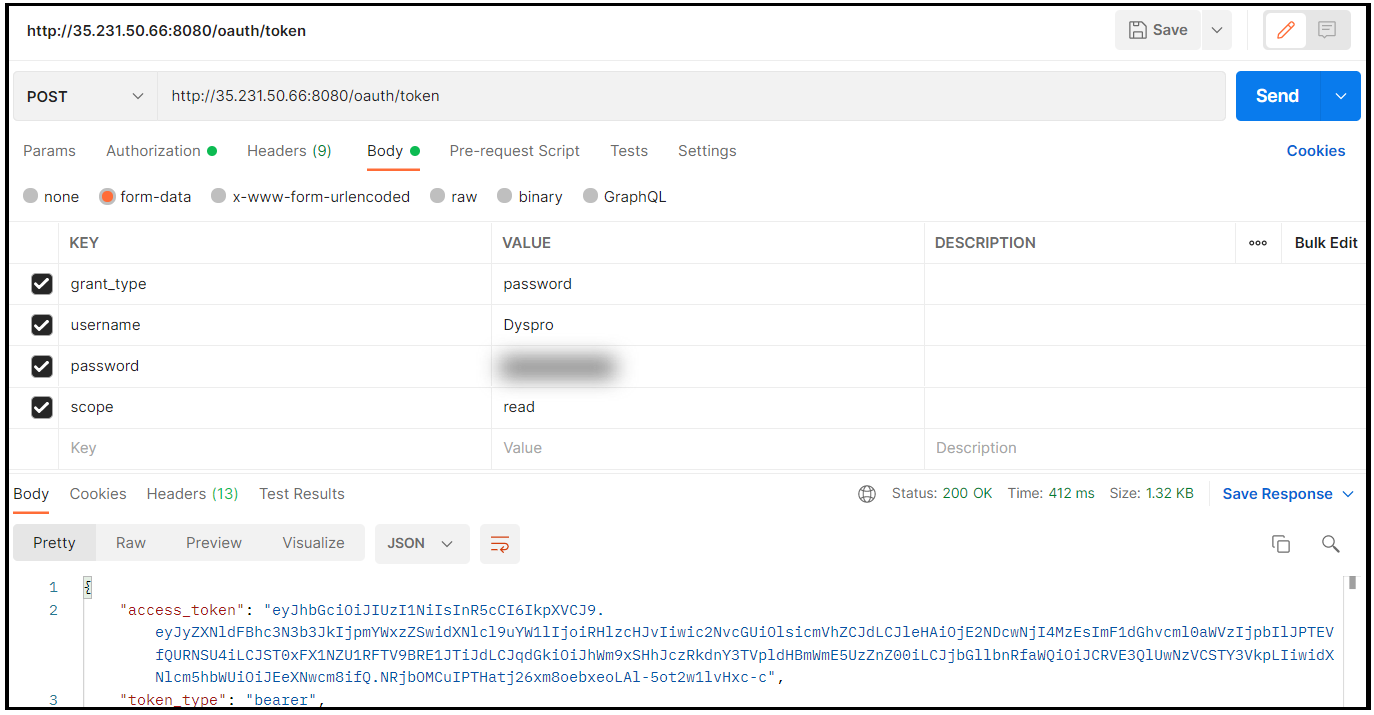
Enter the following values:
- grant_type: The literal string:
password - username: The username of the web admin user
- password: The password of the web admin user
- scope: The literal string:
read
Press the Send button to the right of the URL tab to retrieve your OAuth token.
The response will give you a Bearer token, which you will use from now on to make API calls.
2. Create underlying resources
Before you create an SFTP user, you need to first create a Cloud Connection and a Folder. The SFTP user's Home Directory will point to the Folder that you create.
2a. Create a Cloud Connection
To create a Cloud Connection, open a new request tab in Postman. In the request url, enter in:
https://ip-address:443/backend/3.0.0/cloudconnections
and choose the POST method.
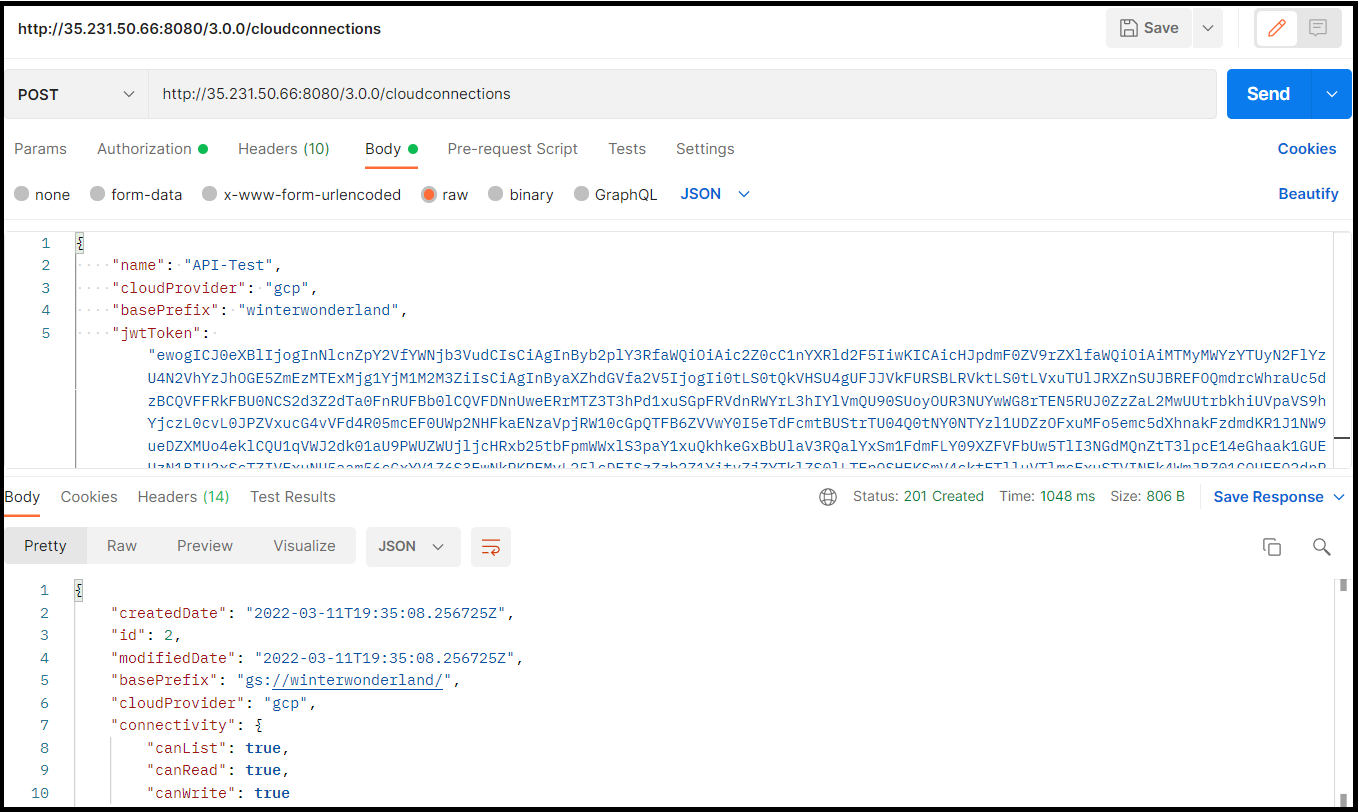
Under the Authorization tab, select Bearer Token for the Type. Enter in the value of the OAuth access token you retrieved the previous step.
Under the Header tab, add a Content-Type header, and set the value as application/json.
Under the Body tab, select the raw option. Enter the following values:
- name: This is the name of the Cloud Connection
- cloudProvider: Set this to
gcp - basePrefix: Use the Bucket URL. In this example,
gs://winterwonderland/is the Bucket URL - jwtToken: Go to https://www.base64encode.org/ and upload your JSON key file and this will return your jwtToken
- jsonKeyFilename: This is your service accounts JSON key file that you normally use when creating a Cloud Connection
- useInstanceCredentials: Set this to
false
Click Send
In the response, you will get the id of the Cloud Connection. We will use this value in the next section.
2b. Create a Folder
Now that the Cloud Connection has been created, in this section you will create a folder that points to the Cloud Connection.
Change the request URL to https://ip-address:443/backend/3.0.0/folders.
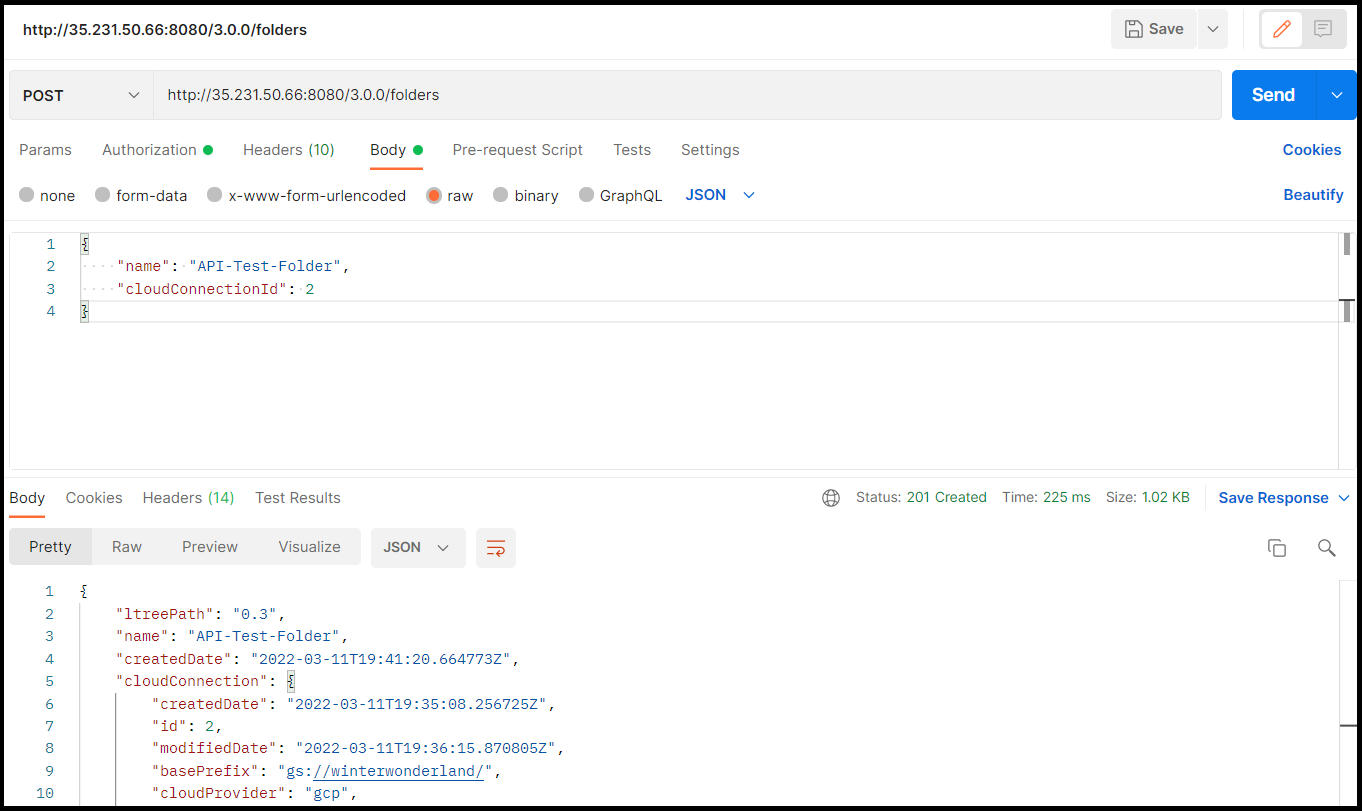
On the Body tab, enter the following:
- name: This is the name of the Folder
- cloudConnectionId: Use the Cloud Connection
idfrom the previous step
Click Send
In the response, you will get the id of the Folder. We will use this value in the next section.
3. Create an SFTP User
Now that you have a Folder that points to a Cloud Connection, you can finally create an SFTP user.
Change the request URL to https://ip-address:443/backend/3.0.0/users
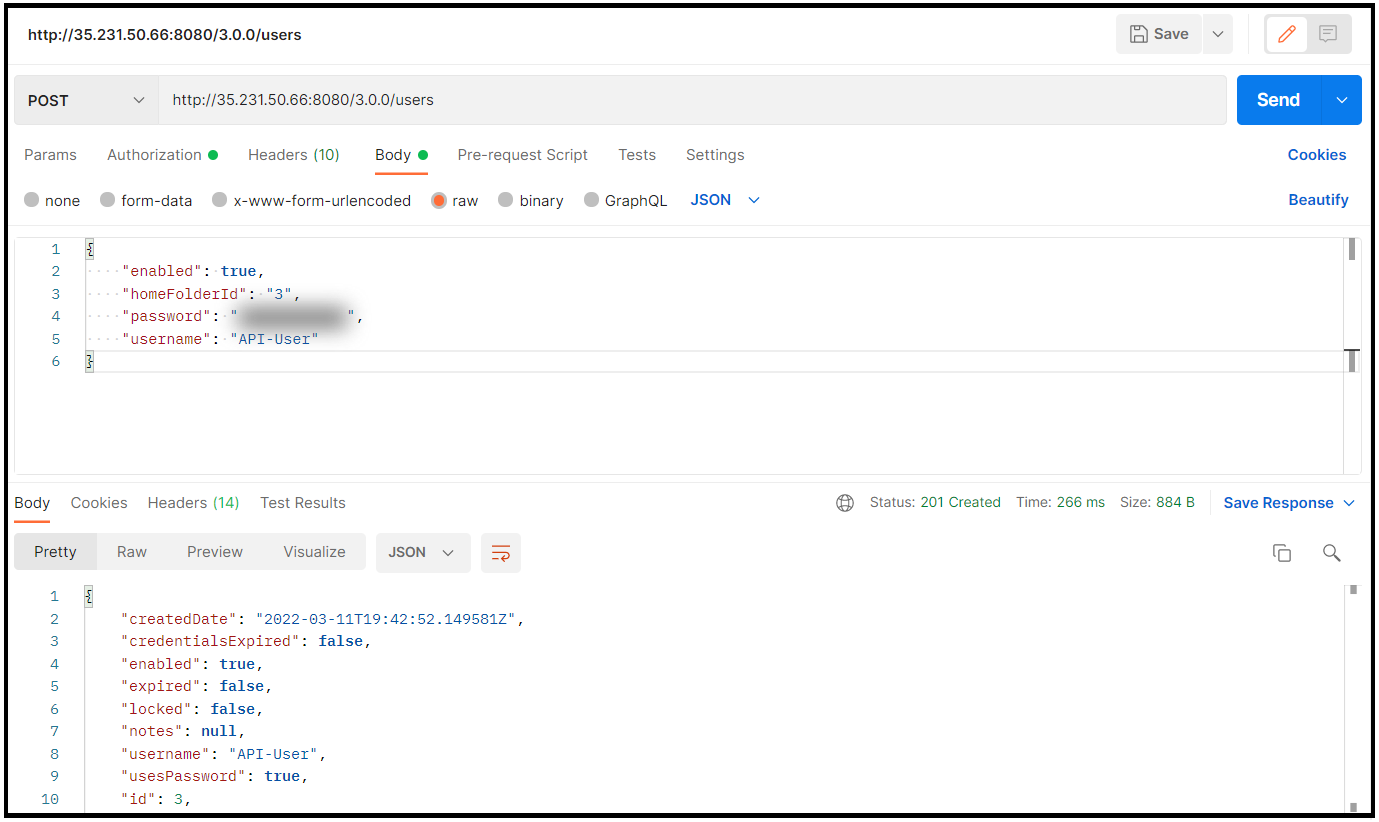
On the Body tab, enter the following:
- enabled: Set this to
true - homeFolderId: Use the Folder
idyou obtained from the previous step - username: The username of the SFTP user
- password: The password of the SFTP user
You should now be able to use your newly created SFTP user to log in via SFTP.