Multi-Region Failover for SFTP Gateway in Azure
TLDR
- Deploy two SFTP Gateway HA stacks in separate Azure regions using Terraform or ARM templates
- Use Azure Traffic Manager to route SFTP traffic between regions
- Configure Blob Storage replication to sync data
- When a catastrophic regional failure occurs, manually disable the primary endpoint in Traffic Manager to route traffic to the secondary region
Overview
This guide explains how to configure multi-region failover for SFTP Gateway on Azure. This architecture provides disaster recovery capabilities by allowing you to failover SFTP traffic from a primary region to a secondary region.
Organizations rely on SFTP for critical file transfers—partner integrations, automated data pipelines, and secure document exchanges. A regional outage can halt these operations, impacting business processes and partner relationships. By deploying SFTP Gateway across two Azure regions with failover capability, you ensure business continuity even when an entire Azure region becomes unavailable.
Premier Support Required
Implementing this multi-region HA failover architecture is not included in our standard support tiers. If you need assistance with this customization, please contact us at sales@thorntech.com to learn about our Premier Support package.
Key Benefits:
- Disaster Recovery: Maintain SFTP service availability during catastrophic regional outages
- Manual Failover Control: You decide when to failover, avoiding unnecessary region switches
- Seamless Client Experience: Shared host keys prevent SSH fingerprint warnings during failover
- Data Redundancy: Blob Storage replication keeps data synchronized across regions
How It Works:
- Two independent SFTP Gateway HA stacks are deployed in separate Azure regions
- Azure Traffic Manager provides DNS-based routing with priority-based endpoints
- Under normal conditions, all traffic routes to the primary region
- When a catastrophic regional failure occurs, you manually disable the primary endpoint in Traffic Manager to redirect traffic to the secondary region
- Blob Storage Object Replication keeps SFTP data synchronized between regions
Why Manual Failover?
This architecture uses manual failover rather than automatic failover. Automatic failover based on health probes can cause unnecessary flip-flopping between regions when temporary issues occur. Since Blob Storage replication is asynchronous, frequent region switches could lead to data inconsistencies. Manual failover ensures you only switch regions during genuine catastrophic failures when it's a conscious, deliberate decision.
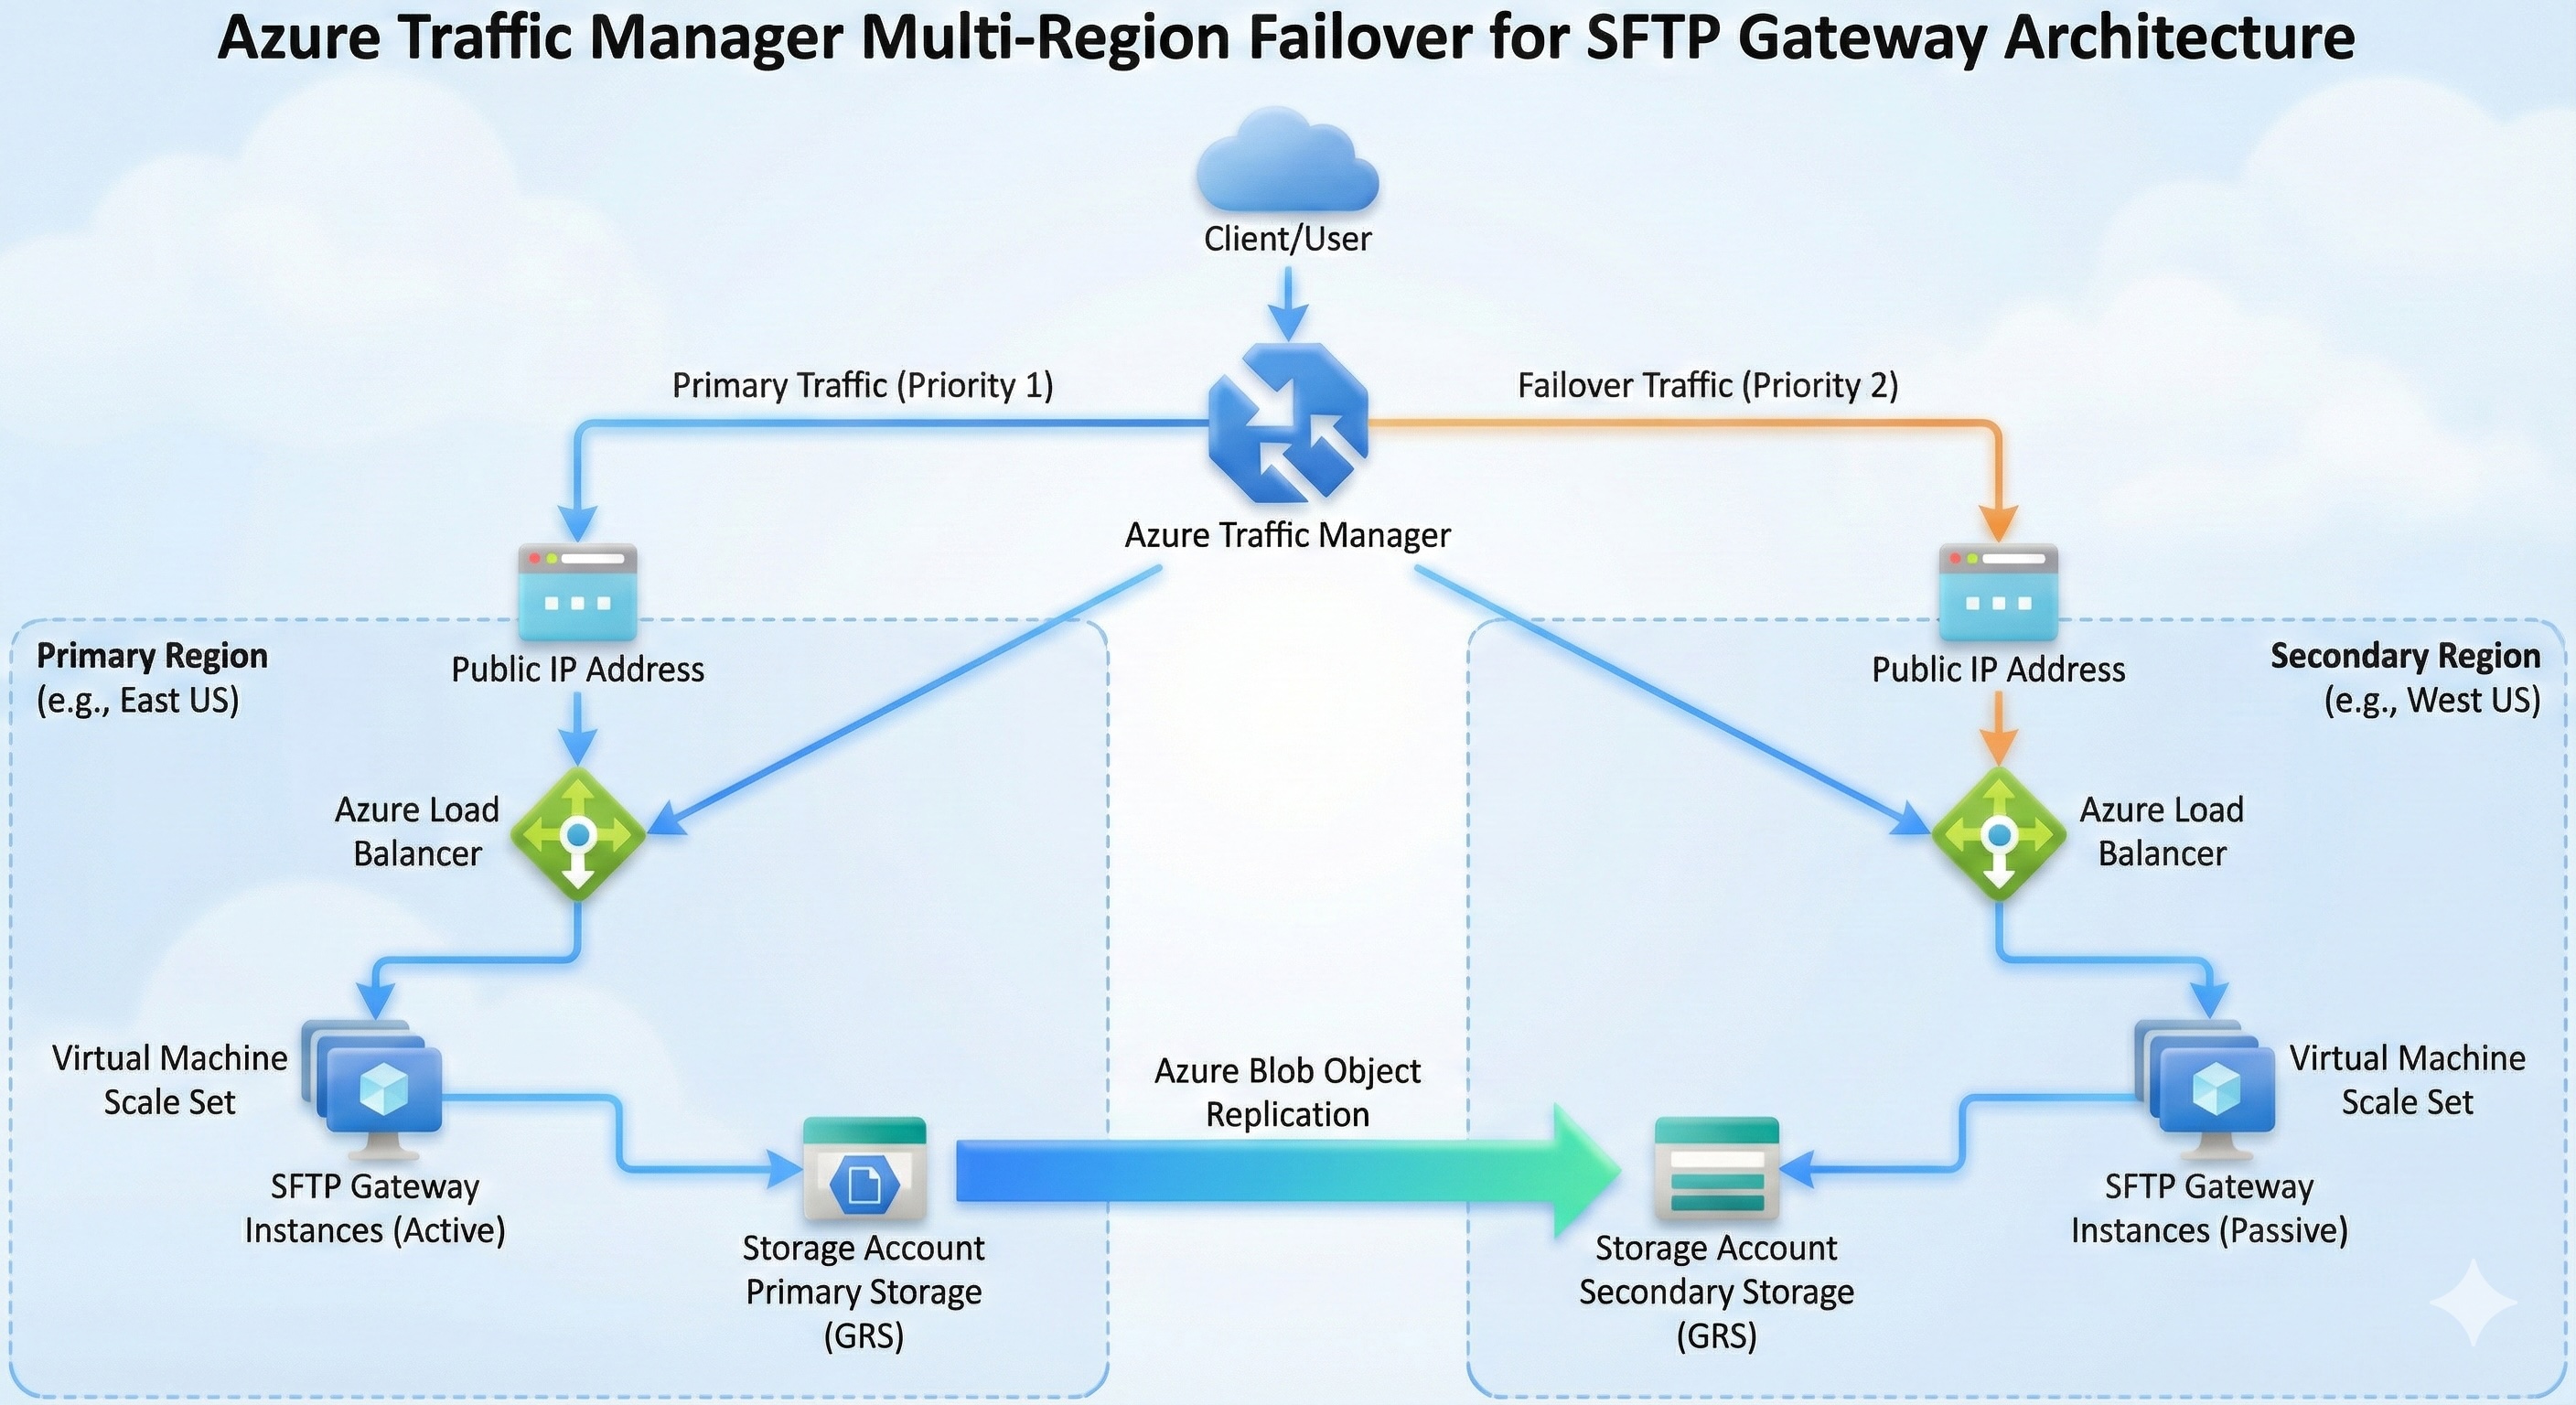
Architecture
The diagram below illustrates the multi-region architecture. Azure Traffic Manager sits at the top as the DNS-based traffic director. Below it, two independent SFTP Gateway HA stacks operate in separate regions—each with its own Load Balancer, VM Scale Set, PostgreSQL database, and Blob Storage. Object Replication keeps the storage accounts synchronized.
                         ┌─────────────────────────┐
                         │   Azure Traffic Manager │
                         │    sftp.company.com     │
                         └───────────┬─────────────┘
                                     │
               ┌─────────────────────┴─────────────────────┐
               │                                           │
               ▼                                           ▼
     ┌───────────────────┐                       ┌───────────────────┐
     │   Primary Region  │                       │ Secondary Region  │
     │     (East US)     │                       │    (West US)      │
     │                   │                       │                   │
     │  ┌─────────────┐  │                       │  ┌─────────────┐  │
     │  │    Load     │  │                       │  │    Load     │  │
     │  │  Balancer   │  │                       │  │  Balancer   │  │
     │  └──────┬──────┘  │                       │  └──────┬──────┘  │
     │         │         │                       │         │         │
     │  ┌──────▼──────┐  │                       │  ┌──────▼──────┐  │
     │  │ VM Scale Set│  │                       │  │ VM Scale Set│  │
     │  │ (2+ nodes)  │  │                       │  │ (2+ nodes)  │  │
     │  └──────┬──────┘  │                       │  └──────┬──────┘  │
     │         │         │                       │         │         │
     │  ┌──────▼──────┐  │                       │  ┌──────▼──────┐  │
     │  │ PostgreSQL  │  │                       │  │ PostgreSQL  │  │
     │  │  Flexible   │  │                       │  │  Flexible   │  │
     │  └─────────────┘  │                       │  └─────────────┘  │
     │         │         │                       │         │         │
     │  ┌──────▼──────┐  │    Object             │  ┌──────▼──────┐  │
     │  │    Blob     │──┼────Replication────────▶  │    Blob     │  │
     │  │   Storage   │  │                       │  │   Storage   │  │
     │  └─────────────┘  │                       │  └─────────────┘  │
     └───────────────────┘                       └───────────────────┘
Each region contains a complete SFTP Gateway HA stack deployed using the Terraform HA template or ARM template:
| Component | Purpose |
|---|---|
| Load Balancer (Standard) | Distributes traffic across VM instances, provides public IP |
| VM Scale Set | 2+ SFTP Gateway instances across availability zones |
| PostgreSQL Flexible Server | Stores user accounts, folder mappings, and configuration |
| Blob Storage | Stores SFTP file data |
| Key Vault | Stores database credentials securely |
| Managed Identity | Provides VM access to Azure resources |
Prerequisites
This deployment involves multiple Azure services and requires appropriate permissions. Before starting, ensure you have the necessary access and tools configured to avoid interruptions during the setup process.
Before starting, ensure you have:
- Azure subscription with permissions to create resources
- SFTP Gateway Professional subscription from Azure Marketplace
- Terraform >= 1.9 installed locally (or use ARM templates as an alternative)
- Azure CLI installed and authenticated
- SSH key pair generated for VM access
- Custom domain (optional but recommended) for Traffic Manager DNS
Note: This guide uses Terraform examples, but you can also deploy using ARM templates. See the Azure ARM Template HA guide for ARM-based deployment instructions. The Traffic Manager and storage replication steps are the same regardless of deployment method.
Step 1: Deploy Primary Stack in Region 1
The primary stack serves as your main SFTP endpoint under normal operating conditions. It handles all incoming SFTP traffic and stores data in its associated blob storage account. Choose a region that is geographically close to your users for optimal performance.
Deploy the first SFTP Gateway HA stack using Terraform.
1.1 Subscribe to SFTP Gateway in Azure Marketplace
- Go to the Azure Marketplace
- Search for "SFTP Gateway Professional"
- Click Get It Now and complete the subscription
1.2 Prepare Terraform Configuration
Create a directory for your primary region deployment:
mkdir -p sftp-gateway-primary
cd sftp-gateway-primary
Create the Terraform files as documented in the Azure Terraform HA guide.
1.3 Configure Variables
Create terraform.tfvars with your primary region settings:
resource_group_name = "sftpgw-primary-rg"
location            = "eastus"
admin_ip_range      = "YOUR_IP_ADDRESS/32"
ssh_public_key      = "ssh-rsa AAAA..."
instance_count      = 2
vm_size             = "Standard_D2s_v3"
1.4 Deploy the Stack
terraform init
terraform plan
terraform apply
1.5 Note the Outputs
After deployment completes, note the public IP address:
terraform output deployment_summary
Record the public IP address - you'll need this for Traffic Manager configuration.
Step 2: Configure Cloud Connection on Primary Stack
After deploying the infrastructure, you need to connect SFTP Gateway to Azure Blob Storage where uploaded files will be stored. This involves two parts: granting the VM's managed identity permission to access the storage account, and then configuring the connection in the SFTP Gateway web admin interface.
2.1 Grant Storage Account Permissions
Before configuring the cloud connection, you must grant the VM's managed identity access to the storage account. This is not done automatically by the Terraform or ARM template deployment.
Using Azure CLI:
# Get the managed identity principal ID
PRINCIPAL_ID=$(az identity show \
  --name sftpgw-instance-identity \
  --resource-group <YOUR_RESOURCE_GROUP> \
  --query principalId -o tsv)

# Grant Storage Blob Data Contributor role
az role assignment create \
  --assignee $PRINCIPAL_ID \
  --role "Storage Blob Data Contributor" \
  --scope "/subscriptions/<SUBSCRIPTION_ID>/resourceGroups/<RESOURCE_GROUP>/providers/Microsoft.Storage/storageAccounts/<STORAGE_ACCOUNT_NAME>"
Or via Azure Portal:
- Open the storage account in Azure Portal
- Go to Access Control (IAM)
- Click Add → Add role assignment
- Select role: Storage Blob Data Contributor
- Select members: Search for
sftpgw-instance-identity - Click Review + assign
Note: Without this role assignment, the "Test Connection" button in the web admin will fail even if all other settings are correct.
2.2 Access Web Admin
- Open your browser and navigate to
https://<PRIMARY_PUBLIC_IP> - Log in with the admin credentials configured during deployment
- Accept any certificate warnings (or configure a proper SSL certificate)
2.3 Create Azure Blob Storage Connection
- Navigate to Cloud Connections in the left menu
- Click Add Connection
- Select Azure Blob Storage as the connection type
- Configure the connection:
- Connection Name:
primary-storage - Storage Account: Your primary region storage account
- Container: The container for SFTP data
- Authentication: Managed Identity (recommended) or Access Key
- Connection Name:
- Click Test Connection to verify permissions
- Click Save
2.4 Set as Default Connection
- Select the new connection
- Click Set as Default
Step 3: Create Test User on Primary Stack
Before proceeding with the secondary stack deployment, create a test user to verify that the primary stack is functioning correctly. This user will also be used later to test failover behavior and confirm that both stacks share the same user configuration.
3.1 Add SFTP User
- Navigate to Users in the left menu
- Click Add User
- Configure the user:
- Username:
testuser - Authentication: Password or SSH Key
- Home Folder:
/testuser
- Username:
- Click Save
3.2 Test SFTP Connection
From your local machine, test the connection:
sftp testuser@<PRIMARY_PUBLIC_IP>
Upload a test file:
sftp> put testfile.txt
sftp> ls
sftp> exit
Verify the file appears in your Azure Blob Storage container.
Step 4: Export Backup from Primary Stack
One of the biggest challenges with SFTP failover is SSH host key verification. When an SFTP client connects to a server, it remembers the server's SSH fingerprint. If the fingerprint changes (as it would when connecting to a different server), the client displays a security warning that can confuse users or break automated integrations.
The backup file contains users, folder mappings, cloud connections, and server host keys. Importing this backup to the secondary stack ensures both stacks present identical SSH fingerprints to clients, making the failover transparent.
4.1 Export Backup
- Navigate to Settings → Backup in the web admin
- Click Export Backup
- Save the backup file (e.g.,
sftpgw-backup.yaml) to your local machine
Note: The backup file contains sensitive information including password hashes. Store it securely.
Step 5: Deploy Secondary Stack in Region 2
The secondary stack provides redundancy by operating in a separate Azure region. Choose a region that is geographically distant from your primary region to protect against regional disasters. For example, if your primary is in East US, consider West US or Central US for the secondary.
The secondary stack is deployed with the same configuration as the primary, but it remains idle during normal operations—only receiving traffic when the primary becomes unavailable.
5.1 Prepare Secondary Terraform Configuration
Create a separate directory for the secondary region:
mkdir -p sftp-gateway-secondary
cd sftp-gateway-secondary
Copy the Terraform files from the primary directory.
5.2 Configure Variables for Secondary Region
Create terraform.tfvars with secondary region settings:
resource_group_name = "sftpgw-secondary-rg"
location            = "westus"
admin_ip_range      = "YOUR_IP_ADDRESS/32"
ssh_public_key      = "ssh-rsa AAAA..."
instance_count      = 2
vm_size             = "Standard_D2s_v3"
5.3 Deploy the Stack
terraform init
terraform plan
terraform apply
5.4 Note the Outputs
terraform output deployment_summary
Record the secondary public IP address.
Step 6: Import Backup into Secondary Stack
Now that the secondary stack is deployed, you need to synchronize its configuration with the primary. The backup import process copies user accounts, folder mappings, and most importantly, the SSH host keys from the primary stack. This ensures that SFTP clients connecting to either region see the same server identity.
6.1 Access Secondary Web Admin
- Open your browser and navigate to
https://<SECONDARY_PUBLIC_IP> - Log in with admin credentials
6.2 Import Backup
- Navigate to Settings → Backup
- Click Import Backup
- Select the backup file exported from the primary stack
- Click Import
Note: This import synchronizes users and host keys. Both stacks will present the same SSH fingerprint to clients, so users will not see host key warnings during failover.
6.3 Verify Users Were Imported
- Navigate to Users
- Confirm that
testuserand any other users appear in the list
Step 7: Configure Blob Storage Replication
While the SFTP Gateway configuration is now synchronized, the actual file data resides in Azure Blob Storage. To ensure the secondary region has access to the same files as the primary, you need to configure Object Replication between the storage accounts.
Azure Blob Object Replication automatically copies blobs from a source container to a destination container, even across different regions. This ensures that files uploaded to the primary region are replicated to the secondary region, making them available if a failover occurs.
Note that Object Replication is asynchronous—there may be a delay between when a file is uploaded to primary and when it appears in secondary. For most use cases, this delay is seconds to minutes.
7.1 Create Secondary Storage Container
If you don't already have a storage account in the secondary region:
- Go to Azure Portal → Storage accounts
- Click Create
- Configure:
- Resource group:
sftpgw-secondary-rg - Storage account name: Choose a unique name
- Region: West US (same as secondary stack)
- Performance: Standard
- Redundancy: LRS (or your preferred option)
- Resource group:
- Click Review + Create → Create
Create a container in the new storage account:
- Open the storage account
- Go to Containers
- Click + Container
- Name it the same as your primary container (e.g.,
sftp-data)
7.2 Enable Versioning on Both Storage Accounts
Object Replication requires versioning enabled on both storage accounts.
Primary Storage Account:
- Open the primary storage account in Azure Portal
- Go to Data management → Data protection
- Check Enable versioning for blobs
- Click Save
Secondary Storage Account:
Repeat the same steps for the secondary storage account.
7.3 Configure Object Replication
- Open the primary storage account in Azure Portal
- Go to Data management → Object replication
- Click Create replication rules
- Configure:
- Destination storage account: Select your secondary storage account
- Source container: Your SFTP data container
- Destination container: The matching container in secondary storage
- Click Create
7.4 Verify Replication
- Upload a new file via SFTP to the primary stack
- Wait a few minutes for replication
- Check the secondary storage account container
- Confirm the file appears
Note: Replication is asynchronous. There may be a delay of seconds to minutes depending on file size and Azure replication lag.
7.5 Configure Secondary Cloud Connection
First, grant the secondary VM's managed identity access to the secondary storage account (same as Step 2.1):
# Get the secondary managed identity principal ID
PRINCIPAL_ID=$(az identity show \
  --name sftpgw-instance-identity \
  --resource-group <SECONDARY_RESOURCE_GROUP> \
  --query principalId -o tsv)

# Grant Storage Blob Data Contributor role
az role assignment create \
  --assignee $PRINCIPAL_ID \
  --role "Storage Blob Data Contributor" \
  --scope "/subscriptions/<SUBSCRIPTION_ID>/resourceGroups/<SECONDARY_RG>/providers/Microsoft.Storage/storageAccounts/<SECONDARY_STORAGE_ACCOUNT>"
Then configure the cloud connection:
- Access the secondary stack web admin
- Navigate to Cloud Connections
- Click Add Connection
- Configure for the secondary storage account:
- Connection Name:
secondary-storage - Storage Account: Secondary region storage account
- Container: The replicated container
- Connection Name:
- Click Test Connection to verify permissions
- Click Save
- Set as default connection for the secondary stack
Step 8: Create Traffic Manager Profile
With both SFTP stacks deployed and data replication configured, you need a mechanism to route client traffic between them. Azure Traffic Manager serves this purpose by providing DNS-based routing.
Traffic Manager works at the DNS layer—when a client resolves your SFTP hostname, Traffic Manager returns the IP address of the highest-priority enabled endpoint. Unlike load balancers that handle actual network traffic, Traffic Manager only handles DNS queries, making it efficient and cost-effective.
For manual failover scenarios, Traffic Manager's Priority routing method is ideal: traffic goes to the highest-priority enabled endpoint. When you need to failover, you disable the primary endpoint and traffic routes to the secondary.
8.1 Create Traffic Manager Profile
- Go to Azure Portal → Create a resource
- Search for "Traffic Manager profile"
- Click Create
- Configure:
- Name:
sftpgw-failover(this becomessftpgw-failover.trafficmanager.net) - Routing method: Priority (recommended for active-passive failover)
- Subscription: Your subscription
- Resource group: Create new or use existing (e.g.,
sftpgw-shared-rg)
- Name:
- Click Create
8.2 Understanding Routing Methods
| Method | Use Case |
|---|---|
| Priority | Active-passive failover. Traffic goes to highest priority healthy endpoint. |
| Weighted | Manual control. Distribute traffic by percentage weights. |
| Performance | Route to closest region by latency. |
| Geographic | Route by client geographic location. |
For disaster recovery, Priority routing is recommended.
Step 9: Add Primary Endpoint to Traffic Manager
Traffic Manager endpoints represent the services that receive traffic. You'll add both your primary and secondary SFTP Gateway load balancer IPs as endpoints. The primary endpoint is configured with the highest priority (lowest number), so it receives all traffic under normal conditions.
9.1 Add Primary Endpoint
- Open your Traffic Manager profile
- Go to Endpoints
- Click Add
- Configure:
- Type: External endpoint
- Name:
primary-eastus - Fully-qualified domain name (FQDN) or IP: Enter your primary Load Balancer public IP
- Priority:
1(highest priority)
- Click Add
Note: Use "External endpoint" type since the Load Balancer public IP is not directly integrated with Traffic Manager. Alternatively, use "Azure endpoint" if you have a Public IP resource you can reference.
Step 10: Add Secondary Endpoint to Traffic Manager
The secondary endpoint serves as your failover target. It remains disabled during normal operations—you only enable it when you need to failover.
10.1 Add Secondary Endpoint
- In the Traffic Manager profile, go to Endpoints
- Click Add
- Configure:
- Type: External endpoint
- Name:
secondary-westus - Fully-qualified domain name (FQDN) or IP: Enter your secondary Load Balancer public IP
- Priority:
2(lower priority than primary)
- Click Add
10.2 Disable Secondary Endpoint
To ensure manual failover control, disable the secondary endpoint:
- Select the
secondary-westusendpoint - Click Disable
The secondary endpoint will remain disabled until you need to failover. This prevents any automatic routing to secondary, even if health probes detect issues with primary.
Step 11: Configure Endpoint Monitoring (Optional)
Traffic Manager can monitor endpoint health for visibility purposes. While this guide uses manual failover (not automatic), endpoint monitoring provides useful status information in the Azure Portal.
11.1 Configure Endpoint Monitoring
- In the Traffic Manager profile, go to Configuration
- Configure endpoint monitoring:
- Protocol: TCP
- Port:
22(SFTP port) - Probing interval:
30seconds - Tolerated number of failures:
3 - Probe timeout:
10seconds
- Click Save
11.2 Understanding Endpoint Status
With monitoring configured, the Traffic Manager overview page shows the health status of each endpoint:
- Online: Endpoint is responding to health probes
- Degraded: Endpoint is not responding to health probes
- Disabled: Endpoint has been manually disabled
Note: In this manual failover configuration, Traffic Manager will not automatically route traffic away from a degraded endpoint. You must manually disable the primary endpoint to trigger failover. The health status is informational only—use it to monitor your endpoints, but failover decisions remain under your control.
Step 12: Configure DNS
Your SFTP clients need a stable hostname to connect to. You have two options: use the Traffic Manager DNS name directly, or create a custom CNAME record pointing to Traffic Manager. The custom CNAME approach is recommended for production environments as it provides a branded hostname and allows you to switch traffic management solutions in the future without updating client configurations.
12.1 Option A: Use Traffic Manager DNS Directly
The simplest option is to use the Traffic Manager DNS name directly:
sftpgw-failover.trafficmanager.net
Provide this DNS name to your SFTP clients.
12.2 Option B: Create Custom DNS CNAME
For a branded domain, create a CNAME record:
- Go to your DNS provider's management console
- Create a CNAME record:
- Name:
sftp(or your preferred subdomain) - Type: CNAME
- Value:
sftpgw-failover.trafficmanager.net - TTL:
60seconds (low TTL for faster failover)
- Name:
Your clients can now connect using:
sftp testuser@sftp.yourcompany.com
Step 13: Verify Multi-Region Setup
Before relying on this setup for disaster recovery, verify that all components are working correctly. This includes checking endpoint status, DNS resolution, and SFTP connectivity.
13.1 Check Endpoint Status
- Open your Traffic Manager profile
- Go to Overview
- Verify:
- Primary endpoint (
primary-eastus) shows Online and is Enabled - Secondary endpoint (
secondary-westus) shows Online but is Disabled
- Primary endpoint (
13.2 Verify DNS Resolution
Check that DNS resolves to the primary region:
nslookup sftpgw-failover.trafficmanager.net
The resolved IP should match your primary Load Balancer public IP.
13.3 Test SFTP Connection via Traffic Manager
sftp testuser@sftpgw-failover.trafficmanager.net
Verify you can connect and transfer files.
Step 14: Test Failover
Testing failover is critical—a disaster recovery setup that hasn't been tested may fail when you need it most. This step walks through the manual failover process to verify everything works correctly.
During this test, pay close attention to the SSH host key verification. If the backup/import process worked correctly, you should connect to the secondary region without any host key warnings.
14.1 Initiate Manual Failover
- Open your Traffic Manager profile
- Go to Endpoints
- Select the secondary endpoint (
secondary-westus) and click Enable - Select the primary endpoint (
primary-eastus) and click Disable
14.2 Verify Failover
- Wait for DNS TTL to expire (typically 30-60 seconds)
- Check DNS resolution:
nslookup sftpgw-failover.trafficmanager.net
The resolved IP should now match your secondary Load Balancer public IP.
- Test SFTP connection:
sftp testuser@sftpgw-failover.trafficmanager.net
Note: You should connect successfully without seeing a host key warning. If you see "WARNING: REMOTE HOST IDENTIFICATION HAS CHANGED", the backup import did not work correctly. Re-import the backup to sync host keys.
14.3 Failback to Primary
- Go to Traffic Manager → Endpoints
- Select the primary endpoint (
primary-eastus) and click Enable - Select the secondary endpoint (
secondary-westus) and click Disable - Verify DNS resolves back to primary IP
Traffic Routing Scenarios
Understanding how Traffic Manager routes traffic in different scenarios helps you plan maintenance windows and respond to incidents.
This guide uses Priority Routing with the secondary endpoint disabled by default, giving you full manual control over failover:
| Scenario | Primary | Secondary | Behavior |
|---|---|---|---|
| Normal Operation | Enabled | Disabled | All traffic to primary |
| Manual Failover | Disabled | Enabled | All traffic to secondary |
| Failback to Primary | Enabled | Disabled | All traffic to primary |
| Maintenance Mode | Disabled | Disabled | No traffic (DNS errors) |
To initiate failover:
- Enable the secondary endpoint
- Disable the primary endpoint
To failback:
- Enable the primary endpoint
- Disable the secondary endpoint
Keeping Stacks in Sync
A multi-region setup requires ongoing maintenance to keep both stacks synchronized. While Blob Storage Object Replication handles file data automatically, user accounts and configuration changes require manual synchronization. This section covers the operational aspects of maintaining your failover setup.
User and Configuration Changes
When you add or modify users, folders, or connections on the primary stack, you need to sync these changes to the secondary stack.
Option 1: Re-export and Import Backup
- Export a new backup from the primary stack
- Import the backup into the secondary stack
Note: The import operation merges data. New users are added, but existing users are not overwritten. This works well for adding new users but may not capture modifications to existing users.
Option 2: Manual Updates
For modifications to existing users or connections:
- Make the same changes manually on both stacks
- Document all changes for consistency
Recommended Approach
This architecture works best when:
- User configuration is relatively stable
- User additions are more common than modifications
- You have a change management process to track updates
For environments with frequent user changes, consider automating sync via the SFTP Gateway API.
Data Sync After Failover
When returning to the primary region after a failover event:
Check for new data: Files uploaded to secondary storage during failover won't automatically replicate back to primary
Sync data back to primary:
Using Azure Storage Explorer:
- Open both storage accounts
- Copy new files from secondary to primary container
Using AzCopy:
azcopy sync "https://secondarystorage.blob.core.windows.net/sftp-data?SAS" \
            "https://primarystorage.blob.core.windows.net/sftp-data?SAS" \
            --recursive
Re-enable primary endpoint in Traffic Manager
Summary
You now have a fully configured multi-region failover setup for SFTP Gateway on Azure. This architecture provides manual failover capabilities for catastrophic regional failures, protecting your SFTP service while keeping you in control of when failover occurs.
This guide walked you through setting up multi-region failover for SFTP Gateway on Azure:
- Deployed two SFTP Gateway HA stacks in separate Azure regions using Terraform (or ARM templates)
- Granted storage permissions to the VM managed identity
- Synchronized host keys by exporting/importing backup between stacks
- Configured Blob Storage Object Replication for data synchronization
- Created Azure Traffic Manager with Priority routing and secondary endpoint disabled
- Tested failover by disabling primary and enabling secondary endpoint
Key takeaways:
- Traffic Manager provides DNS-based routing with manual failover control
- Secondary endpoint stays disabled until you decide to failover
- Shared host keys ensure seamless client experience during failover
- VM managed identity requires manual role assignment for storage access
- Blob Storage replication is asynchronous; manual failover avoids data sync issues from region flip-flopping
- User configuration changes require manual sync between stacks
- Always test failover procedures before relying on them for disaster recovery
Related Articles
For more information on the technologies used in this guide, refer to the following resources: