Version 3.x Upgrade Process
TLDR - Quick Summary
What: Upgrade SFTP Gateway on Azure to latest version while preserving configuration
Export: Settings > Backup & Recovery > Export Backup File (downloads YAML)
Restore: Deploy new instance, import YAML via Settings > Backup & Recovery > Import
Verify: After the import, compare host key fingerprints on the old and new servers with
ssh-keyscan -p 22 <host> | ssh-keygen -lf -. If the RSA fingerprint still differs, restartsftpgw-admin-apiTip: Export backups regularly for disaster recovery
Overview
This article outlines an upgrade process that you can use when upgrading to the latest version of SFTP Gateway. It's important that you test this scenario yourself, so you know what to expect beforehand.
You can also use this as a backup and recovery process that you can follow for disaster recovery, or just for making a backup of your SFTP Gateway configuration.
Upgrade Process Details
The upgrade procedure for going to the latest version of SFTP Gateway is a fairly simple process. On the old instance, you would export a yaml backup file containing configuration details such as Users, Folders & Settings.
Then, you would import this backup file into the new instance to create the same configuration you had previously.
This way, you can upgrade to the latest version of SFTP Gateway, while maintaining the same configuration.
Backup
There are a few steps you can do now to prepare for performing a migration to an upgraded version of SFTP Gateway.
Export your users and settings
Go to the Web Admin Interface for SFTP Gateway.
On the Settings page, scroll down to the Backup & Recovery section.
Click Export & select the Export Backup File option.
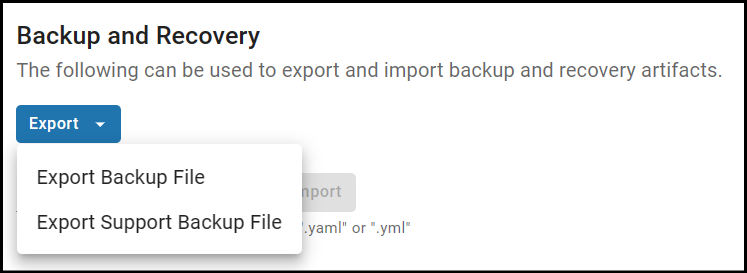
This will download a yaml backup artifact to your local machine.
Note: You may want to export this yaml file on a regular basis.
Restore
To restore your configuration, first deploy a new instance of SFTP Gateway.
Then, in the Web Admin Interface, perform the following steps to restore your users and settings.
Import your users and settings
Find the yaml backup artifact, and import it into the Settings ---> Backup & Recovery ---> Import page.

You should see some output on the screen, as your configuration is imported.
Verify the server host keys
The backup file includes the SSH server host keys, so after the import the new instance should present the same host keys as the old one. This matters whenever users keep connecting to the same hostname or IP: if the keys differ, every SFTP client warns that the host identification has changed, and scripted transfers using a saved fingerprint fail outright. Check the fingerprints before you cut over.
Compare fingerprints from your workstation
Run this against the old server and the new server, and compare the output line by line:
ssh-keyscan -p 22 -t rsa,ecdsa,ed25519 <server-ip-or-hostname> 2>/dev/null | ssh-keygen -lf -
Example output:
2048 SHA256:mT592Am+gASKPIGTQ9UD372hC9zIzydrXYzXqiYPvuQ  (RSA)
256 SHA256:YAe/YS+vcAPVDFRpDdQrRTbugH7QheSwsDbPbDSbA8c  (ECDSA)
256 SHA256:aYmOxWnuUw2404kHqWMF28UUunqaOMvPgghxrLPtCJE  (ED25519)
All three fingerprints should be identical on both servers. Run the scan before you shut down the old server. If the old server is already gone, read the fingerprint your SFTP client saved from it with ssh-keygen -l -F <hostname> on a machine that connected before.
Notes:
- Use port
22, the SFTP service. Port2222is the operating system's SSH daemon, which has its own host keys, so comparing those would give you a false mismatch. - Add
-E md5to thessh-keygencommand if you need to compare against theMD5:style fingerprints shown by WinSCP or FileZilla. - In a High Availability deployment, scan the load balancer address several times so that you hit every node. Every scan should return the same fingerprints.
Check the key files on the server
To see which keys are on disk, SSH into the server on port 2222 and run:
cd /opt/sftpgw
sudo ssh-keygen -lf ssh_host_rsa
sudo ssh-keygen -lf ssh_host_ecdsa_256
sudo ssh-keygen -lf ssh_host_ed25519
Use the private key files as shown. The .pub files are stored in SSH2 format, which ssh-keygen -l cannot read.
Comparing this output with the ssh-keyscan output tells you whether a mismatch comes from the import (the files on disk are wrong) or from the running service (the files are right, but the service has not loaded them yet).
If the fingerprints do not match
Only the RSA fingerprint differs: the import applies the ECDSA and Ed25519 keys immediately, but the RSA key is not served until the SFTP Gateway service restarts. Restart it, then scan again:
sudo systemctl restart sftpgw-admin-api
In a High Availability deployment, restart the service on every node. Nodes other than the one you imported the backup on keep serving their old keys until they restart.
All fingerprints differ, and the files on disk are also different: the backup did not carry the host keys, for example because it was exported from an older version. Copy the key files from the old server manually using the host key migration guide, keep them owned by sftpgw:sftpgw, and restart the service.
A user already accepted the new key before you fixed it: they will see the warning once more, the other way around. They can clear the saved entry with ssh-keygen -R <hostname>.
For rotating host keys deliberately across an HA cluster, see Host Key Rotation (HA).
If you run into any issues, feel free to contact us at support@thorntech.com.