How to upgrade your HA stack
TLDR - Quick Summary
What: Upgrade HA stack to newer version with zero downtime
Steps: Export backup, take RDS snapshot, create Launch Template from Launch Config, update AMI, use Warm Pools to test new instances
Key Point: Detach old instances after verifying new ones work, avoids downtime
Rollback: Point ASG back to original Launch Config, restore RDS from snapshot if needed
Overview
This article walks you through upgrading your SFTP Gateway HA stack to a newer version. The overall process involves pointing the template to the new marketplace image, and then cycling in new EC2 instances.
There are a few edge cases, so make sure you skim through the entire kb article and figure out which steps apply to your upgrade scenario. Feel free to skip the sections that do not apply. You can use the table of contents in the right sidebar to jump to specific sections.
This article covers the scenario of upgrading an HA stack of v3.5.1 to v3.7.0.
We will be using SFTP Gateway Professional, which supports up to 100 SFTP users.
And, we will be upgrading in such a way where there is zero downtime.
Taking precautions
When performing any kind of change to Production, you need to think about how you would recover in case something unexpected happens. In this section, you will take some backups that will serve as a safety net. There is a section at the end of this article which covers the restore process in case you need to roll back.
The steps in this section can be performed without impacting current Production, so feel free to do these right now.
Make an application backup
In this section, you will take an application backup of your current SFTP Gateway v3 Production stack. This backup contains all your users and settings, much like a database dump. But it's in yaml format, which is a human-readable format similar to JSON.
Go to the Web Admin Interface for SFTP Gateway.
On the Settings page, scroll down to the bottom. You will see a Backup & Recovery section.
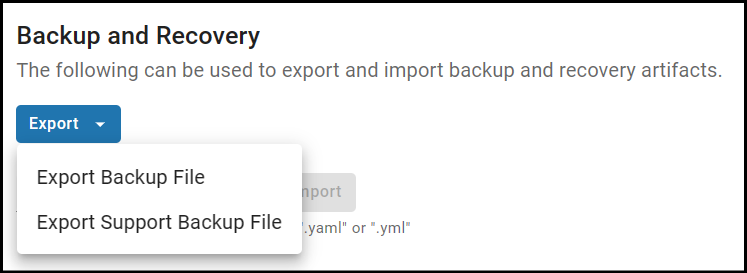
Click Export to expand the drop-down menu, and select the Export Backup File option.
This will download a yaml backup artifact to your local workstation.
Move this file to a location where you will be able to find it later.
Make a database backup
In this section, you will take a database snapshot of your RDS instance. It's unlikely that you will need to roll back the database, but this task is worth doing anyway because of how easy it is to perform.
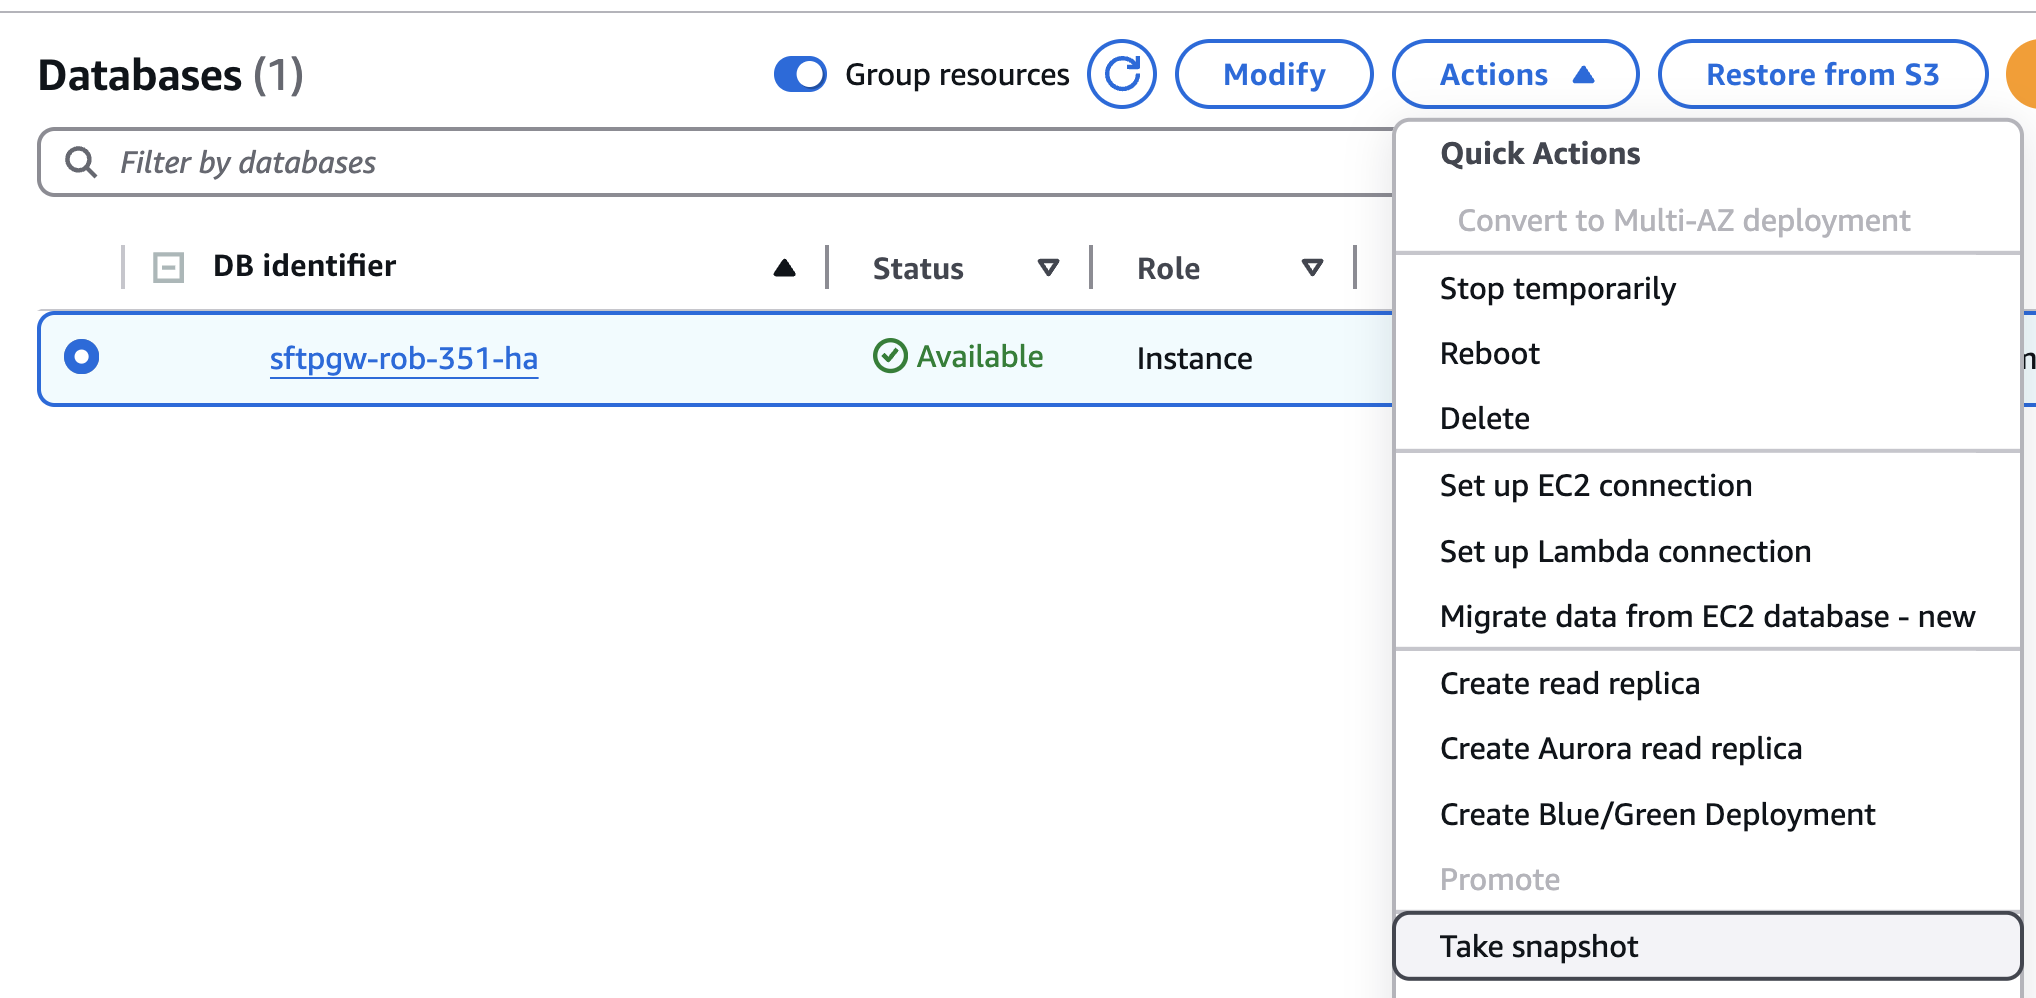
In the AWS console, go to the RDS service.
Select the radio button next to your production database.
Under Actions, choose Take snapshot.
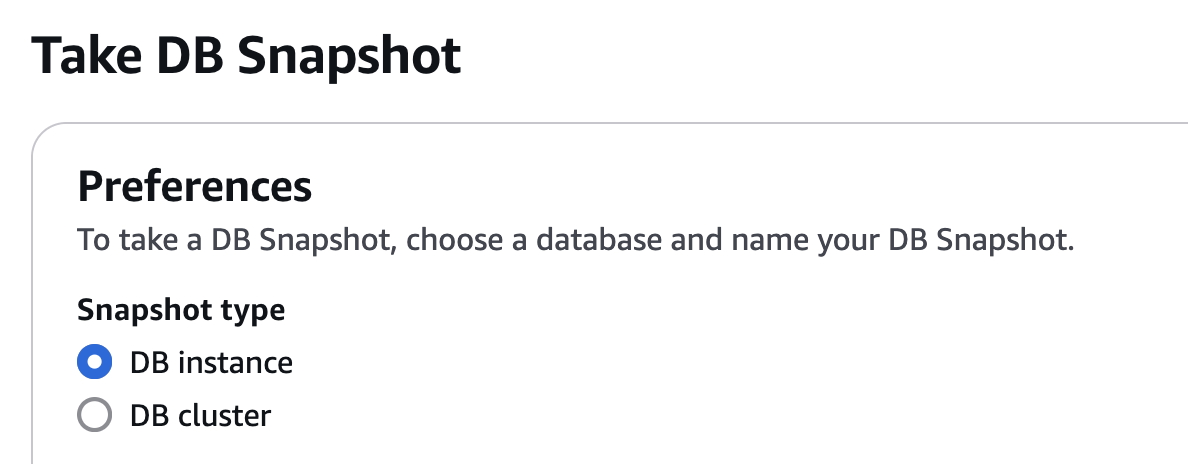
On the next Take DB Snapshot screen, make sure DB instance is selected in the Preferences section.
For the name of the snapshot, think of a name such as sftpgw-v3-db-backup, and
maybe append the date.
Finally, click Take Snapshot on the bottom right.
This will kick off the process of creating the database snapshot, which will take several minutes.
Note: Refer to the section at the end of this article for how to restore the database from a snapshot.
Create a new Template
In this section, you will be creating a new Launch Template. This is a document that defines how new EC2 instances will be introduced to the Auto Scaling Group (ASG).
Since we are just creating a template object, the steps in this section can be performed without impacting current Production. So feel free to proceed with this section -- you will not affect production until you wire the ASG to the Launch Template.
Convert the Launch Configuration to a Launch Template
Launch Configurations (LC) are used to define how new EC2 instances will be
introduced to an ASG. Launch Configurations have been deprecated, and replaced
by Launch Templates (LT). If you are running a previous version of SFTP
Gateway (e.g. v3.5.1), this is a good opportunity to switch over to the new
Launch Template.
In the AWS console, navigate to EC2 and then Auto Scaling Groups. On the list of ASGs, look for the ASG associated with your current Production.
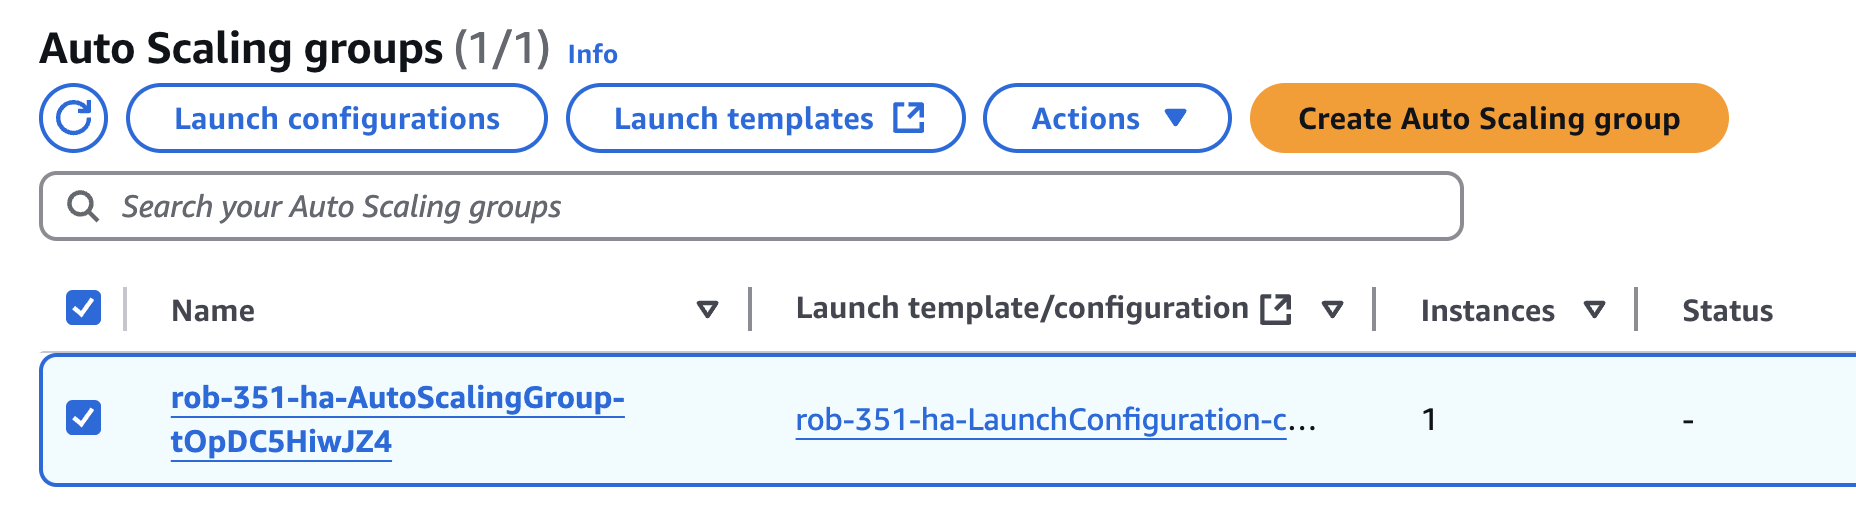
Next to the name of your ASG, it will show the associated Launch Configuration in the Launch template/configuration column.
Click on the name of your Launch Configuration, and it will take you to a list of Launch Configurations. Make sure your Launch Configuration is selected from the list.
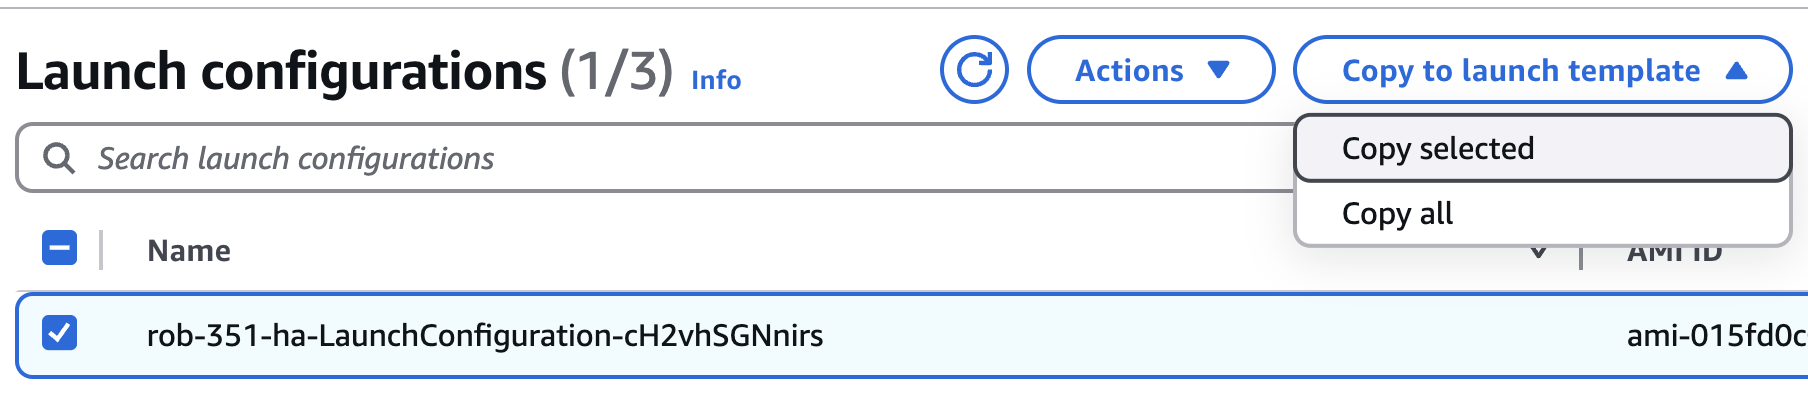
Toward the top of the page, click the button Copy to launch template. From the drop-down menu, choose Copy selected.
This will open a modal window titled Copy to launch template.
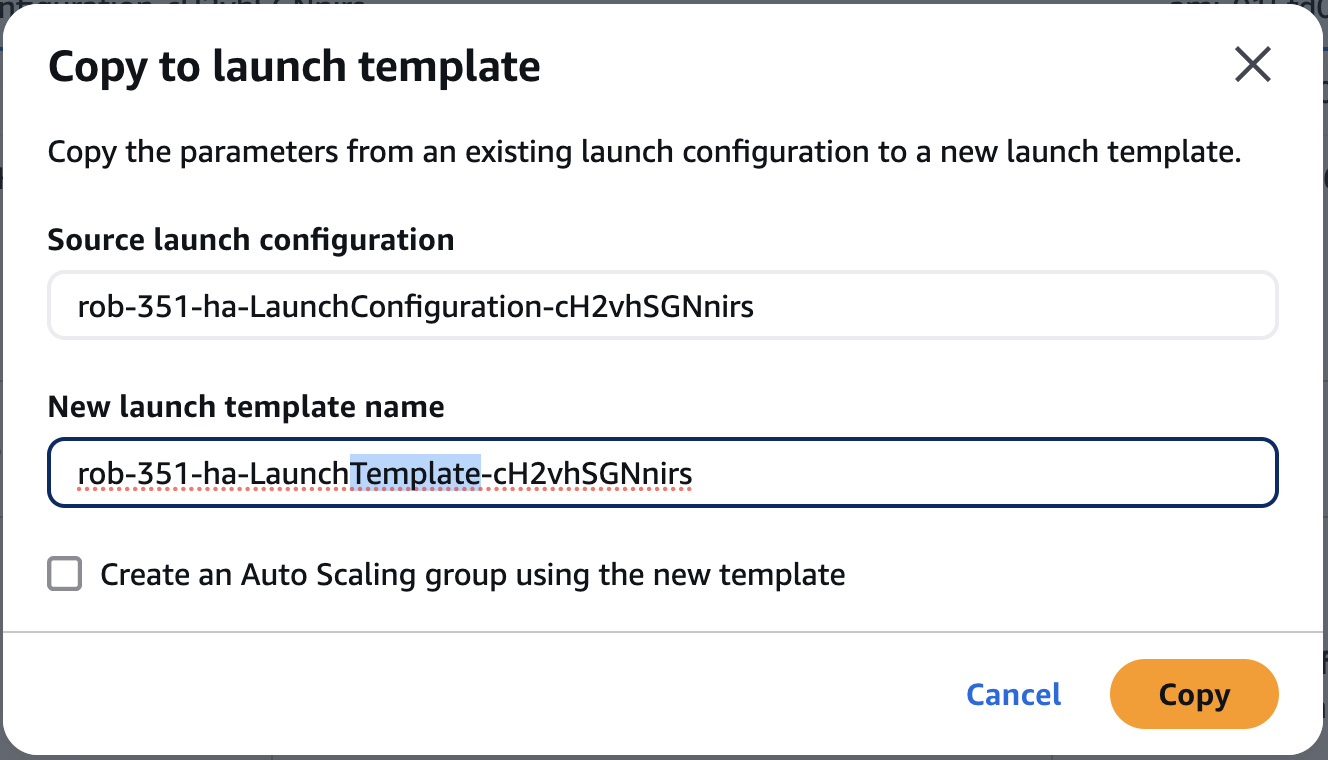
For the New launch template name, change the text LaunchConfiguration to
LaunchTemplate.
Also, make sure you do NOT check the box next to Create an Auto Scaling group using the new template.
Note: While you're on this screen, copy the name of the Source Launch Configuration somewhere. You want to keep this handy if you need to roll back later.
Finally, click Copy.
You will see a newly created Launch Template.
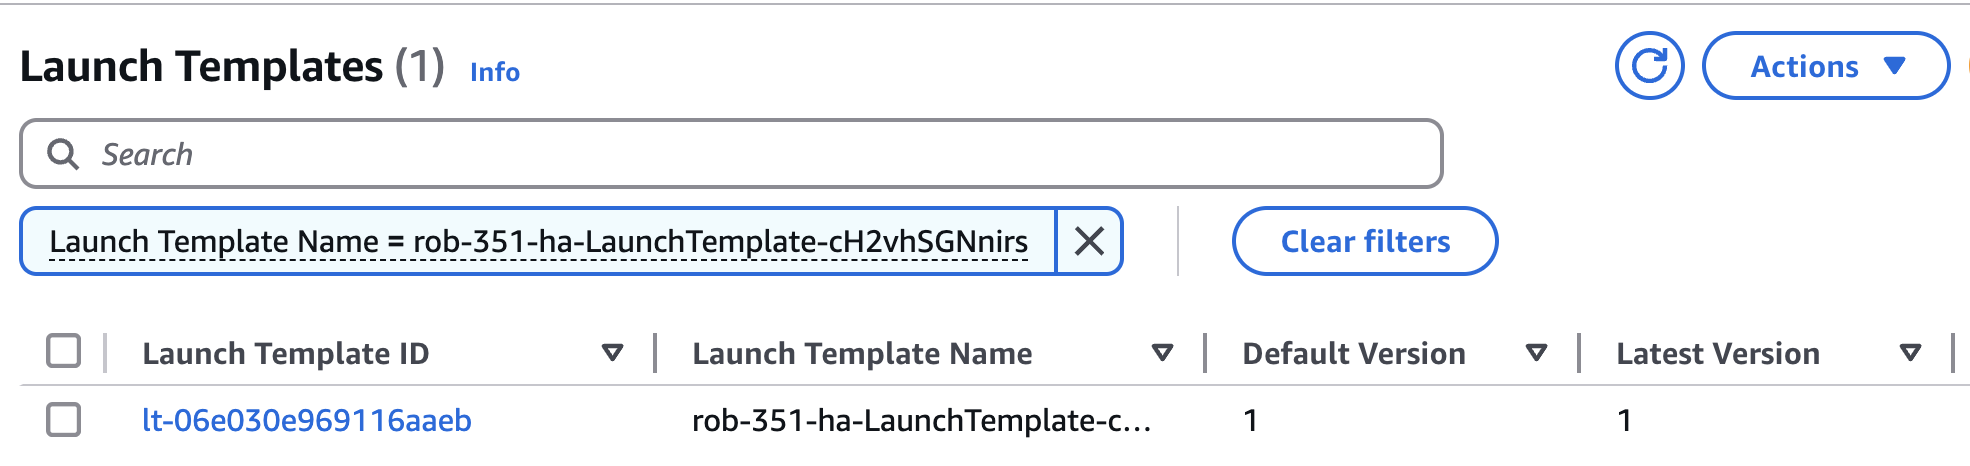
If you made it this far, you have successfully copied your Launch Configuration to a Launch Template.
Note: It's important to remember that this new Launch Template is not wired to anything yet. Also, this Launch Template is an exact copy of your current Launch Configuration, meaning that we have not made any changes yet (such as pointing to a new AMI).
Point the Launch Template to the new AMI
Now that you are using Launch Templates instead of Launch Configurations, you can move onto pointing it to a new AMI. Launch Templates are atomic, so you can't edit them -- rather, you have to create a new version that includes the new settings.
Select the Launch Template.
Under the Actions menu, select Modify template (Create new version).
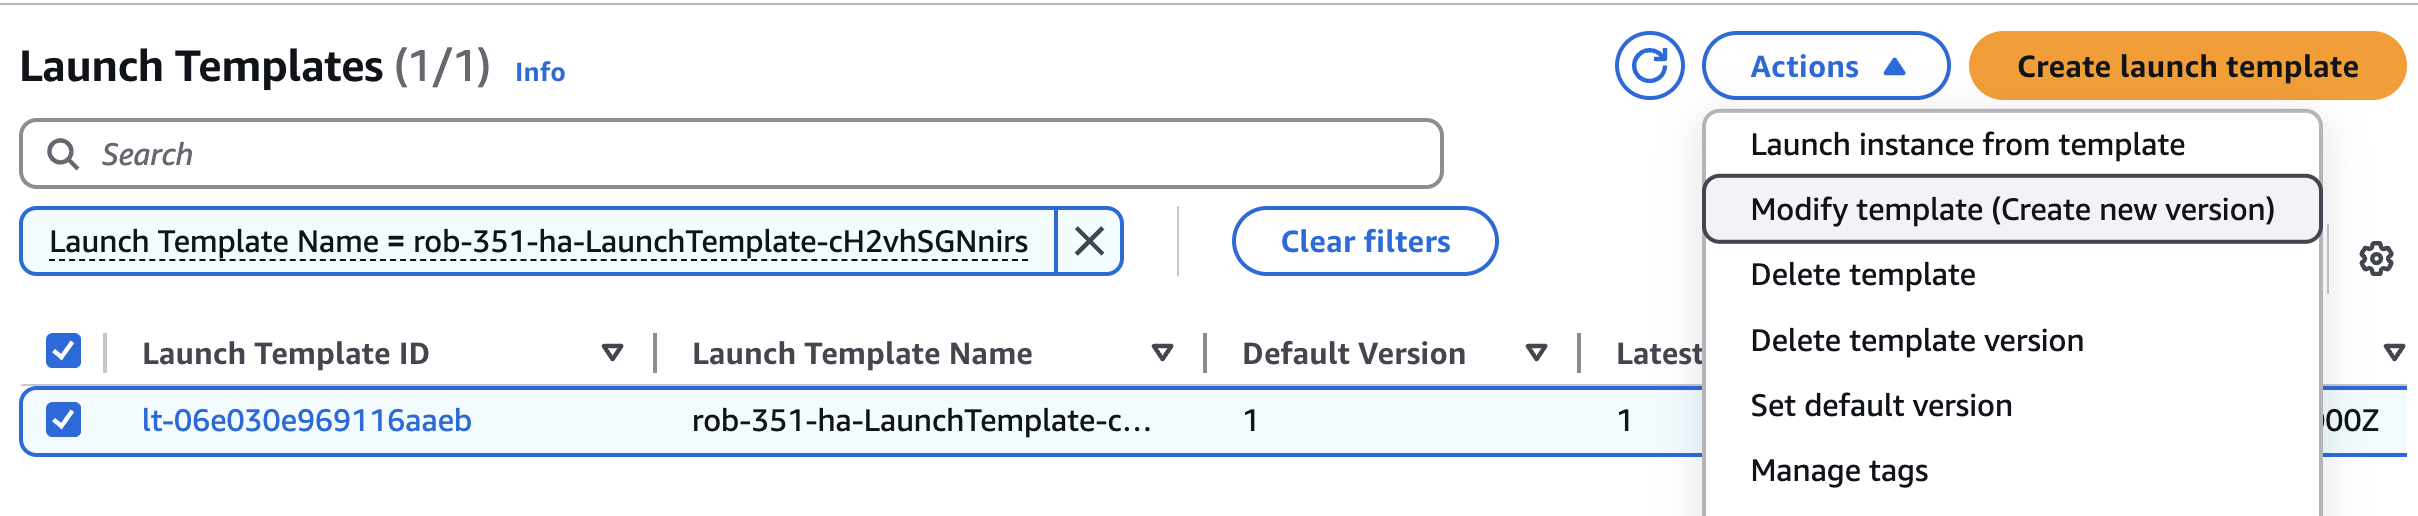
This will open the Modify template (Create new version) page.
For the Template version description, type SFTP Gateway Professional v3.7.0.
Make sure you adjust the version number based on your situation.
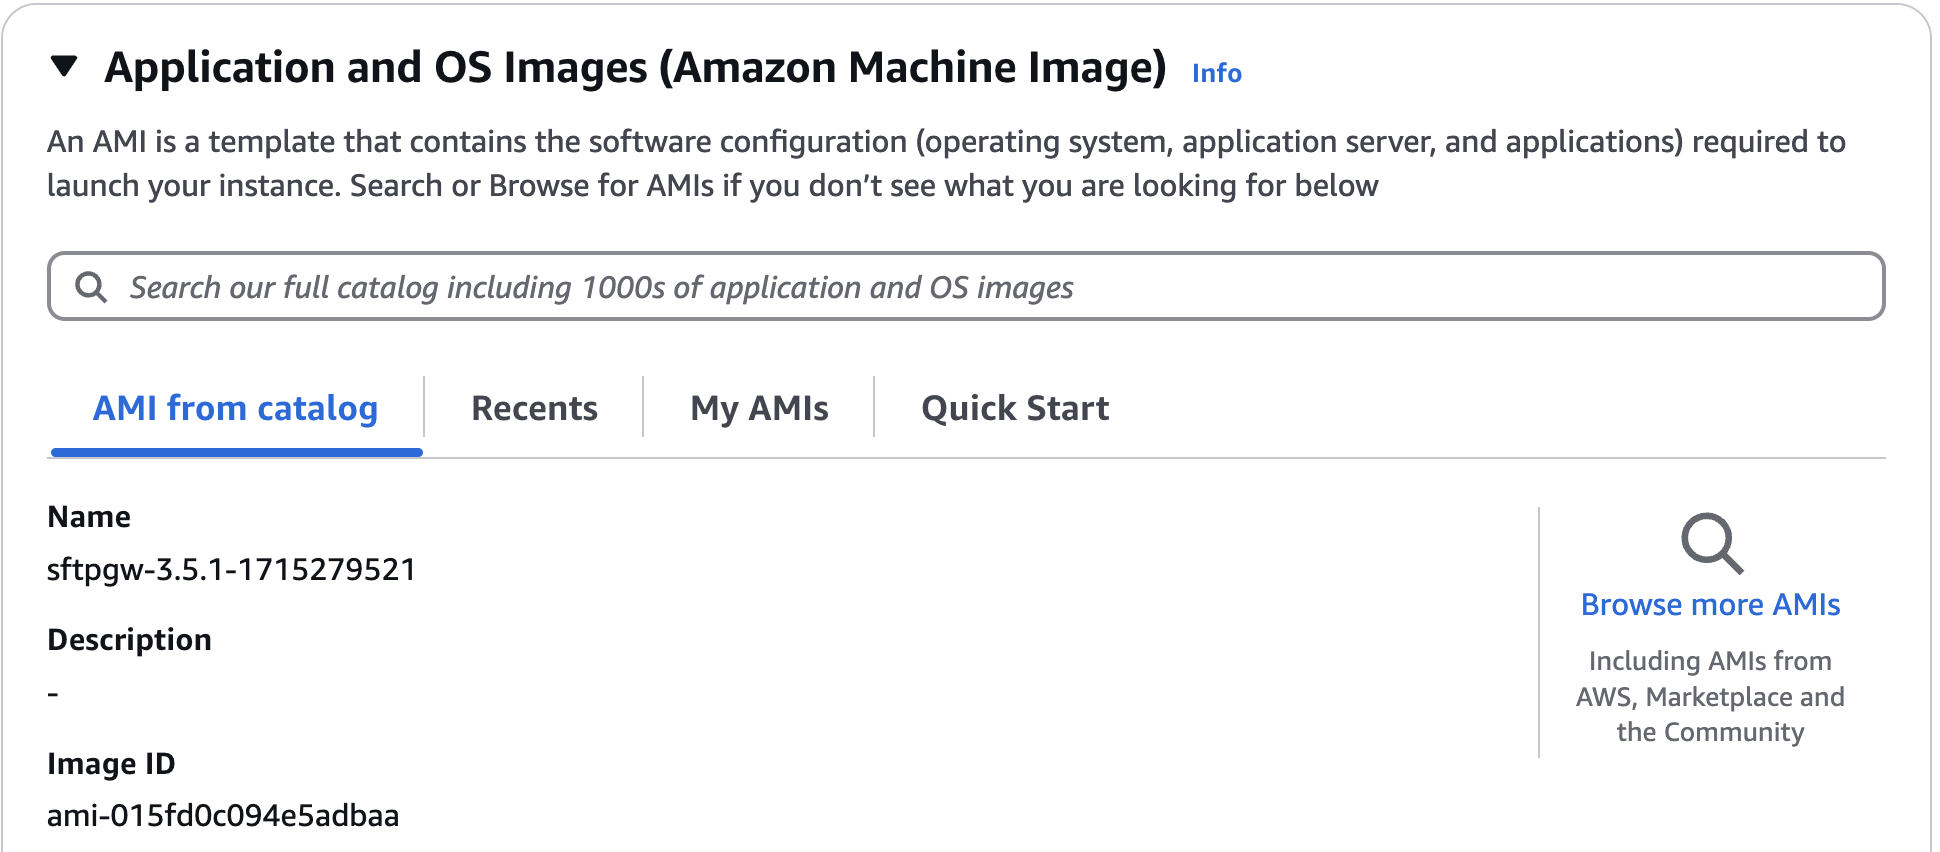
Scroll down to the Launch template contents section.
Under Application and OS Images (Amazon Machine Image), click Browse more AMIs over on the right side. We're going to look for the SFTP Gateway Professional AMI.
This will take you to a new page called Choose an Amazon Machine Image (AMI).
Select the sub-tab named AWS Marketplace AMIs.
Then, in search field, type SFTP Gateway Professional and hit Enter.
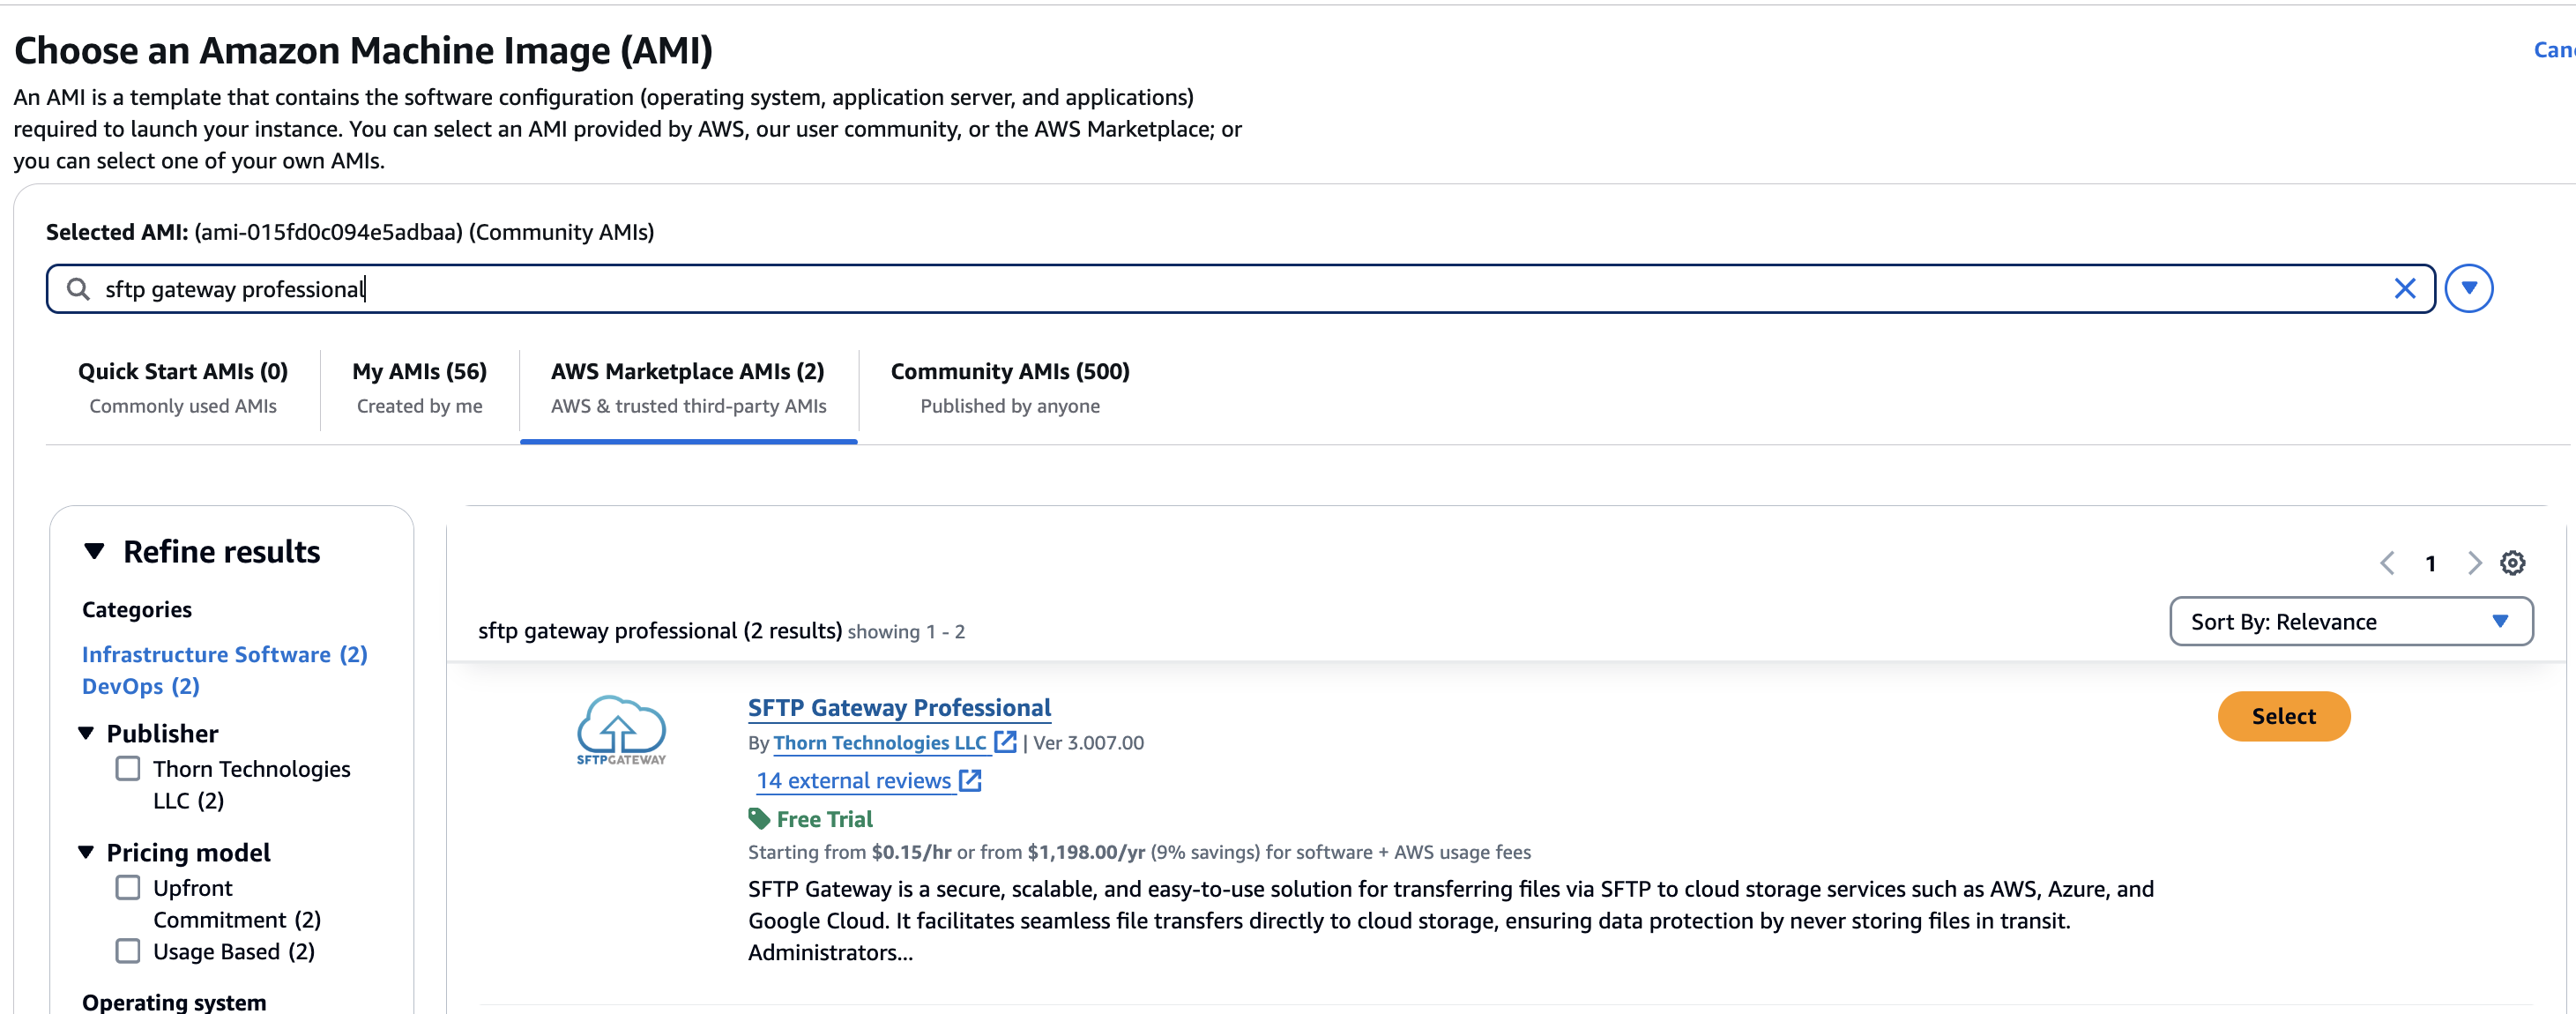
Look for SFTP Gateway Professional, and click Select.
This will pop up a modal that shows the marketplace product details. On the bottom right, click Subscribe now.
Note: The act of subscribing does not cost you anything. Rather, it just authorizes your AWS account to launch the product. You are only charged (per hour) when the EC2 instance is running.

If you see another modal warning that your current settings will be changed, go ahead and click Confirm changes.
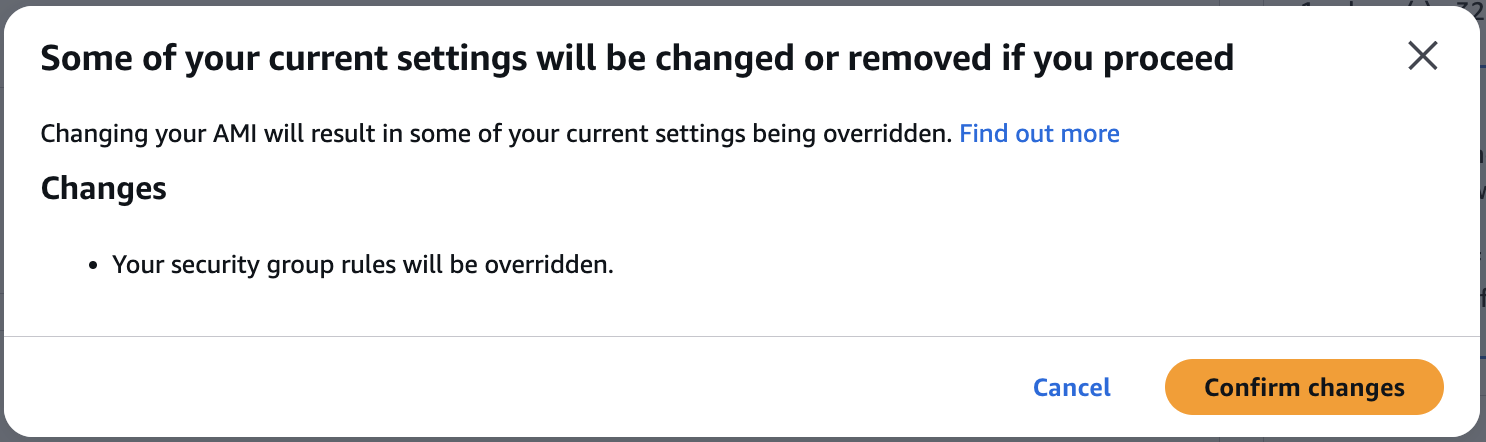
Note: Remember to verify your EC2 Security Group rules as you test the rollout of new instances later on.
Finally, you will be taken back to the Modify Launch Template page. Verify that the AMI ID points to the latest version of SFTP Gateway Professional.
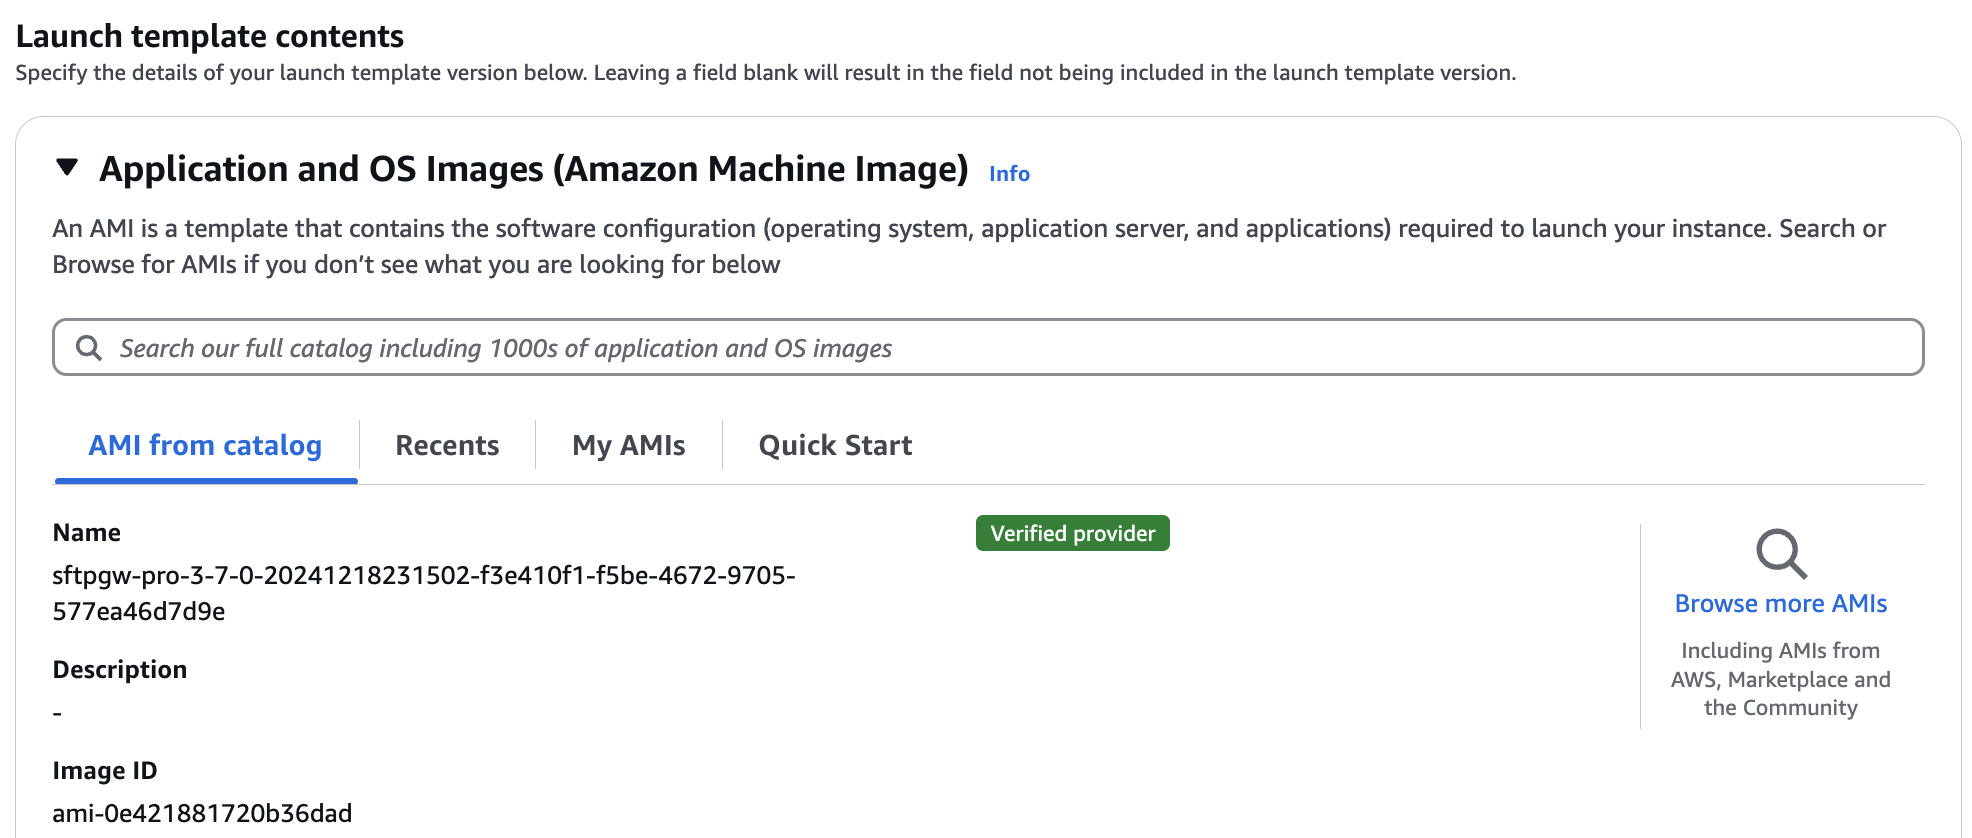
Note: Before you click Create template version, there is another change you may need to make. Please move onto the next section.
Update the EBS volume size
The recommended EBS volume size for SFTP Gateway is 30 GB.
If you look at your existing CloudFormation stack, you should see that your
EBS volume is set to 30 GB (or something similar) by default.
When the Launch Configuration is copied to a Launch Template, the
EBS volume size does not carry over. The reason for this is because the EBS
volume size is a nested value, and AWS does not perform a deep copy. As a
result, your Launch Template will show an EBS volume size of 8 GB which
is the minimum size of our product AMI.
We recommend having at least 30 GB of Linux disk space. This will cover
the operating system as well as fully rotated log files.
Scroll down to the Storage (volumes) section.
Drill down to EBS volumes and then Volume 1.
Change the Size (GiB) value from 8 to 30.
Disable IAM authentication in the UserData
In SFTP Gateway v3.7.0, we added a feature where the application authenticates
to the RDS database via IAM authentication rather than username and password.
While this is a requested feature that improves security, this feature is not
compatible with an existing v3.5.1 HA stack which relies on database passwords.
In order to perform an in-place HA upgrade from v3.5.1 to v3.7.0, you will
need to disable the RDS IAM authentication feature for incoming EC2 instances.
To disable the feature, you will need to set a flag within the Launch Template.
Note: If this section does not apply to you, go ahead and finish saving any changes by clicking on the Create template version button on the right pane. Then, feel free to skip to the next section.
Scroll to the bottom of the Modify Launch Template page.
Click on the Advanced details section to expand it.
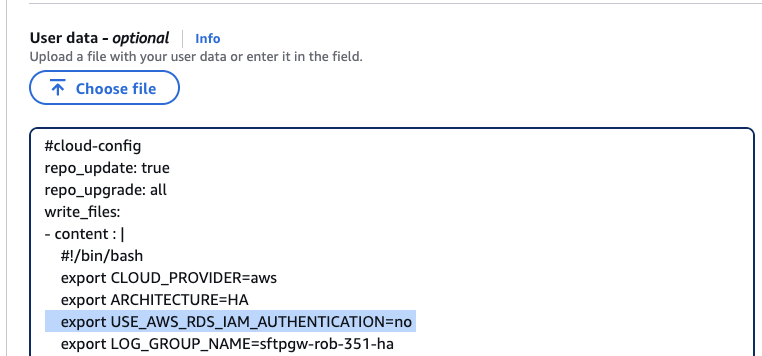
Again, scroll to the bottom of the Modify Launch Template page. You should see a section called User data - optional.
In the UserData field, you should see the following text snippet:
write_files:
- content : |
    #!/bin/bash
    export CLOUD_PROVIDER=aws
    export ARCHITECTURE=HA
    export LOG_GROUP_NAME=sftpgw-rob-351-ha
    ...
  path: /opt/sftpgw/launch_config.env
This code is creating a new file launch_config.env that declares several
bash variables. These variables tell SFTP Gateway how to configure itself
on first launch.
Among the existing export lines, add this line as well:
export USE_AWS_RDS_IAM_AUTHENTICATION=no
So, the text snippet should now look like this (remember to indent with spaces):
write_files:
- content : |
    #!/bin/bash
    export CLOUD_PROVIDER=aws
    export ARCHITECTURE=HA
    export USE_AWS_RDS_IAM_AUTHENTICATION=no
    export LOG_GROUP_NAME=sftpgw-rob-351-ha
    ...
  path: /opt/sftpgw/launch_config.env
And here is a screenshot of what you want to see in the AWS console:
When finished, click the Create template version button on the right pane to save your changes.
Set the default version on the Launch Template
Launch Templates have a feature where you can create multiple versions. This way, you have a history of changes made. So in our example, we now have the following versions:
- Version 1: Initial version of the Launch Template, as a result of copying the Launch Configuration.
- Version 2: Includes our changes to the AMI and UserData.
The Launch Template defaults to version 1. We want to change the default to
the latest, which is version 2.
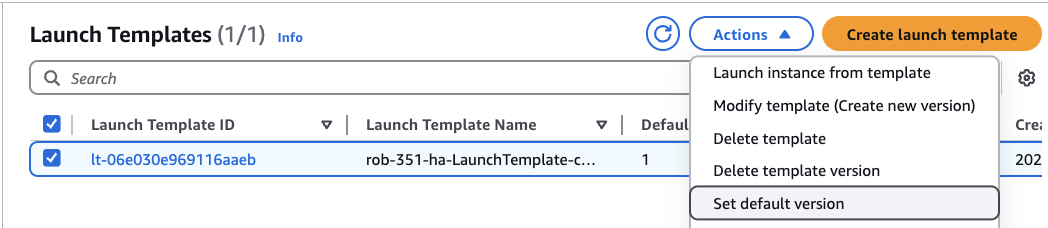
In the AWS console, go to EC2 and then Launch Templates.
From the list, check the box next to your Launch Template.
It will say the Default Version is 1, but the Latest Version is 2.
From the Actions menu, click Set default version.
This will pop up a modal. From the drop-down menu, select version 2.
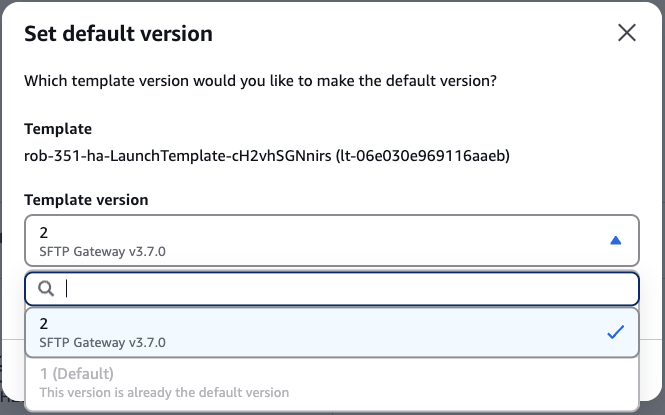
Finally, click the Set as default version button.
Point the ASG to the Launch Template
Up until this point, all of the steps have been preparatory in nature. For example, you took some backups, and you created a Launch Template that isn't wired to anything.
Warning: In this section, you will begin to affect your Production environment.
In the AWS console, go to EC2 and then Auto Scaling Groups.
Click on the ASG that is being used by your Production stack.
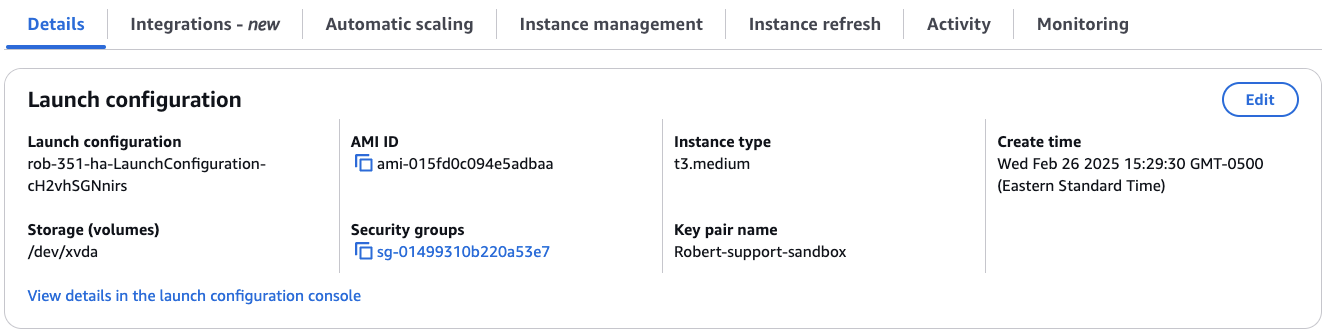
On the Details tab, you will see that it's pointing to your current Launch Configuration.
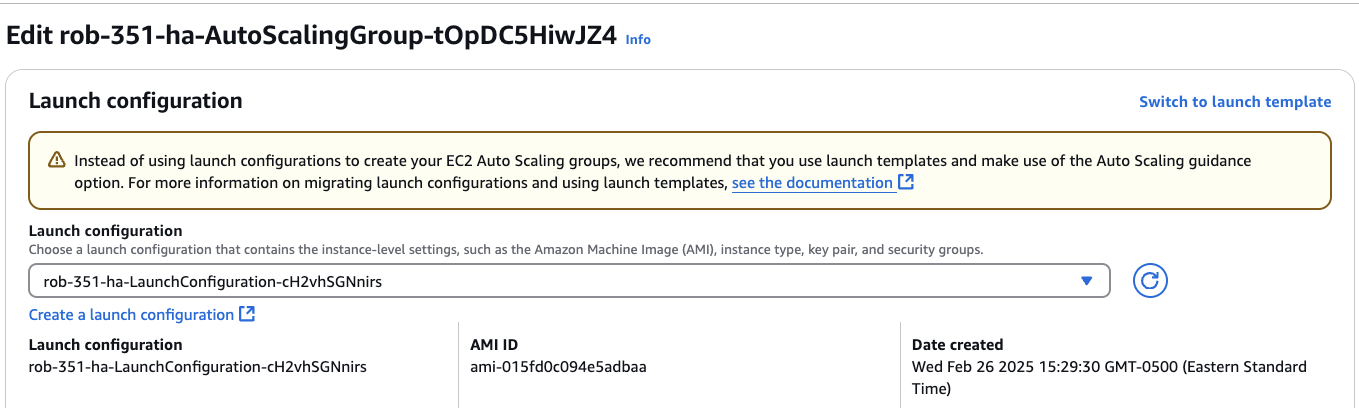
On the right side, click the Edit button. This will take you to the Edit Auto Scaling Group page.
You should see that the ASG is pointing to your current Launch Configuration. Again on the right side, click Switch to launch template.
You should see a Launch template section at the top of the Edit Auto Scaling Group page.
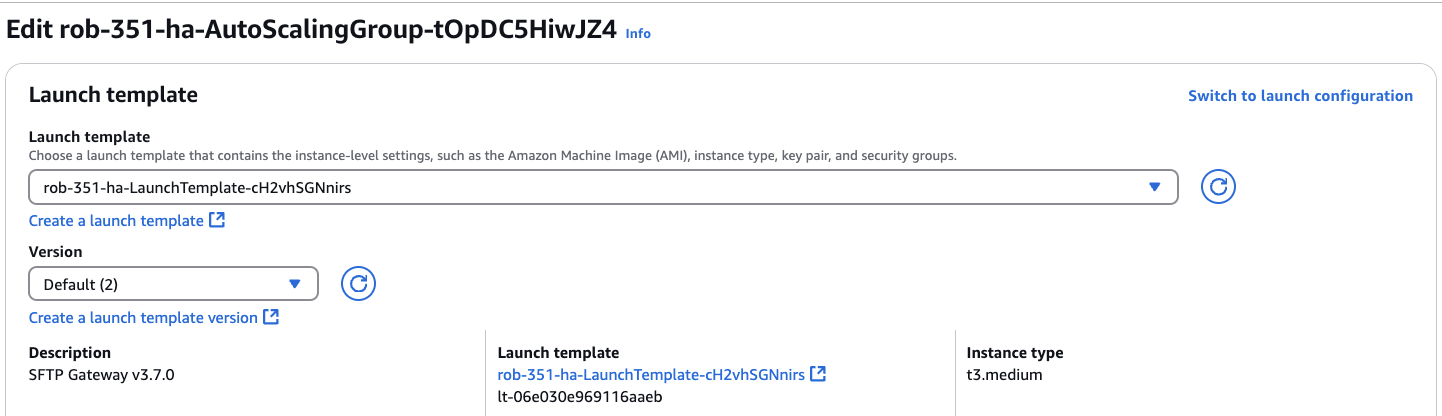
From the drop-down list, select the Launch Template you created earlier.
Under the Version field, verify that it says 2, or whatever is the latest version.
When finished, scroll to the bottom of the page and click the Update button.
From this point forward, any new EC2 instances that are introduced into the ASG
will be generated using the latest AMI for SFTP Gateway (i.e. SFTP Gateway Professional v3.7.0).
Update the Instances on the ASG
Currently, all of the EC2 instances in Production are still running the original
version (i.e. v3.5.1). It's only the new incoming EC2 instances that will
run the new version (i.e. v3.7.0).
In this section, you will update the EC2 instances in the ASG to point to the new version. There are two approaches you can take:
- Automatic: You can leverage the AWS features in the ASG to effortlessly cycle in new instances. But there could be service outages while this happens.
- Manual: You can take control of how instances are replaced, and use techniques to make sure there is no downtime.
This section will cover both approaches.
SFTP polling script
Before you start cycling in new instances, you might want to continuously check your SFTP endpoint. This way, you can immediately detect any downtime, and report to your stakeholders the extent of this downtime.
Here is a bash script that you can run from your local machine (or from the AWS cloud shell):
#!/bin/bash

# Configuration
SFTP_HOST="rob-35-Netwo-8kbBR5CoZK8j-a719c6523c142d20.elb.us-east-1.amazonaws.com"
SFTP_USER="robtest"
SFTP_PORT=22  # Default SSH port, change if different
PRIVATE_KEY="private.pem"

# Function to check SFTP connection
check_sftp_connection() {
    sftp -i "$PRIVATE_KEY" -P "$SFTP_PORT" "$SFTP_USER@$SFTP_HOST" <<< $'pwd\nquit' > /dev/null 2>&1
    return $?
}

# Main polling loop
while true; do
    if check_sftp_connection; then
        echo "$(date): SFTP connection successful"
    else
        echo "$(date): SFTP connection failed"
        # Optional: Add notification logic here (email, slack, etc.)
    fi

    # Wait for 1 second before next check
    sleep 1
done
Create a new file named poll.sh:
nano poll.sh
Paste in the contents of this script.
Make sure you change the SFTP_HOST and SFTP_USER values in the script.
Save and quit.
Make the script executable:
chmod +x poll.sh
Also, create another file private.pem:
nano private.pem
Paste in the contents of the private key for this specific user.
To run the script, run:
./poll.sh
You should see a new line every few seconds indicating whether the SFTP connection succeeded or failed.
Automatic - using ASG Instance Refresh
If you want to quickly and easily update the EC2 instances in the ASG, you can use the Instance Refresh feature. Our recommendation is to skip this section, and perform a manual refresh of the instances using a different technique in order to upgrade more safely and with no service downtime.
To use the Instance Refresh feature, go to EC2, then Auto Scaling Groups.
Click the link to your Auto Scaling Group.
In the sub-tabs, click the Instance refresh tab.
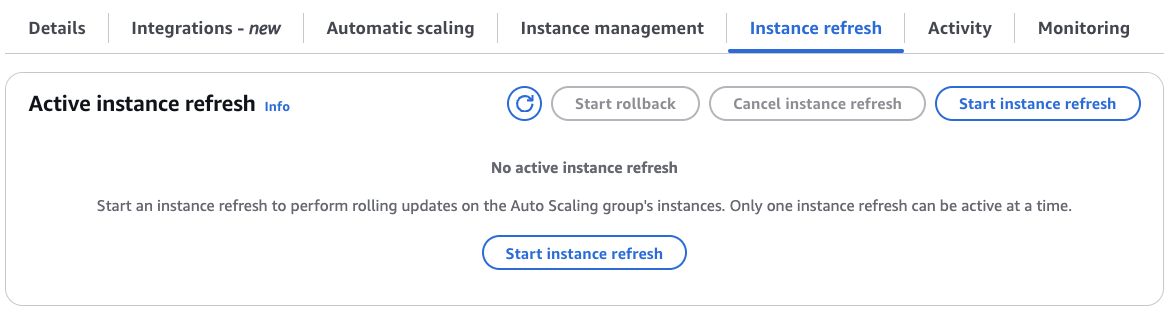
In the Active instance refresh section, click the Start instance refresh button.
You will see the following screen:
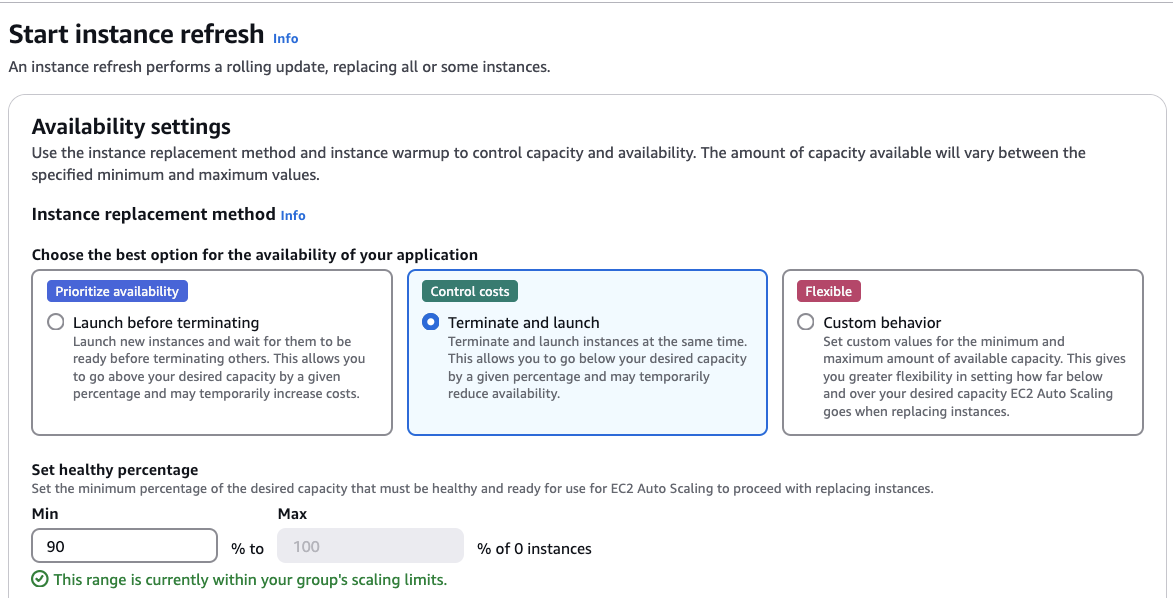
You can tweak the different settings on this page. But it doesn't really matter what you choose, because it will still result in downtime.
Scroll to the bottom and click Start instance refresh.
Wait for at least 30 minutes as the ASG terminates existing instances and replaces them with new ones.
Manual - using Warm Pools and Detaching instances
Our recommended approach to cycling in new EC2 instances is to use a combination of Warm Pools and using the ASG Detach feature. These two techniques used together will eliminate downtime as you update your stack.
Instance Refresh is fully automated and easy to use. This would be ideal if you have fully tested the HA upgrade process in a staging environment. But we understand that not all of your applications will have full DEV/QA/Staging environments. So, we want to take a more manual approach to the upgrade so we can make sure everything is working every step of the way.
Create a Warm Pool
In this scenario, we are upgrading between versions (v3.5.1 to v3.7.0).
So we want to make sure that any new v3.7.0 instances are working without
issue. And, we want to do this prior to the load balancer sending them live traffic.
Auto Scaling Groups have a Warm Pool feature that lets you spin up new EC2 instances in a holding area, so you can test and verify everything is operational.
When you increase the Desired Capacity on the ASG, the Warm Pool instances are immediately drafted into service.
In the AWS console, go to EC2 and then Auto Scaling Groups.
Click on the ASG that is being used by your Production stack.
On the ASG details page, scroll down to the bottom. You will see a Warm pool section.
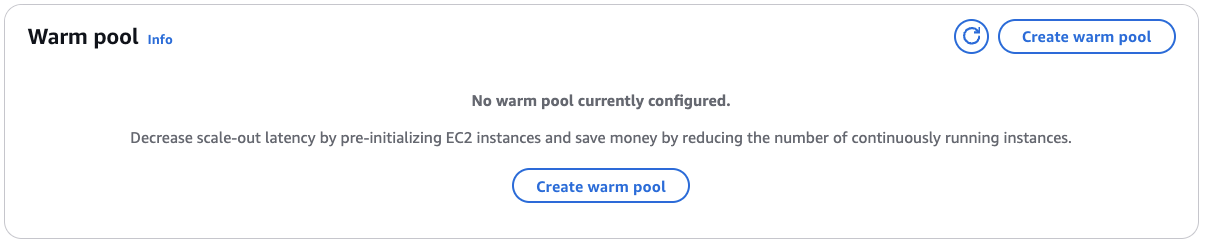
Click the Create warm pool button. This will open a Create warm pool modal window.
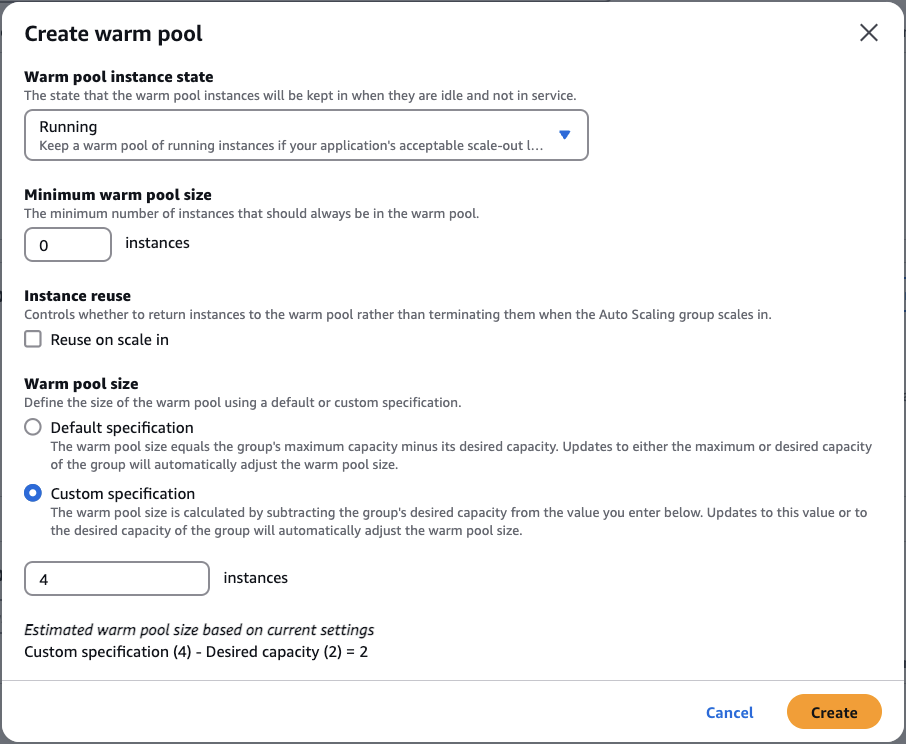
Change the Warm pool instance state to Running.
Under Warm pool size, choose Custom specification.
For the number of instances, type 4.
You should see the following output:
Estimated warm pool size based on current settings
Custom specification (4) - Desired capacity (2) = 2
Note: You may want to adjust this number, based on your current state.
To explain, this is how the number 4 is calculated:
2: There are currently2running production instances (i.e. Desired Capacity)2: We want to have2incomingv3.7.0instances added to the Warm Pool4: This is the total number of running instances (Desired Capacity + Warm Pool)
Finally, click Create
Back on the ASG details page, you will see two new v3.7.0 instances,
as well as which Launch Template they are using.
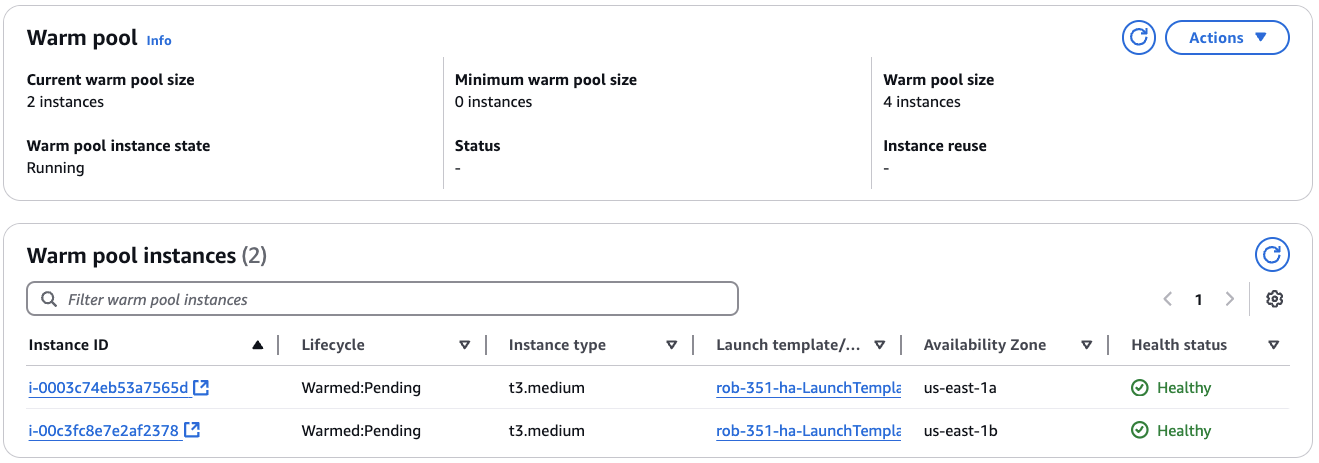
Here, you can directly test each Warm Pool instance and verify that they are running without issue.
Also, if you scroll to the top of the ASG details page (on the Instance management tab), you can verify that the Desired Capacity instances receiving load balancer traffic are different from the Warm Pool instances.

Note: While you are here, make a note of the production EC2 instance IDs. These are the instances that you will be removing later on, after the new instances enter into service.
Add the Warm Pool Instances into service
Make sure you test the incoming v3.7.0 instances and verify that each
individual instance is working as expected. Once everything looks good,
you can bring them into service.
Note: If you haven't already started the SFTP poll.sh bash script mentioned
earlier in the article, now would be a good time to kick off that script.
In the AWS console, go to EC2 and then Auto Scaling Groups.
Click on the ASG that is being used by your Production stack.
At the very top, in the Capacity Overview section, click the Edit button on the right side.
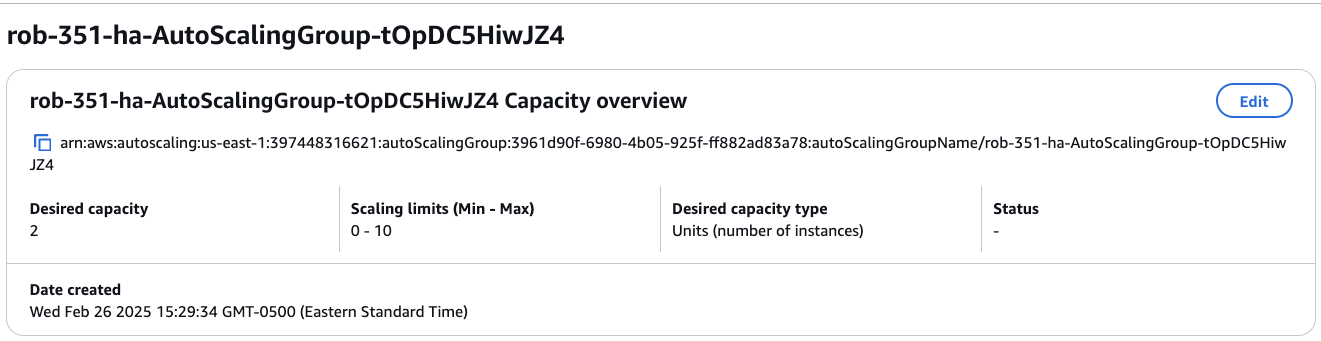
This will open a modal window:
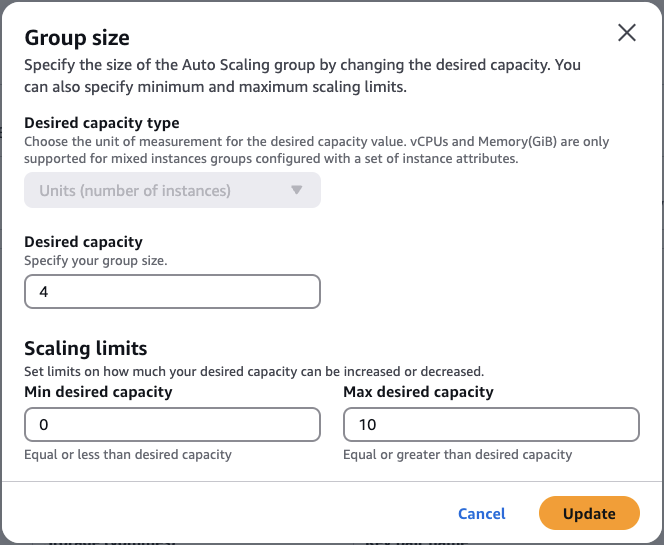
Increment the Desired Capacity by 2. For example, if you started with
2 instances, increase it to 4.
Finally, click Update
Back on the ASG details page, go to the Instance management sub-tab. Keep clicking the Refresh button icon until you see new instances show up.
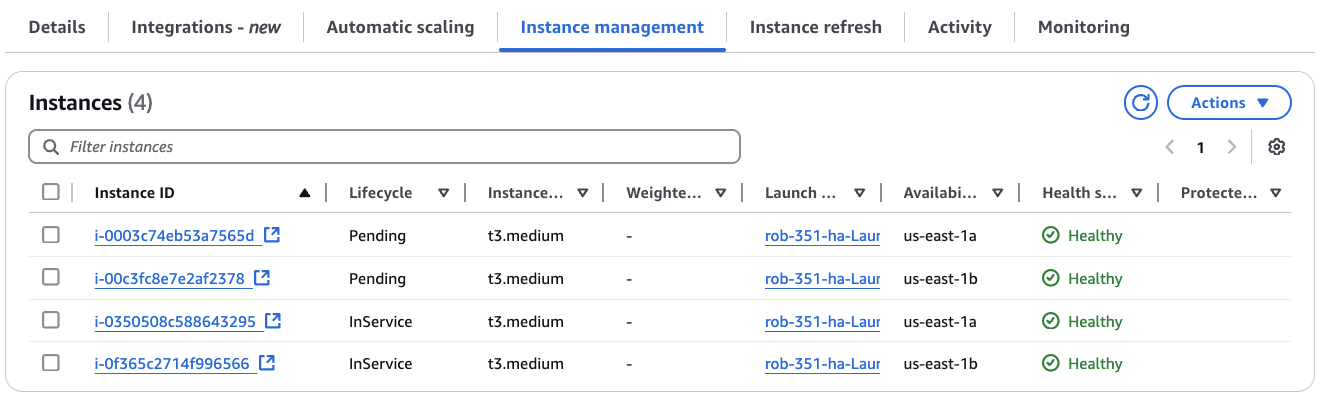
If you look closely, you'll notice that the Instance IDs of the two new instances are the same as the ones from the Warm Pool.
Detach and remove the old production instances
The Auto Scaling Group has different instance states such as Detached and StandBy. In both cases, the Load Balancer is not sending traffic to the instance. The difference between these two states is your intention:
- StandBy: You intend to return the instance back into service.
- Detached: You want to permanently remove the instance from the ASG.
In this section, you will use the Detach operation to drain the Load
Balancer connections to the v3.5.1 instances. Once the Load Balancer is no
longer sending traffic, you can safely terminate the instance without
affecting production.
Keep running the SFTP poll.sh script and verify that there has been no downtime
for the SFTP service, now that the new v3.7.0 instances are receiving load
balancer traffic.
On the ASG details page, go to the Instance management sub-tab.
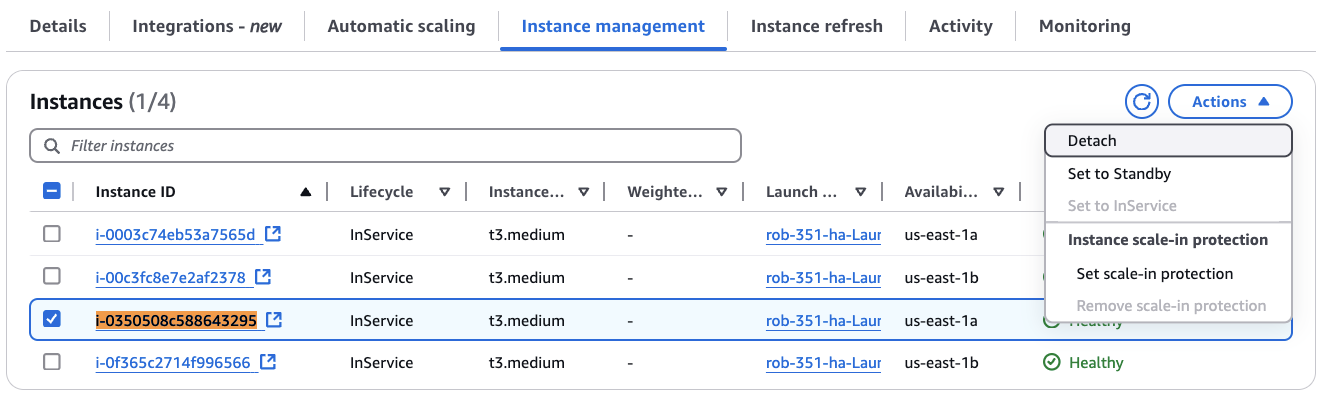
Search the page for one of the original v3.5.1 Instance IDs you copied earlier.
Note: Each EC2 Instance detail page also has an AMI location field that you can use to infer the SFTP Gateway version number, in case you're not sure which instances are running the old version.
Check the box next to the Instance ID.
From the Actions menu, choose Detach. This will open a Detach instance modal window.
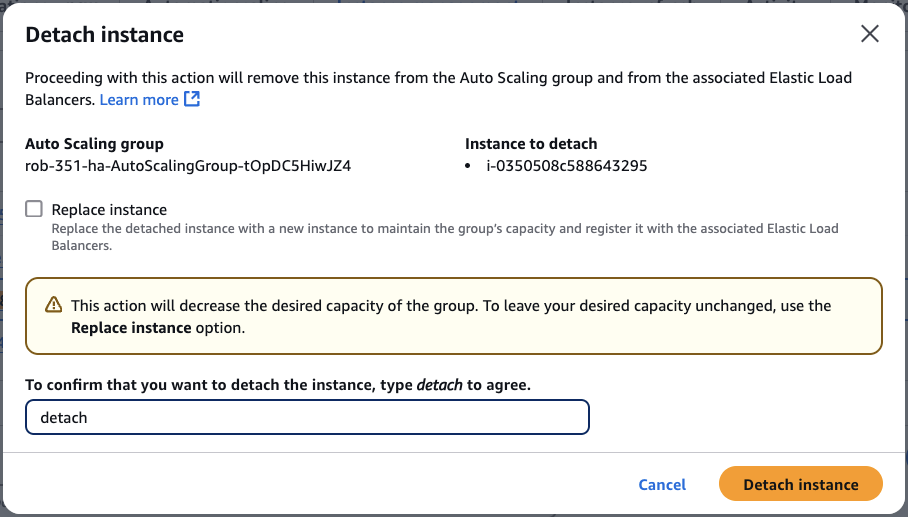
Uncheck the box for Replace instance (since we already replaced it with the Warm Pool instance).
Type the word detach to confirm.
Finally, click Detach instance
You should see that the instance state changes to Detaching.
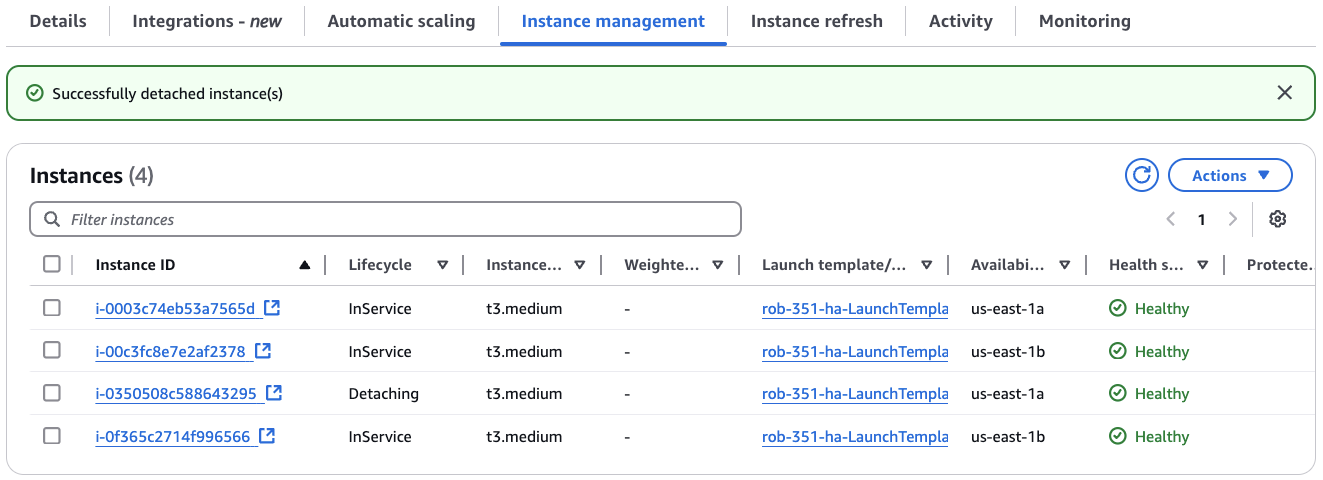
Repeat this process for the other v3.5.1 instance.
Also, keep an eye on the poll.sh script to make sure the SFTP service is not
adversely affected.
Clean up
Now that the two v3.5.1 instances have been Detached from the ASG,
you can safely delete them.
Go to the EC2 service to see a list of EC2 instances.
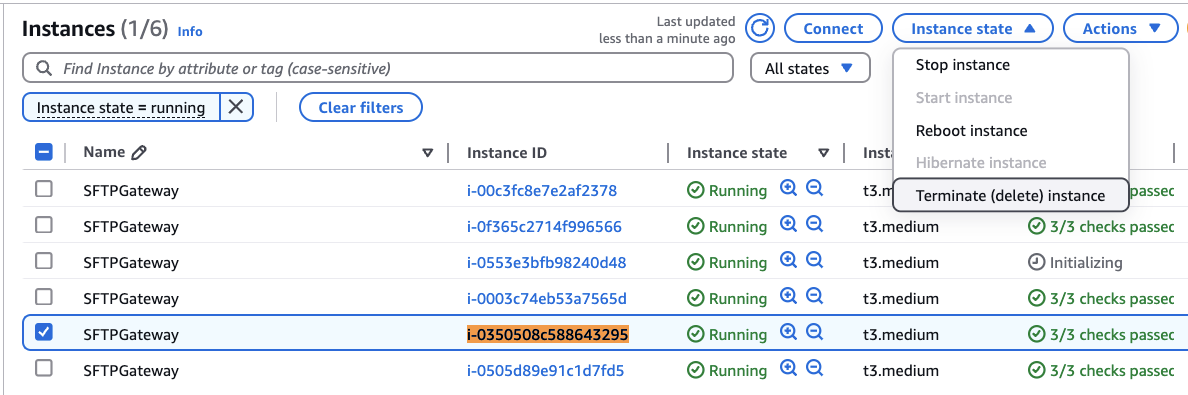
Search for one of the Detached v3.5.1 instances, and select the checkbox next to it.
From the Actions menu, select Terminate (delete) instance.
Repeat this for the other Detached v3.5.1 instance.
Next, go back to the ASG details page, and go to the Instance management sub-tab.
Scroll to the bottom where it shows the Warm pool instances section.
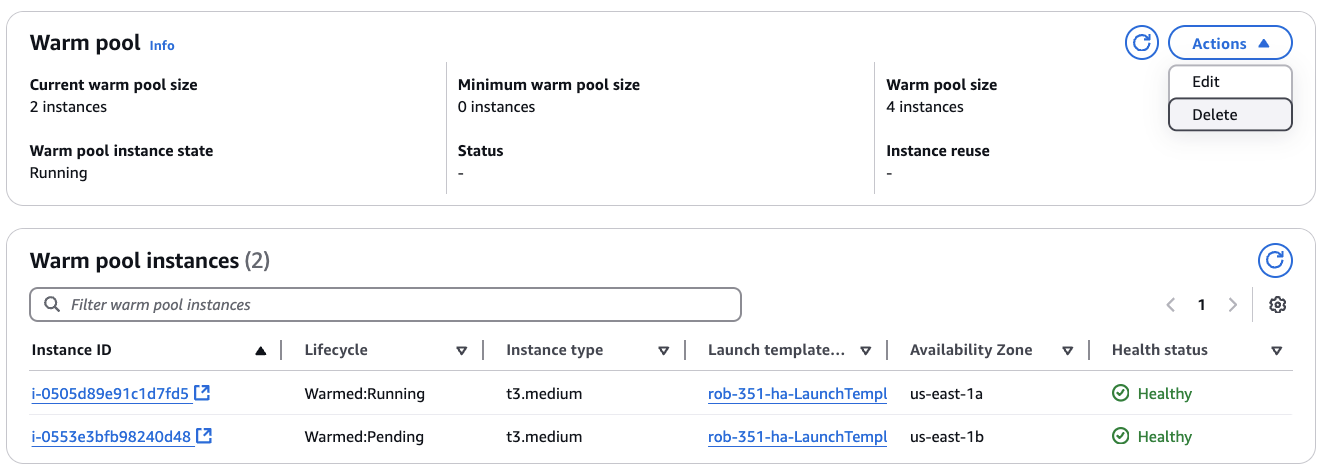
You'll see that there are two new EC2 instances in the Warm Pool. Also note that these are not the same instances as the ones that were brought into service. Rather, these are created to back-fill the drafted instances, to ensure that you always have Warm Pool instances on-deck and ready to go.
In the Warm Pool section, go to Actions and then select Delete. This will delete the Warm Pool, including the two extra instances.
Continue monitoring the SFTP poll.sh script to make sure nothing unexpected
happens to the SFTP service.
If you have made it this far, you should be upgraded to the newest version of SFTP Gateway, and any unused EC2 instances should be cleaned up.
Rollback
The upgrade process described above is fairly cautious, with opportunity to verify things along the way. But you still want to have a process for rolling back your changes just in case the unexpected happens.
Point back to the original Launch Configuration
The easiest way to roll back your changes is to point your ASG back to the
original Launch Configuration, and then cycle in the original v3.5.1 instances.
Note: Pull up the name of the original Launch Configuration if you wrote this down earlier, if you have this available.
In the AWS console, go to EC2 and then Auto Scaling Groups.
Click on the Auto Scaling Group being used in Production.
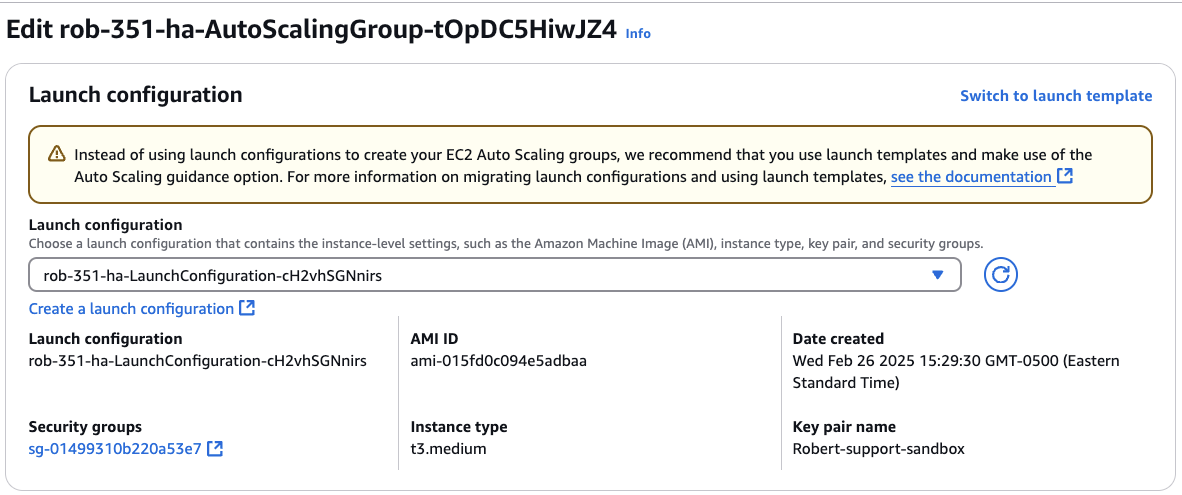
On the Details sub-tab, in the Launch Template section, click Edit.
You should see the following screen:
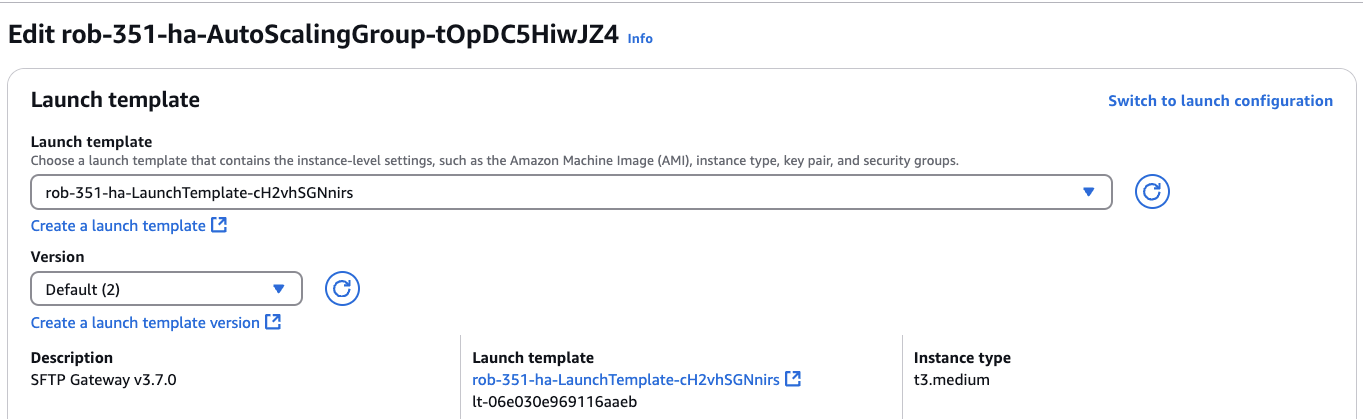
On the right, click Switch to launch configuration. You should see the following screen:
In the Launch configuration field, choose your original Launch Configuration from the drop-down menu.
Scroll to the bottom of the page, and click Update.
Then, use the instructions from the Updating the Instances on the ASG section of this article to replace the instances. You can do this automatically using the Instance Refresh feature, or manually using Warm Pools and the Detach feature.
Restore the RDS database from snapshot
It is unlikely that you will need to revert the RDS database to the latest snapshot. But this section covers at a high level what you would do in this particular situation.
With AWS, you cannot roll back the database state to the latest snapshot. Rather, you provision a new RDS instance from the snapshot, and then you cutover to the new DB instance.
Create a new database from the snapshot
This section covers at a high level the process of creating a new database from a snapshot.
In the AWS console, go to RDS and then Snapshots.
Find the snapshot you took earlier, and click on it to go to its detail page.
From the Actions menu, choose Restore snapshot
Make sure you deploy it using the exact same settings as the original database:
- DB Security Group
- EC2 Security Group
- VPC
If you are using a cheaper DB instance size, there are some additional steps you need to perform.
Under Instance configuration, under DB instance class, choose the radio button for Burstable classes (includes t classes).
Change the instance size to db.t3.micro.
When everything is configured correctly, scroll to the bottom and click Restore DB instance.
Wait at least 15 minutes for the new database to provision.
Point SFTP Gateway to the restored database
Normally, you would point SFTP Gateway to the newly restored RDS database that you created from the snapshot. But this would require configuring the SFTP Gateway stack to point to the new DB endpoint, and cycling out the instances again to apply the change.
In this section, you are going to use a technique to change the DB endpoint. While AWS does not let you change the DB endpoint per se, what you can do is rename the DB instance identifier. This in turn will change the DB endpoint, which is what SFTP Gateway points to.
Eventually, we want to rename the snapshot-restored DB to the production DB endpoint. But first, we need to rename the current production DB instance to something else to avoid a name conflict.
Note the name of production DB endpoint, and write it down somewhere. For example, the format looks like this:
sftpgw-rob-351-ha.abcd0123efgh.us-east-1.rds.amazonaws.com
On the original database, click the Modify button on the top right.
Change the DB instance identifier, appending -orig to it.
For example: sftpgw-rob-351-ha-orig
Click Continue
Under Schedule modifications, choose Apply immediately
Finally, click Modify DB instance
This takes a long time for it to take effect, so give it 15 minutes at least.
Repeat the process for the snapshot-restored database, but rename it to the
original DB instance identifier that was being used by Production (i.e. sftpgw-rob-351-ha).
Go through the same steps of Modifying and Applying immediately.
Again, this also takes a long time for it to take effect, so give it 15 minutes at least.
For each of the RDS instances, go to the detail page. In the Summary section, look at the Current activity, and note the number of Connections. Even though the databases have been renamed, all of the connections are going to the original database instance. In order to get SFTP Gateway to point to the new snapshot-restored database, you will need to restart Java on each instance.
SSH into VM 1 and restart Java
Note the RDS traffic. Out of 20 connections, 10 should now go to the snapshot-restored database.
SSH into VM 2 and restart Java
Check the database connections again, and they should all go to the snapshot-restored database.
After verifying that no connections are going to the original database, you can go to Actions and choose Stop temporarily. Note: it takes a long time for the stop operation to complete.
Use the SFTP poll.sh script from before to test whether there are any issues connecting
to the SFTP service.
If everything is working while the original database is stopped, you can delete it.