How to upgrade your HA stack on Azure
TLDR - Quick Summary
What: Upgrade an Azure HA deployment (VM Scale Set + PostgreSQL Flexible Server) to a newer SFTP Gateway version
How: Point the scale set at the new image version, then replace the VMs one at a time. Users, settings and host keys live in the database, so the new VMs pick them up on their own. On BYOL the activated license is in the database too; on Professional it comes with the image
Before you start: Export a backup file, back up the database, record the current image version and plan, pause autoscale, pin the image version, check what was installed on the VMs by hand
Method 1 (Recommended): Add a VM on the new version, check it, delete an old VM. Repeat. No outage, but sessions open on the VM you delete are dropped
Method 2: Rebuild each VM in place with
az vmss update-instances. Simpler, each VM is offline for a few minutesRollback: Pin the previous version and replace the VMs again
Tested with: 3.7.3 to 3.10.0 and back, Professional offer, ARM HA template, Standard_D2s_v3 VMs
Overview
This article walks you through upgrading an SFTP Gateway High Availability (HA) deployment on Azure to a newer version. An HA deployment is the one created by our ARM HA template or Terraform HA template: several VMs in a Virtual Machine Scale Set behind a load balancer, sharing a PostgreSQL Flexible Server.
In an HA deployment the VMs hold no configuration of their own. Your SFTP users, folders, cloud connections, settings and server host keys are all in the database, and your files are in Azure Storage. The license is in the database on the BYOL offer, once activated; on the Professional offer it is part of the image. So you do not upgrade the VMs. You replace them with VMs built from the newer image, and the new VMs join the existing database.
Why not deploy a new stack? Our other Azure upgrade articles, such as the Version 3.x Upgrade Process, recommend deploying a fresh instance and importing a backup file. That is still a valid way to upgrade an HA stack, and it is the only way if you are on version 3.5.1 or earlier, because the licensing model changed in 3.6.0. For an HA stack on 3.6.0 or later, replacing the VMs is faster, keeps your public IP and database, and needs no import. This article covers that method.
The procedure is the same for the Professional (hourly) offer and the BYOL offer. We tested 3.7.3 to 3.10.0 directly with no intermediate step.
What you need
- Access to the Azure CLI, either in Cloud Shell from the Azure Portal or on a workstation where you have run
az login. - The name of the resource group and the scale set. If you are not sure,
az vmss list -o tablelists every scale set in the subscription. - A login for the SFTP Gateway web admin interface.
- A test SFTP user with a password and an SSH key.
- Allow an hour. In our two-VM test each replacement took under five minutes.
How a scale set upgrade works
A scale set has a model: the definition every new VM is built from, including which marketplace image and version to use. Our templates set the scale set's upgrade policy to Manual, which means changing the model does nothing to the VMs that are already running. You then bring each VM onto the new model yourself, either by adding a new VM and deleting an old one (Method 1) or by rebuilding it in place (Method 2).
When the first VM on the new version starts, it updates the database schema for its version. The older VMs keep running against the updated schema until you replace them. The load balancer sends connections to both versions during that window, and both served SFTP in our testing. Keep the window short all the same.
Azure's Automatic OS image upgrade feature does not apply to marketplace images that carry purchase plan information, which ours do, so a scale set never upgrades SFTP Gateway on its own.
Before you start
Six things to do before you touch the scale set:
- Export a backup file from the web admin interface.
- Back up the database.
- Record the scale set's current image version and plan.
- Pause autoscale.
- Pin the scale set to the version you are upgrading to.
- Check for anything installed on the VMs by hand.
Step 1: Export a backup file
In the web admin interface, open Settings, scroll to Backup & Recovery, click Export, and choose Export Backup File.
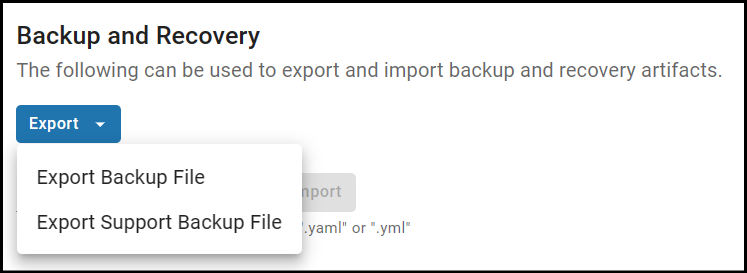
This downloads a YAML file with your users, folders, cloud connections and settings. It is not an image of the server, but it is the fastest way to rebuild on a fresh deployment if something unexpected happens. Keep it somewhere other than the VMs.
Step 2: Back up the database
Flexible Server keeps automatic backups and supports point-in-time restore. Write down the current time so you have a restore point, or take an on-demand backup:
az postgres flexible-server backup create \
  --resource-group <rg> --name <server-name> \
  --backup-name pre-upgrade-$(date +%Y%m%d)
Restoring a Flexible Server backup creates a new database server with a new hostname. It does not overwrite the existing one. See Rollback before you restore.
Step 3: Record the current state
az vmss show --resource-group <rg> --name <vmss-name> \
  --query "{image:virtualMachineProfile.storageProfile.imageReference, plan:plan, upgrade:upgradePolicy.mode, repairs:automaticRepairsPolicy, capacity:sku.capacity}" -o json

az vmss list-instances --resource-group <rg> --name <vmss-name> \
  --query "[].{id:instanceId, latestModel:latestModelApplied, state:provisioningState, version:storageProfile.imageReference.exactVersion}" -o table
Save this output. You will need three things from it:
- The
versionon each VM. This is your rollback target. - The
offerandskuunderimage. You will list available versions for this offer and SKU in Step 5. The Professional, BYOL and Enterprise offers each have their own list of versions, so do not assume the offer. - The
planblock. It must stay exactly as it is. A scale set cannot build VMs from a marketplace image without a matching plan.
Also look at repairs. Our templates do not turn on automatic instance repairs, but if someone has enabled them, Azure will rebuild a VM from the model on its own whenever the health probe fails for long enough. That is harmless once the model is pinned to the version you want. If the model says latest, it is a surprise upgrade.
Step 4: Pause autoscale
Our templates create an autoscale setting named autoscalewad. It keeps at least 2 VMs and adds one above 65% CPU or removes one below 30%. During an upgrade it will work against you: a scale set at idle CPU gets scaled back down within minutes, and the VM Azure removes can be the one you just added. Record its current settings, then disable it for the duration:
az monitor autoscale show --resource-group <rg> --name autoscalewad \
  --query "profiles[0].capacity" -o json

az monitor autoscale update --resource-group <rg> --name autoscalewad --enabled false
Re-enable it when you are done, with the values you recorded:
az monitor autoscale update --resource-group <rg> --name autoscalewad --enabled true \
  --min-count <original min> --count <original count> --max-count <original max>
Note: Do not try to make room by raising the autoscale minimum instead. Raising the minimum is itself a scale-out, and a scale command sent at the same time fails with a conflict error.
Step 5: Pin the image version
Our templates deploy with the image version set to latest. For an upgrade, pin the model to the exact version you are moving to. That makes the upgrade target and the rollback target explicit, and it means a scale-out or an automatic repair can never pull in a version you have not tested.
List the versions available for your offer and SKU, using the values you recorded in Step 3:
az vm image list --publisher thorntechnologiesllc \
  --offer <offer> --sku <sku> \
  --location <region> --all --query "[].version" -o tsv | sort -V
Check the release notes for the version you choose. Then update the model. This changes nothing on the running VMs:
az vmss update --resource-group <rg> --name <vmss-name> \
  --set virtualMachineProfile.storageProfile.imageReference.version=<new version>
If you deployed with Terraform, change version in the source_image_reference block and run terraform apply instead, so the Terraform state does not drift. Terraform updates the model only. Replacing the VMs is still done with the CLI commands below.
Step 6: Check what lives on the VMs
A replaced VM comes back with a fresh OS disk built from the image, plus whatever the scale set's cloud-init puts on it (userData in the ARM template, custom_data in Terraform). Anything else is gone. Check for:
- Manual edits to
/opt/sftpgw/application.propertiesor/opt/sftpgw/launch_config.envthat are not in the cloud-init. Move them into the cloud-init, or plan to reapply them. - A custom TLS certificate for the web admin interface. Each VM has its own copy; it is not stored in the database.
- Monitoring agents, hardening or OS packages installed by hand.
Note that the Ubuntu release changes with the SFTP Gateway version: 3.3.3 to 3.7.3 run Ubuntu 22.04, 3.7.4 and later run 24.04 (see OS patching). Anything you install by hand on a new VM may need a different package.
The cloud-init written by our templates carries the values a new VM needs to join the cluster: the database host, the Key Vault secret with the database password, the load balancer address and ARCHITECTURE=HA. These normally never change. It also posts the initial web admin credentials on first boot. On an existing cluster the admin account is already in the database; in our test new VMs joined without changing it.
License (BYOL only). On the BYOL offer, the license must be in the database, which is where it goes when you activate it under Settings, License in the web admin interface. A license file copied onto a VM by hand does not survive replacement. The Professional offer carries its license in the image and needs nothing.
Method 1: add a new VM, then delete an old one (recommended)
This is a rolling replacement inside the existing scale set. You add a VM on the new version, check it while it serves traffic behind the load balancer, then delete an old VM. Repeat until every VM is on the new version.
There is no outage: the load balancer only sends connections to VMs that pass the health probe, and at least one healthy VM is serving at all times. But deleting a VM ends any SFTP session that is still open on it. The load balancer does not wait for transfers to finish. Clients reconnect and land on another VM, but a transfer in flight on the deleted VM fails. Do the deletions during a quiet period.
Add one VM. With the model pinned and autoscale paused, it is built from the new version.
az vmss scale --resource-group <rg> --name <vmss-name> --new-capacity <current + 1>Our templates set
overprovisionto true, so Azure may briefly create more VMs than you asked for and delete the extras. That is normal.Wait for the new VM to show
Succeededinaz vmss list-instancesand for the load balancer health probe to pass. This takes a few minutes. Then run the validation checks against it.Delete one old VM by its instance ID:
az vmss delete-instances --resource-group <rg> --name <vmss-name> --instance-ids <old-id>Do not simply lower the capacity. Azure's default scale-in policy chooses the VM to remove by availability zone balance and then by highest instance ID, which can be the VM you just added.
Repeat steps 1 to 3 until
az vmss list-instancesshows the newversionon every VM and the capacity is back to the original count.
If you would rather add all the new VMs first and delete all the old ones afterwards, protect each new VM from scale-in while you work, and remove the protection when you are done:
az vmss update --resource-group <rg> --name <vmss-name> --instance-id <new-id> \
  --protect-from-scale-in true
Note: Instance IDs only ever go up. After the upgrade your VMs have new IDs, and the SSH NAT ports on the load balancer follow the ID (port 2222 plus the instance ID). Update any SSH bookmarks.
Method 2: rebuild each VM in place
az vmss update-instances rebuilds a VM's OS disk from the model's image. The VM keeps its instance ID, network interface, private IP and SSH NAT port. It is offline for a few minutes while the disk is rebuilt and the application starts. SFTP sessions on that VM are dropped; clients reconnect through the load balancer to the other VMs. In our two-VM test the other VM carried every connection during the rebuild.
Use this method in non-production environments, or in production when a few minutes of reduced capacity per VM is acceptable. It is simpler than Method 1 because nothing is added or deleted.
Rebuild one VM and let it finish before touching the others. The first VM on the new version updates the database schema, and VMs started at the same time wait on a database lock until it is done. If a VM is interrupted during that update, the lock can be left behind; see Liquibase Lock Error.
az vmss update-instances --resource-group <rg> --name <vmss-name> --instance-ids <id>Wait for
provisioningStateto showSucceededand the health probe to pass, then run the validation checks.Rebuild the remaining VMs one at a time.
Validation
After each new VM comes up, and again at the end:
- Version. The version is shown at the bottom of every web admin page and on the Diagnostics screen. If you see the old version, the load balancer sent you to an old VM; refresh.
- Cluster. The Diagnostics screen shows High Availability on the System Information panel.
- Admin login works, and your users, folders and cloud connections are present.
- SFTP. Log in as a test user with a password and with a key, upload a file, confirm it lands in the storage account, and download it back. The entry appears in
/opt/sftpgw/log/sftp-audit-<date>.logon the VM that served the session. - Host key. From a client,
ssh-keyscan -p 22 <hostname>returns the same fingerprint as before. Host keys are stored in the database, so this should never change. If it does, stop and contact support at support@thorntech.com. - Scale set.
az vmss list-instancesshows the expectedversionon every VM. Go by theversioncolumn, notlatestModelApplied: that flag only tracks the most recent model change, so a VM that already runs the right version can showfalseafter you edit the model again. That is cosmetic. - Operating system. A replaced VM runs the OS packages baked into the marketplace image. It does not apply Ubuntu updates at first boot, so an image built before a given security advisory does not contain that fix. If OS patching is part of the reason for the upgrade, run our patch script on each new VM afterwards and check the package versions you care about with
dpkg -l <package>.
Rollback
To go back, pin the model to the previous version you recorded in Step 3, then replace the VMs again with either method. The database keeps the newer schema. In our test, a 3.7.3 VM started cleanly against a database that 3.10.0 had updated, served SFTP, and ran alongside the remaining 3.10.0 VM. We tested that one pair of versions; treat other pairs as likely but not guaranteed.
The database backup from Step 2 is the safety net if the older version fails to start against the updated schema. Be aware that restoring a Flexible Server backup creates a new database server with a new hostname, and the scale set's cloud-init and Key Vault secret point at the old one. Contact support at support@thorntech.com before you restore.
You cannot roll back to 3.5.1 or earlier this way; those versions need a fresh deployment plus a backup file import (see the Overview).
Changing offer
Moving a scale set from the Professional offer to BYOL uses the same mechanism, but the model's plan changes as well as its image, the subscription must accept the BYOL terms first, and the BYOL license has to be activated so the new VMs find it in the database. We have not published this as a step-by-step procedure. Contact support at support@thorntech.com before changing offer.